In this guide we will cover how to create a High Availability pihole setup with Gravity Sync, so next time one of your pihole is not reachable, your DNS requests are still resolving over the fallback pihole instance. Lets get started!
Getting started: setup a second machine
First, either create a second virtual machine if you are running your existing pihole on a virtual environment like Proxmox. You can also just clone an existing one. If you use bare metal hardware like a Raspberry Pi, you should get a second one and set it up with the OS and ssh first. Now give your new VM or PI a fixed IP and a hostname.
We use pihole-master as our hostname and the fixed IP 192.168.0.15. That was our existing one that we renamed to be -master. Now I cloned it and gave the cone the fixed IP 192.168.0.14 and renamed it to hostname pihole-slave. Now we migrate the slave to our second machine so we are operating in a cluster. this way we always have 2 instances on 2 different physical machines.
Reconfigure the second pihole instance
Next we reconfigure and reset our cloned pihole-slave. Connect to the shell of the slave pihole and enter:
pihole -rThat launches reconfiguring mode and select option 2 which will reset the pihole-slave to default settings.
NOTICE: if you starting the second instance from scratch, you need to install pihole first and don't need to reconfigure. To install use the official install command:
curl -sSL https://install.pi-hole.net | bash
Also check if both instances are running the latest version of pihole with:
pihole -vIf the versions on both instances are not identical, update them with:
pihole -upMaking the pihole instances sync
Go through the system settings of both piholes in the webinterface and make sure they match. compare each setting from master to slave. Once they are 1:1 the same, go back to your shell and upgrade / install the prerequisite packages on both instances:
apt update && apt install sqlite3 sudo git cron rsync sshBefore we can start with the actual sync install, we have to remove the sudo rsync permission barriers ON BOTH INSTANCES:
sudo EDITOR=nano visudoIn that file comment out the sudo line and add this so it looks like:
##%sudo  ALL=(ALL:ALL) ALL
%sudo   ALL=(ALL:ALL) NOPASSWD:ALL
After you done that on BOTH server instances reboot them:
sudo reboot nowFinally after that is done and rebooted lets check out the sync repo and install the sync mechanism between the 2 instances:
On the primary pihole-master launch this command to check everything is ready for sync instances:
export GS_INSTALL=primary && curl -sSL https://gravity.vmstan.com | bashNow go to the second instance, our pihole-slave and install Gravity Sync with this:
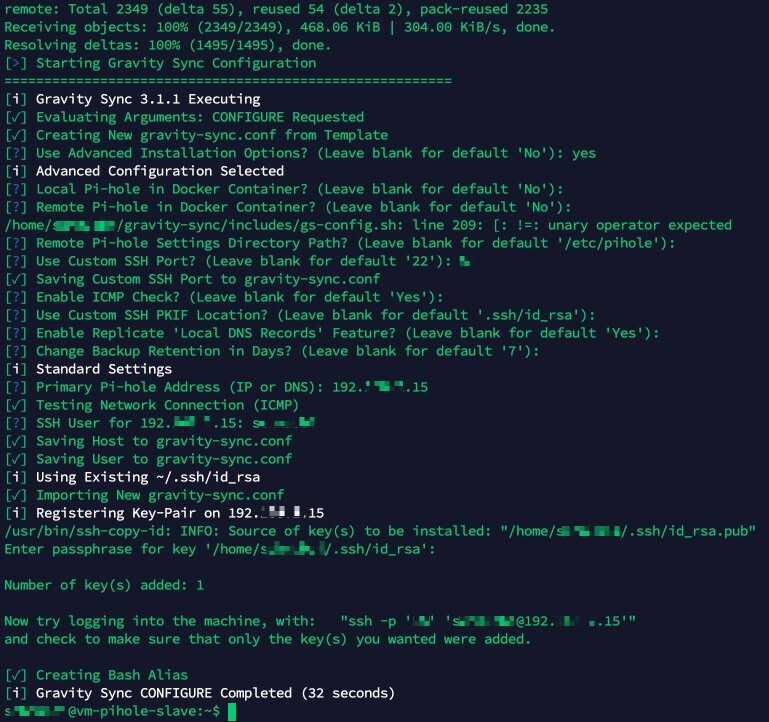
export GS_INSTALL=secondary && curl -sSL https://gravity.vmstan.com | bashNow a setup wizzard in the command line starts and ask you about your config:
Great now our slave instance can compare, pull and sync from our master pihole!
FIrst we want to just compare our master and slave instance:
./gravity-sync/gravity-sync.sh compareThis will get you something like this:
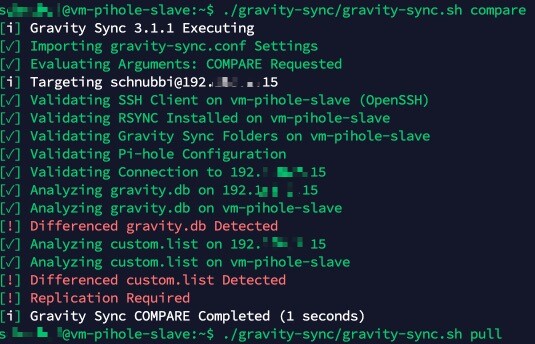
So we can see that as our new pihole-slave is not configured and we have several differences within the instances. We can resolve these with a pull:
./gravity-sync/gravity-sync.sh pull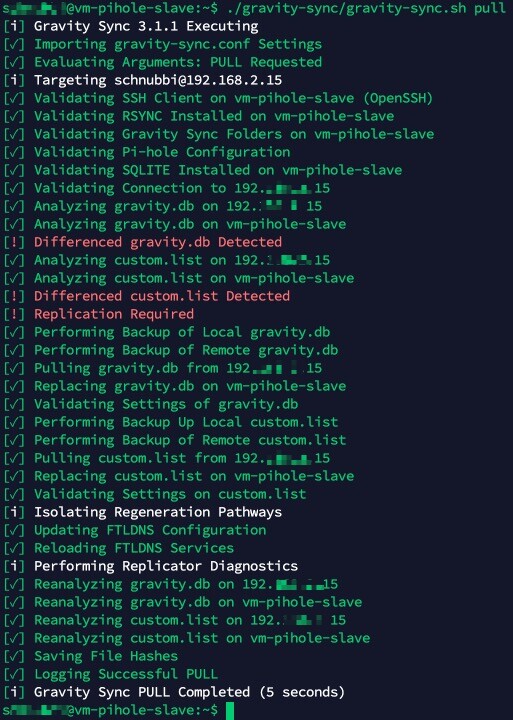
Great, now our slave server has the same state as our master main pihole!
Automate the sync process
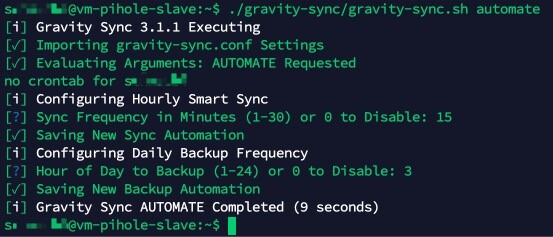
As a last step of this guide lets automate the sync of both servers:
./gravity-sync/gravity-sync.sh automateIt will ask you some questions I setted it up like this:
Now we check the cronjob and edit it with:
crontab -eChange the first line from "smart" to "pull" if you are like me and only use the primary pihole server as a main DNS. So the cronjob looks now like:
*/15 * * * * /bin/bash /home/schnubbi/gravity-sync/gravity-sync.sh pull > /home/schnubbi/gravity-sync/gravity-sync.cron
0 3 * * * /bin/bash /home/schnubbi/gravity-sync/gravity-sync.sh backup >/dev/null 2>&1
Finishing by adding the second DNS IP
The final step is to add our second pihole instance IP address to our Router/Gateway. In my case it is the Unifiziertes Controller where we have to add the 192.168.0.14 address as a secondary DNS server to ALL our networks under there advanced settings.