I decided to run all of my supporting homelab services in a more flexible setup, making it easy to deploy and test new features, while also ensuring that already running and needed tasks are stable and constant available. Therefore I decided to create a four node Docker Swarm cluster with four Raspberry Pis 4 8GB running Ubuntu Server 20.04 LTS on SSDs and utilizing a network attached shared storage to have consistent data always available to all nodes. Instead of power supplies I use the new PoE+ Hats, so there is only one ethernet cable per Pi needed.
Index
Hardware assembly
Software setup
Set firewall and hardening the server
Install Docker and create the swarm cluster
Storage option 1: Setup scalable GlusterFS filesystem
Storage option 2: Setup NFS shared storage for the cluster
Deploy Traefik v2 as the load balancer and reverse proxy
Deploy Portainer to manage our cluster
Appendix 1: Completely remove Docker
Appendix 2: Install fail2ban
Appendix 3: Test USB Drive IO performance
Hardware assembly
Parts list
- 4x Raspberry Pi 4 8GB
- 4x Raspberry Pi PoE+ HAT 2. Gen
- 4x Raspberry Pi Passive Cooling Block Set
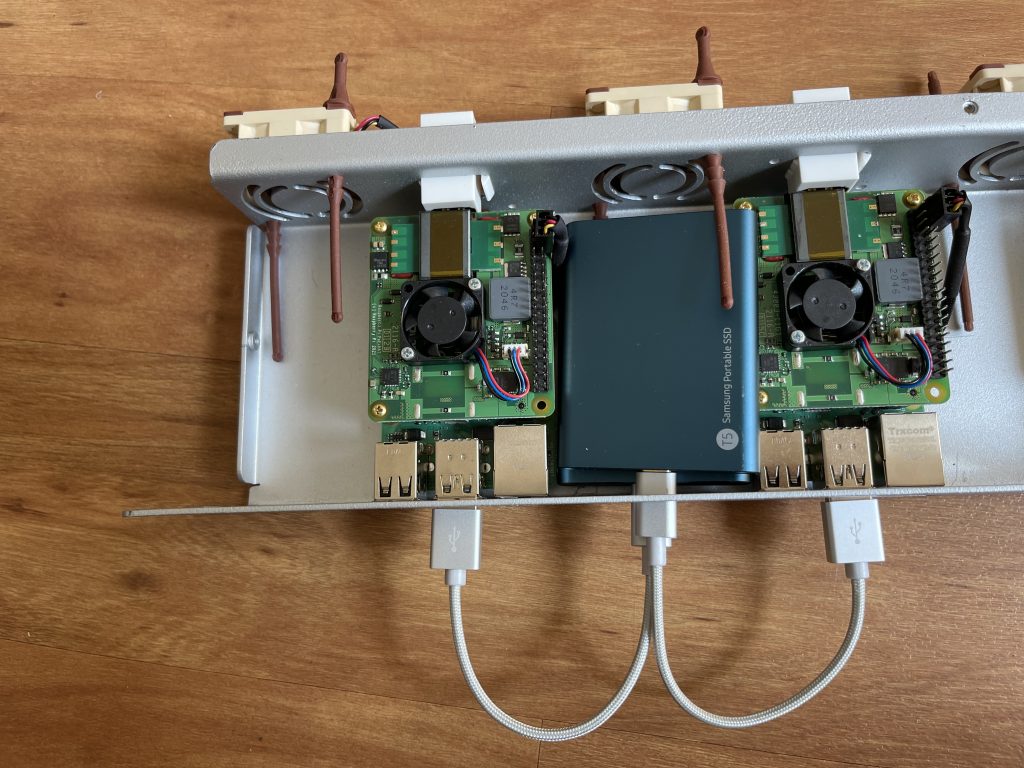
- 4x Samsung T5 SSD USB3.1 External 512GB
- 4x Short 0.15cm USB3 to USBC cable (for SSDs)
- 1x Set of 2x2 2,54mm breakaway pins
- 1x Set of 20x2 2,54 breakaway pins, extra high
- 1x M2,5 15mm Distance Holders and Screws
- 4x 40mm Noctua Fans 5v
- 1x 19" Rack Case for 4x Raspberry Pis
The assembly of the hardware was pretty much straight forward. The only things that needed some good old try & error research, were the GPIO extensions and the connection of the 5v Noctua fan. Besides the 2x20 GPIO Pin extension, the Raspberry Pi also needs a small 2x2 pin extension, which took a while to find the needed parts in the right size.


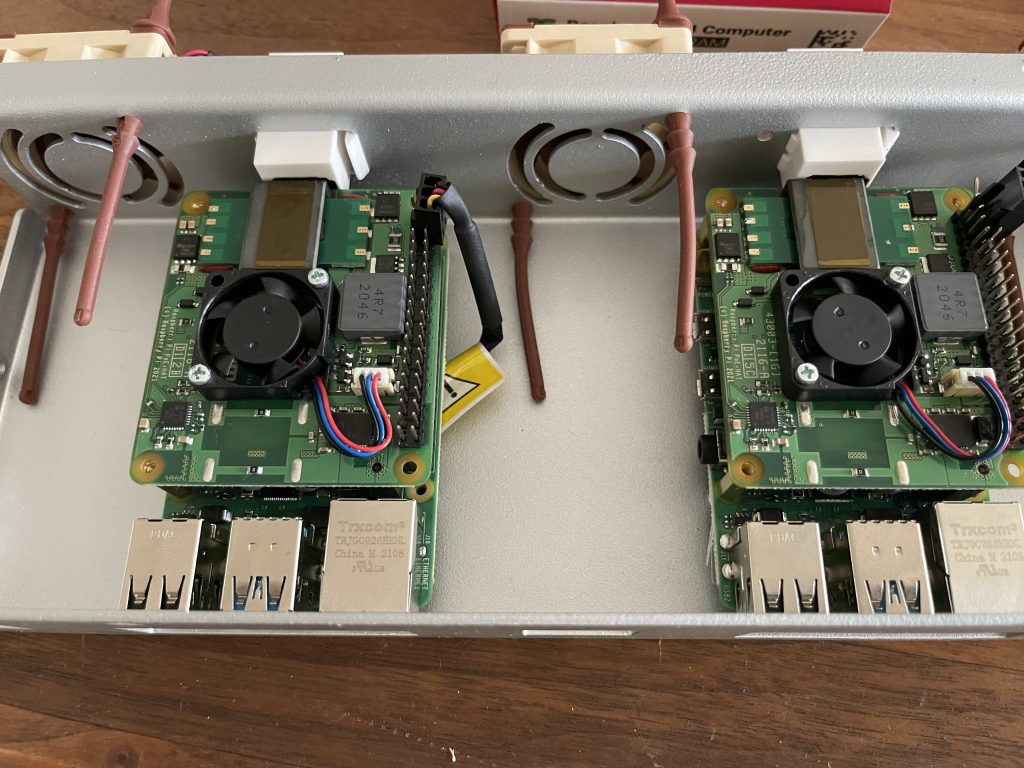


To connect the 5v Noctua fan, I used GPIO Pin 4 (5v Power) and 6 (GND) (See picture below. This way the fans are just spinning at full speed when the Raspberry Pi is turned on.

Software setup
DISCLAIMER: In this tutorial I am assuming that all steps are done per Pi and manual. I am aware that there are much more elegant ways to deploy and install on multiple devices at once (Hello ansible!), BUT for the purpose of learning and keeping it on point towards Docker swarm, I am not covering this.
>> The following steps need to be done for every Raspberry Pi individually, so in our case 4x times.<<
Get Latest Raspbian & Updates
First we need to ensure that we are running the latest bootloader / firmware so we have the best USB SSD boot option available. You should use Raspbian on a SD card first, even when we will use Ubuntu later as our OS. Reason is that the support in third party operating systems to do anything with the new Raspberry Pi 4’s firmware or bootloader is very limited / nonexistent. So we need to download the latest Raspbian OS Lite image from the official website and flash it to a SD-card with our favorite tool Etcher. Make also sure you have the empty "ssh" file in the boot partition to enable ssh access right away.
Now get the IP address of your PI 4 and ssh into it. First make sure that you have the absolute latest updates and firmware for the Pi. To upgrade all your packages and firmware to the latest version use the following command:
sudo apt update && sudo apt full-upgrade -yAfter the update is done restart the Pi with:
sudo rebootAfter the restart we have to verify the EEPROM bootloader is up to date:
sudo rpi-eeprom-updateThis should give you the following results:
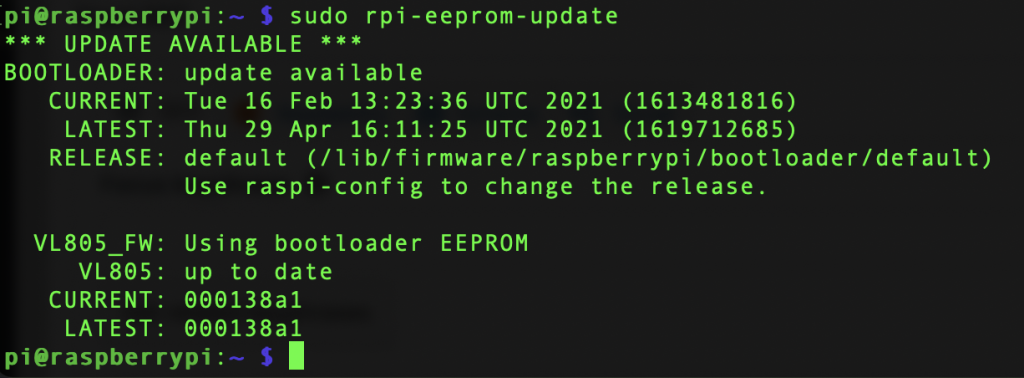
If your Raspbian is *very* out of date you may not have this utility and can install it using:
sudo apt install rpi-eepromNow install the new eeprom with:
sudo rpi-eeprom-update -aIn both cases, to finish our install we need to reboot again:
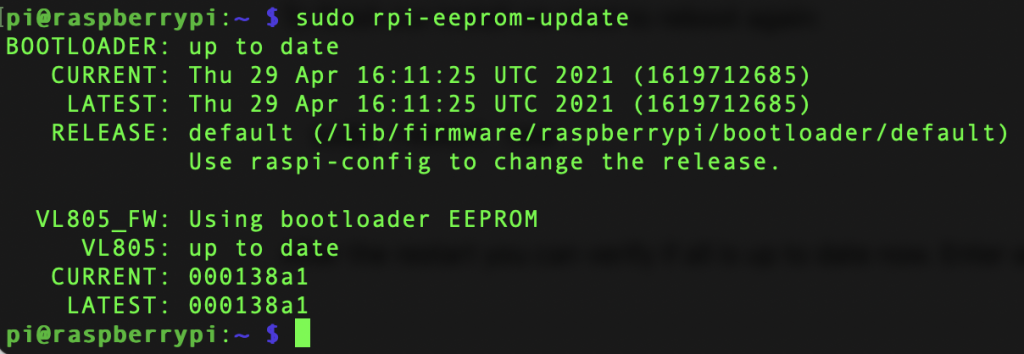
sudo reboot nowAfter the restart you can verify if all is up to date now. Enter again:
sudo rpi-eeprom-updateIt shows all good:
No lets go to the Raspberry Pi config tool:
sudo raspi-configGo to advanced -> boot options and set option 2, boot from USB. Confirm the changes and when the tool asks you, reboot. After the reboot is done, shutdown your pi with:
sudo shutdown nowNow flash the Ubuntu image to the USB SSD disk with etcher or the official Pi Flash tool. In my case the official Pi image didn't boot, so I downloaded this image from this ubuntu thread to be able to boot directly into Ubuntu server 20.04 LTS.
Now remove the SD Card and plug in your freshly flashed USB SSD Drive.
Update Ubuntu, set hostname, timezone and static IP first
Now turn the Pi back on and it should boot directly into your ubuntu USB SSD flash drive and ssh into it with:
ssh [email protected]Password on first boot is ubuntu. It will prompt you directly to change it to your own personal password. You get disconnected after successfully changing it and you need to reconnect again but this time use your newly set own password.
Congratulations, you have successfully setup Ubuntu server on the Raspberry Pi 4, booting from USB SSD!
Updates, hostname & timezone
First thing you want to do is update ubuntu to the latest versions with:
sudo apt update && sudo apt full-upgrade -yThis may take a while and after it is done, cleanup and reboot:
sudo apt autoremove && sudo apt autoclean
sudo reboot now
Now we set our hostname. We want to name our Pis in a consitent scheme like pi-cluster-1 and so on:
sudo hostnamectl set-hostname pi-cluster-1Verify your changed hostname with:
hostnamectlNow we change the time zone. To get a list of timezones you can use timedatectl list-timezones. In my case I set the time zone like this:
sudo timedatectl set-timezone Europe/BerlinAnd you can confirm the changes with:
timedatectlReboot the pi before you continue changing the IP:
sudo reboot nowSet fixed IP
Now we want to set a fixed IP for all our 4 Pis. Ubuntu 20.04 handles it with netplan like this:
sudo nano /etc/netplan/50-cloud-init.yamlYou should see something similar to this DHCP setting:
network:
    ethernets:
        eth0:
            dhcp4: true
            optional: true
    version: 2
New lets change it to our fixed IP like this:
network:
    ethernets:
        eth0:
            #dhcp4: true
            #optional: true
            addresses: [192.168.2.101/24]
            gateway4: 192.168.2.2
            nameservers:
                addresses: [192.168.2.2, 1.1.1.1]
    version: 2
Apply these changes with:
sudo netplan applyNow you get disconnected and you should be able to reconnect to your new set fixed IP address, in our case 192.168.2.101.
Set firewall and hardening the server
First we harden our ssh login by disallowing root and changing the default port to 33. Edit the ssh config with:
sudo nano /etc/ssh/sshd_configIn there find these 2 lines, uncomment them and change them to:
Port 33
PermitRootLogin no
Save and close the editor and restart the ssh service with:
sudo service ssh restartNow log off from ssh and you can log on again with your new port:
ssh [email protected] -p 33You should enable ufw firewall rules if you plan to expose the server to the internet: First we need to make sure that we don't lock out ourselves so enable ssh first:
sudo ufw allow ssh         # only if you use the standard ssh port 22
OR
sudo ufw allow 33/tcp      # if you are not using the default port
We also allow all necessary ports for docker swarm to be allowed:
sudo ufw allow 2376/tcp
sudo ufw allow 2377/tcp
sudo ufw allow 7946/tcp
sudo ufw allow 7946/udp
sudo ufw allow 4789/udp
Next we set the defaults to allow all outgoing, but block all incoming, except what we allowed to come in:
sudo ufw default allow outgoing
sudo ufw default deny incoming
Now we can activate the ruleset and the firewall with:
sudo ufw enableEverything should still keep the connection and you should be able to check the firewall status with:
sudo ufw statusInstall Docker and create the swarm cluster
Now its finally time to install Docker and create our cluster. First we install a prerequisite for the ubuntu image we use, uidmap and also raspberry tools:
sudo apt install uidmap linux-modules-extra-raspi -ythen we install docker with its official install script:
curl -fsSL https://get.docker.com -o get-docker.sh && sudo sh get-docker.shNext, as suggested by docker, we set our install to work in rootless mode as well:
dockerd-rootless-setuptool.sh installAnd also set the user with right privileges:
sudo usermod -aG docker $USERPerfect, we are done with our basic docker install and now only need to restart:
sudo reboot nowGreat, time to setup the swarm cluster. We start with our first node pi-cluster-1, which we want to be the first manager and leader to start on. On pi-cluster-1 we take the fixed IP address of pi-cluster-1 and use it with this command to initialize the swarm. In our case its:
sudo docker swarm init --advertise-addr 192.168.2.101After that you should get a success message that will also display you your individual join link for adding later more workers to the cluster. Best is to copy and save this link for now, the message command looks something like this:
Don't copy this! its just an random typed example to give you a hint on how it looks on your end! You have to use your OWN generated token command!

docker swarm join --token SWMTKN-1-12345678901234567890qwertzuiopüasdfghjklöyxcbvnbmn1234556789 192.168.2.101:2377
Great, before we continue with our workers we add pi-cluster-2 as our second manager. For this we also need our manager token to join a node as a manager. Enter this on pi-cluster-1:
sudo docker swarm join-token managerThis will give you a similar token command to the one we already got for our workers. Copy and save this as well as your individual manager token.
Now you can shh into pi-cluster-2 and use the commands to add it to our cluster:
Don't copy this! its just an random typed example to give you a hint on how it looks on your end! You have to use your OWN generated token command!

docker swarm join --token SWMTKN-1-XXXXXXXXXXXXXXXXXXXXXXXXXXXXXXXXXXXXXXXXXXXXXXXXXXXXXXXXXXXX-XXXXXXXXXXXXXXXXXXXXXXXX 192.168.2.101:2377
Awesome! You now have two nodes joined together as managers! You can verify it by entering this command on either pi-cluster-1 or pi-cluster-2:
sudo docker node lsThis should output:
ubuntu@pi-cluster-2:~$ sudo docker node ls
ID                            HOSTNAME       STATUS    AVAILABILITY   MANAGER STATUS   ENGINE VERSION
e1l1cdsfghut5seyu5aqdag7g     pi-cluster-1   Ready     Active         Leader           20.10.7
gggc5hywp9yfghut5k17wu3uk *   pi-cluster-2   Ready     Active         Reachable        20.10.7
Now you can either add pi-cluster-3 as a manager as well, as it is recommended to have a minimum of three managers per cluster, or, if you are just experimenting, add the other nodes as workers, by simply connecting to pi-cluster-3 and pi-cluster-4 and entering our token command for workers, that we received ans saved earlier:
Don't copy this! its just an random typed example to give you a hint on how it looks on your end! You have to use your OWN generated token command!

docker swarm join --token SWMTKN-1-12345678901234567890qwertzuiopüasdfghjklöyxcbvnbmn1234556789 192.168.2.101:2377
Again, this is just an example command, you need to use your own individual join workers command. Lets verify our cluster by entering sudo docker node ls again on one of your nodes. This should show us:
ubuntu@pi-cluster-1:~$ sudo docker node ls
ID                            HOSTNAME       STATUS    AVAILABILITY   MANAGER STATUS   ENGINE VERSION
e1l1cdsfghut5seyu5aqdag2g *   pi-cluster-1   Ready     Active         Leader           20.10.7
gggc5hywp9yfghut5k17wu8uk     pi-cluster-2   Ready     Active         Reachable        20.10.7
ptu043igx95936ffmaozfm9h7     pi-cluster-3   Ready     Active         Reachable                           20.10.7
fmaozfm9h4s3igx9d34k51ix5     pi-cluster-4   Ready     Active                          20.10.7
Great, we now have 1x Leader, 2x managers and 1x worker. Our four node docker swarm cluster up and running!
Storage option 1: Setup scalable GlusterFS filesystem
For persistant stoage we have twp options. First is the scalable network cluster solution using GlusterFS. If you would like to use it, please jump over to this post I fully dedicated to GlusterFS with a docker swarm.
If you want the quick solution and have a NFS network share ready, than proceed with option 2, the NFS storage:
Storage option 2: Setup NFS shared storage for the cluster
To have persistent data available for every node and container, we need a shared storage, that can be accessed by all our nodes. In our case we setup a simple NFS shared storage on a Synology NAS as our shared storage.
First we need to install nfs-common on our cluster pis:
sudo apt install nfs-common -yNow we create our mount point folder on our pis and set the permissions:
sudo mkdir /mnt/docker
sudo chmod 777 /mnt/docker
Now we can mount our Synology share with:
sudo mount -t nfs 192.168.x.x:/volume1/docker /mnt/dockerTest the share and see if we can list and access it without elevated sudo privileges:
ls /mnt/dockerNow make sure the folder gets mounted when the system starts:
sudo nano /etc/fstabAt the end of the file add in the last line:
IMPORTANT: "192.1XX.XX.XX" is the IP address of your Synology or other NFS server you use!
192.168.x.x:/volume1/docker /mnt/docker nfs rsize=8192,wsize=8192,timeo=14,intr,noauto,x-systemd.automount 0 0Close and save the file with CTRL + X and Y for override file. Now reboot with sudo reboot now and after the system is back online try if the auto mount worked and you should directly after connecting see the mounted folder:
ls /mnt/dockerDeploy Traefik v2 as the load balancer and reverse proxy
To access our Cluster from the outside under a FQDN we need to use a Loadbalancer/Reverse Proxy. For this we use Traefik. It will automatically secure all our services and application running in the cluster with a generated wildcard ssl certificate. To deploy Traefik to our docker swarm cluster we need to do some Prework:
Prerequisites
First create a local DNS entry for the domain you want to use for your local services. I use pihole for that and point in pihole all docker services to the IP of my docker swarm. So for example the domain traefik.local.yourdomain.com points to 192.168.2.101.
Now ssh into our leading cluster pi-cluster-1 and create the working directory on our NFS storage:
mkdir /mnt/docker/traefik
mkdir /mnt/docker/traefik/data
mkdir /mnt/docker/traefik/logs
Next we create all necessary files and access rights:
touch /mnt/docker/traefik/config.yml
touch /mnt/docker/traefik/traefik-swarm-compose.yml
touch /mnt/docker/traefik/logs/traefik.log
touch /mnt/docker/traefik/data/traefik.yml
touch /mnt/docker/traefik/data/acme.json
sudo chmod 600 /mnt/docker/traefik/data/acme.json
Next we create the required overlaying network "proxy" for Traefik:
docker network create --driver=overlay proxyGreat. Now we have to pre-generate a hashed password and user for our Traefik web interface to be accessible. You can do this by using environment variables, but for the ease of use and for better understanding in this guide, I don't use these advanced setup techniques. Instead we will write all of the variables into our traefik-swarm-compose.yml file. So lets generate the Basic Auth Password. First install apache2-utils
sudo apt update && sudo apt install apache2-utils -yNow generate user and pass with this. IMPORTANT: replace "admin" with whatever username you want. Also replace "password" with whatever password you want to use in plain text. Don't worry, it will be hashed with that command:
echo $(htpasswd -nb admin password) | sed -e s/\\$/\\$\\$/gThis will return a line like this. Copy and save it, we need it soon in our compose file, to set the access credentials to "admin" & "password". PLEASE CHANGE TO A SECURE COMBINATION FOR YOURSELF!
admin:$$apr1$$OAUZx7gK$$bDa2BIjD0ZUGn2Uawmr2p.Next we create our Traefik compose yml file:
nano /mnt/docker/traefik/traefik-swarm-compose.ymlCopy & paste this into the file and change the following options to your needs:
- under labels "traefik.http.routers.traefik.rule=Host(`traefik.local.yourdomain.net`)" you need to change yourdomain.net to whatever domain you run
- under labels "traefik.http.middlewares.traefik-auth.basicauth.users=" you mus replace the user and password string with your own just previously generated string
- under labels "traefik.http.routers.traefik-secure.rule=Host(`traefik.local.yourdomain.net`)" you need to change yourdomain.net to whatever domain you run
- under labels "traefik.http.routers.traefik-secure.tls.domains[0].main=local.yourdomain.net" you need to change yourdomain.net to whatever domain you run
- under labels "traefik.http.routers.traefik-secure.tls.domains[0].sans=*.local.yourdomain.net" you need to change yourdomain.net to whatever domain you run
- under environment "[email protected]" replace [email protected] with your Cloudflare account login mail.
- under environment "CF_API_KEY=youdCloudflareAPIkey" replace youdCloudflareAPIkey with your Cloudflare GLOBAL API KEY. You find it under "My Account" on the top right user icon in your Cloudflare dashboard. Under "My Account" choose the API TOKEN tab on the top and there should be a list where one item is called "Global API Key". There click on "View/show" and copy and paste the key into the yml file.
version: '3'

services:
  traefik:
    image: traefik:latest
    ports:
      - 80:80
      - 443:443
    deploy:
      mode: replicated
      replicas: 4
      placement:
        constraints:
          - node.role == manager
      labels:
        - "traefik.enable=true"
        # Use the traefik-public network (declared below)
        - traefik.docker.network=proxy
        - "traefik.http.routers.traefik.entrypoints=http"
        - "traefik.http.routers.traefik.rule=Host(`traefik.local.yourdomain.net`)"
        - "traefik.http.middlewares.traefik-auth.basicauth.users=admin:$$apr1$$OAUZx7gK$$bDa2BIjD0ZUGn2Uawmr2p."
        - "traefik.http.middlewares.traefik-https-redirect.redirectscheme.scheme=https"
        - "traefik.http.middlewares.sslheader.headers.customrequestheaders.X-Forwarded-Proto=https"
        - "traefik.http.routers.traefik.middlewares=traefik-https-redirect"
        - "traefik.http.routers.traefik-secure.entrypoints=https"
        - "traefik.http.routers.traefik-secure.rule=Host(`traefik.local.yourdomain.net`)"
        - "traefik.http.routers.traefik-secure.middlewares=traefik-auth"
        - "traefik.http.routers.traefik-secure.tls=true"
        - "traefik.http.routers.traefik-secure.tls.certresolver=cloudflare"
        - "traefik.http.routers.traefik-secure.tls.domains[0].main=local.yourdomain.net"
        - "traefik.http.routers.traefik-secure.tls.domains[0].sans=*.local.yourdomain.net"
        - "traefik.http.routers.traefik-secure.service=api@internal"
         # Define the port inside of the Docker service to use
        - traefik.http.services.traefik-secure.loadbalancer.server.port=8080
    volumes:
      - /etc/localtime:/etc/localtime:ro
      - /var/run/docker.sock:/var/run/docker.sock:ro
      - /mnt/docker/traefik/data/traefik.yml:/traefik.yml:ro
      - /mnt/docker/traefik/data/acme.json:/acme.json
      - /mnt/docker/traefik/config.yml:/config.yml:ro
      - /mnt/docker/traefik/logs:/logs
    networks:
      - proxy
    environment:
      - [email protected]
      - CF_API_KEY=youdCloudflareAPIkey
networks:
  proxy:
    external: true
Great! Save and exit with STRG + X, confirm with Y and press enter.
Next we edit the traefik.yml file:
nano /mnt/docker/traefik/data/traefik.ymlCopy and paste the below code in there and change under "certificatesResolvers - acme - email" "[email protected]" to your Cloudflare User Account email.
api:
  dashboard: true
  debug: true

entryPoints:
  http:
    address: ":80"
  https:
    address: ":443"

log:
  level: ERROR
  filePath: "/logs/traefik.log"
  format: common

serversTransport:
  insecureSkipVerify: true

providers:
  docker:
    endpoint: "unix:///var/run/docker.sock"
    swarmMode: true
    exposedByDefault: false
  file:
    filename: config.yml

certificatesResolvers:
  cloudflare:
    acme:
      email: [email protected]
      storage: acme.json
      dnsChallenge:
        provider: cloudflare
        resolvers:
          - "1.1.1.1:53"
          - "1.0.0.1:53"
Great! Save and exit with STRG + X, confirm with Y and press enter.
Now we are ready to deploy Traefik with:
docker stack deploy traefik -c /mnt/docker/traefik/traefik-swarm-compose.ymlValidate if the deployment worked with: docker service ls
This should result in:
$ docker service ls
ID             NAME              MODE         REPLICAS   IMAGE            PORTS
vjeugmxvh5cl   traefik_traefik   replicated   1/1        traefik:latest   *:80->80/tcp, *:443->443/tcp
Awesome! You should now also be able to access the Traefik Dashboard via your browser. After some seconds/minutes, Traefik will acquire the HTTPS certificates for the web user interface (UI). Once you deploy a stack, you will be able to see it there and see how the different hosts and paths map to different Docker services / containers. Also check the SSL certificate in the browser, it should be a wildcard for *.local.yourdomain.net
https://traefik.local.yourdomain.netThe web interface should also prompt you for user and password, which is the one you choose above during the config of Traefik.
Deploy Portainer to manage our cluster
For easier browser based management of our cluster we install portainer-agent and portainer-ce. For this we ssh into our pi-cluster-2, a manager.
Because we want to use our previous created shared NFS storage as a persistent volume for portainer, we have to create a portainer data folder on our NFS share and also edit the default portainer-agent-stack.yml to use the storage in our deployment:
mkdir /mnt/docker/portainer
mkdir /mnt/docker/portainer/data
Now we create a new docker compose yml for portainer or use the existing default portainer-agent-stack.yml.
I am using a fresh file that is also stored on the NFS share under /mnt/docker/portainer/:
nano /mnt/docker/portainer/portainer-swarm-compose.ymlNow copy and paste this code in there where we use our custom NFS volume as data store. Important to change these variables before you save and exit:
- under labels "traefik.http.routers.portainer.rule=Host(`portainer.local.yourdomain.net`)" you need to change yourdomain.net to the above domain you run
- under labels "traefik.http.routers.portainer-secure.rule=Host(`portainer.local.yourdomain.net`)" you need to change yourdomain.net to the above domain you run
version: '3'

services:
  agent:
    image: portainer/agent
    environment:
      AGENT_CLUSTER_ADDR: tasks.agent
    volumes:
      - /var/run/docker.sock:/var/run/docker.sock
      - /var/lib/docker/volumes:/var/lib/docker/volumes
    networks:
      - agent-network
    deploy:
      mode: global
      placement:
        constraints:
          - node.platform.os == linux

  portainer:
    image: portainer/portainer-ce
    command: -H tcp://tasks.agent:9001 --tlsskipverify
    volumes:
      - /etc/localtime:/etc/localtime:ro
      - /var/run/docker.sock:/var/run/docker.sock:ro
      - /mnt/docker/portainer/data:/data
    networks:
      - agent-network
      - proxy
    environment:
      - "TZ=Europe/Berlin"
    deploy:
      placement:
        constraints:
          - node.role == manager
      labels:
        - traefik.enable=true
        - traefik.docker.network=proxy
        - traefik.http.routers.portainer.entrypoints=http
        - traefik.http.routers.portainer.rule=Host(`portainer.local.yourdomain.net`)
        - traefik.http.middlewares.portainer-https-redirect.redirectscheme.scheme=https
        - traefik.http.routers.portainer.middlewares=portainer-https-redirect
        - traefik.http.routers.portainer-secure.entrypoints=https
        - traefik.http.routers.portainer-secure.rule=Host(`portainer.local.yourdomain.net`)
        - traefik.http.routers.portainer-secure.tls=true
        - traefik.http.routers.portainer-secure.service=portainer
        - traefik.http.services.portainer.loadbalancer.server.port=9000

networks:
  agent-network:
    external: true
  proxy:
    external: true
Great! Save and exit with STRG + X, confirm with Y and press enter.
Now we are ready to deploy portainer onto our cluster, using the portainer-swarm-compose.yml file:
docker stack deploy portainer -c /mnt/docker/portainer/portainer-swarm-compose.ymlValidate if the deployment worked with: docker service ls
This should result in:
$ docker service ls
ID             NAME                  MODE         REPLICAS   IMAGE                                 PORTS
ynvr3feshmpv   portainer_agent       global       4/4        portainer/agent:latest
k02jxsrm4bni   portainer_portainer   replicated   1/1        portainer/portainer-ce:latest
vjeugmxvh5cl   traefik_traefik       replicated   4/4        traefik:latest                        *:80->80/tcp, *:443->443/tcp
If you installed traefik before as well you should now see the portainer agents, the portainer webgui and the traefik service running.
Great, now we can access portainer in the browser and it should automatically be handles by traefik and getting signed with the SSL certificate:
https://portainer.local.yourdomain.netYou should get the welcome site and first user setup page where you have to set your username and password for the web interface. After that you an see and manage your swarm, and inside of that the already created traefik and portainer services.
Appendix 1: Completely remove Docker
To completely uninstall Docker:
Step 1
dpkg -l | grep -i docker
To identify what installed package you have:
Step 2
sudo apt-get purge -y docker-engine docker docker.io docker-ce docker-ce-cli
sudo apt-get autoremove -y --purge docker-engine docker docker.io docker-ce
The above commands will not remove images, containers, volumes, or user created configuration files on your host. If you wish to delete all images, containers, and volumes run the following commands:
sudo rm -rf /var/lib/docker /etc/docker
sudo rm /etc/apparmor.d/docker
sudo groupdel docker
sudo rm -rf /var/run/docker.sock
You have removed Docker from the system completely.
Appendix 2: Install fail2ban
fail2ban is a UNIX service (daemon) that automatically detects malicious behaviour and bans offenders by updating the firewall rules. Basically once fail2ban identifies a malicious user they can’t connect to the server at all, requests to connect go unanswered until the ban is lifted.
sudo apt install fail2ban -yOnce fail2ban installs you can check the service Status
sudo service fail2ban statusConfigure fail2ban
A full description of fail2ban configuration is beyond the scope of this article. However the main configuration file /etc/fail2ban/jail.conf which you should never edit directly. We’ll add some overrides in /etc/fail2ban/jail.local
sudo nano /etc/fail2ban/jail.local- I think the default ban time is too short, 8h should deter most people.
- Ignore any IP address that I own which do not change often (like my home IP address) and the server itself.
- Enable the jail for sshd.
 [DEFAULT]
 bantime = 8h
 ignoreip = 127.0.0.1/8 xxx.xxx.xxx.xxx
 ignoreself = true

 [sshd]
 enabled = true
Now restart the fail2ban service:
sudo service fail2ban restartList Banned offenders
sudo iptables -L f2b-sshd --line-numbersoutput:
Chain f2b-sshd (1 references)
num  target     prot opt source               destination
1    REJECT     all  --  test.example.com     anywhere             reject-with icmp-port-unreachable
2    RETURN     all  --  anywhere             anywhere
Here we are listing only the rules in the f2b-sshd chain. If you want to see everything simply run sudo iptables -L --line-numbers
So to unban test.example.com from example output above:
sudo iptables -D fail2ban-ssh 1Remove ban
sudo iptables -D fail2ban-ssh <Chain num>Appendix 3: Test USB Drive IO performance
Good way to test your hardware: custom usb3 cable good? good ssd performance overall?
See usb3 ssd driver: lsusb -t
Test speeds io with iozone: sudo apt install iozone3
test disk speeds io in automate with . sudo iozone -a
iozone -i 0 -t 2 Command line used: iozone -i 0 -t 2
Output is in kBytes/sec
Time Resolution = 0.000001 seconds.
Processor cache size set to 1024 kBytes.
Processor cache line size set to 32 bytes.
File stride size set to 17 * record size.
Throughput test with 2 processes
Each process writes a 512 kByte file in 4 kByte records
Children see throughput for 2 initial writers = 502558.91 kB/sec
Parent sees throughput for 2 initial writers = 79198.16 kB/sec
Min throughput per process = 250353.08 kB/sec
Max throughput per process = 252205.83 kB/sec
Avg throughput per process = 251279.45 kB/sec
Min xfer = 508.00 kB
Children see throughput for 2 rewriters = 348809.23 kB/sec
Parent sees throughput for 2 rewriters = 71866.35 kB/sec
Min throughput per process = 172320.25 kB/sec
Max throughput per process = 176488.98 kB/sec
Avg throughput per process = 174404.62 kB/sec
Min xfer = 508.00 kB