Today we install the famous DNS advertisment blocker pihole in a LXC container on a Proxmox server, and set this as our network wide primary DNS server on the Unifi controller.
The cool thing is that even as pihole was born as a Raspberry Pi project, it can easily run on most other Debian-based operating systems. So we choose ubuntu in its super lightweight 205 MB proxmox LXC container version. Lets get started:
Create the Proxmox LXC container:
First we login to the Proxmox webinterface and if not done yet, download the ubuntu 18.04 LXC template to our template storage: on the left menu click all the way through to your iso and vm sotrage, in my case I use a remote nfs share volume. Click the storage, select in the right menu "Content" and here you see a list of already downloaded or imported templates and isos. Now click on Templates.
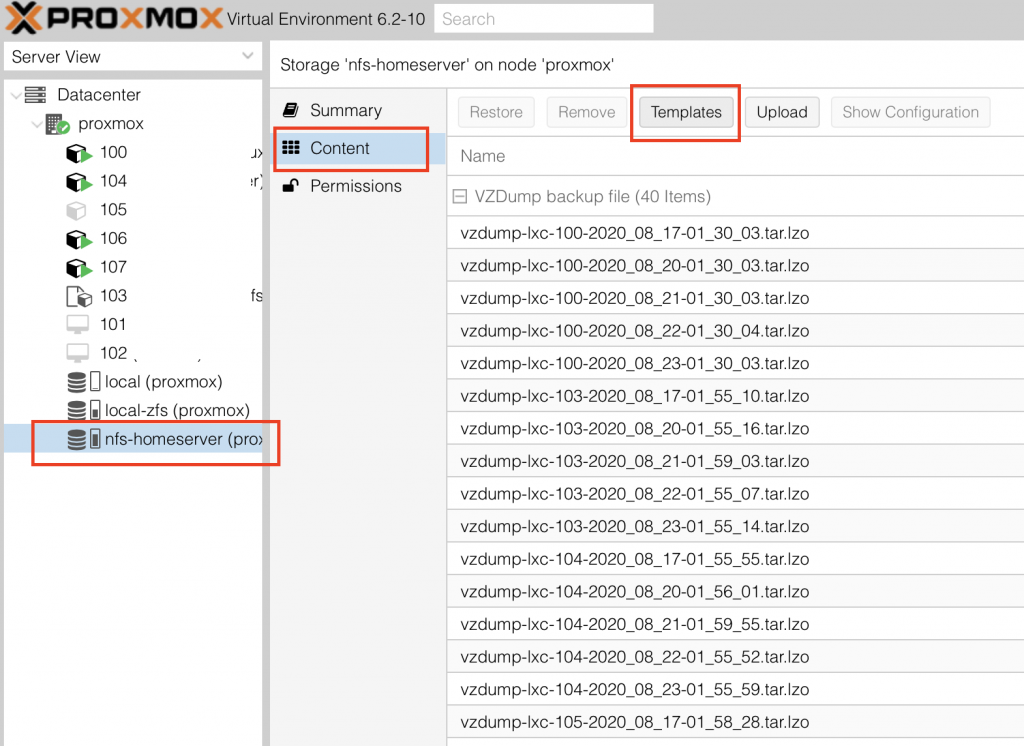
This will open the following overlay menu to find and download your desired LXC container distribution:

In the search field on the top right look for "ubuntu". Then select the lxc ubuntu-18.04 container and click download. This will download and save the 205 MB image for all future installations as a template on your storage.
Next we setup our VM / container: go back to the left main menu in Proxmox and right click on your instance to select "Create CT":
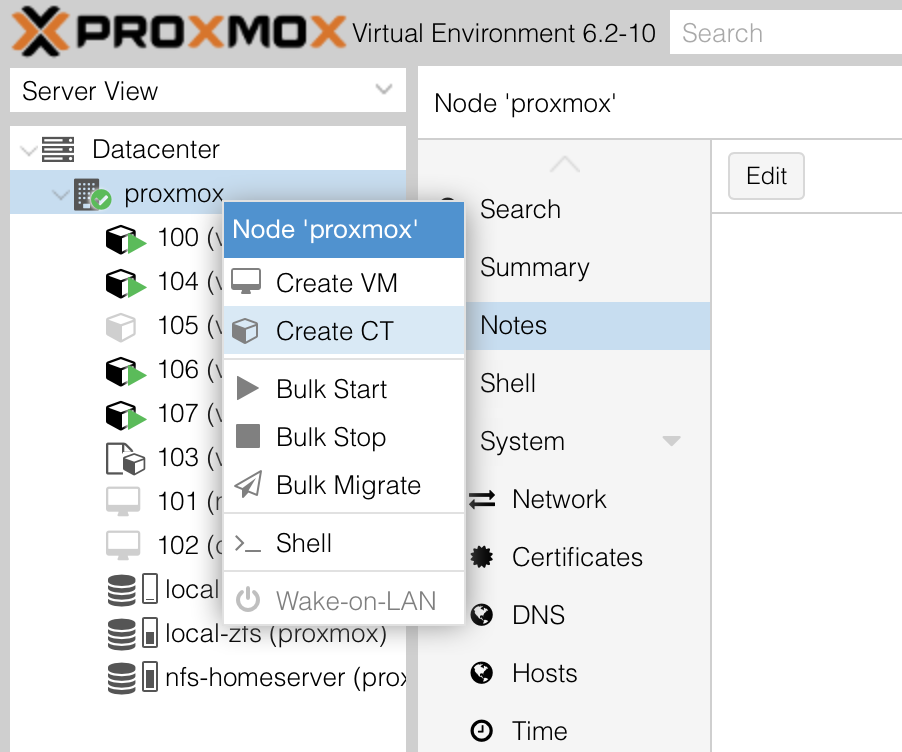
This will open the overlay menu for container creation.
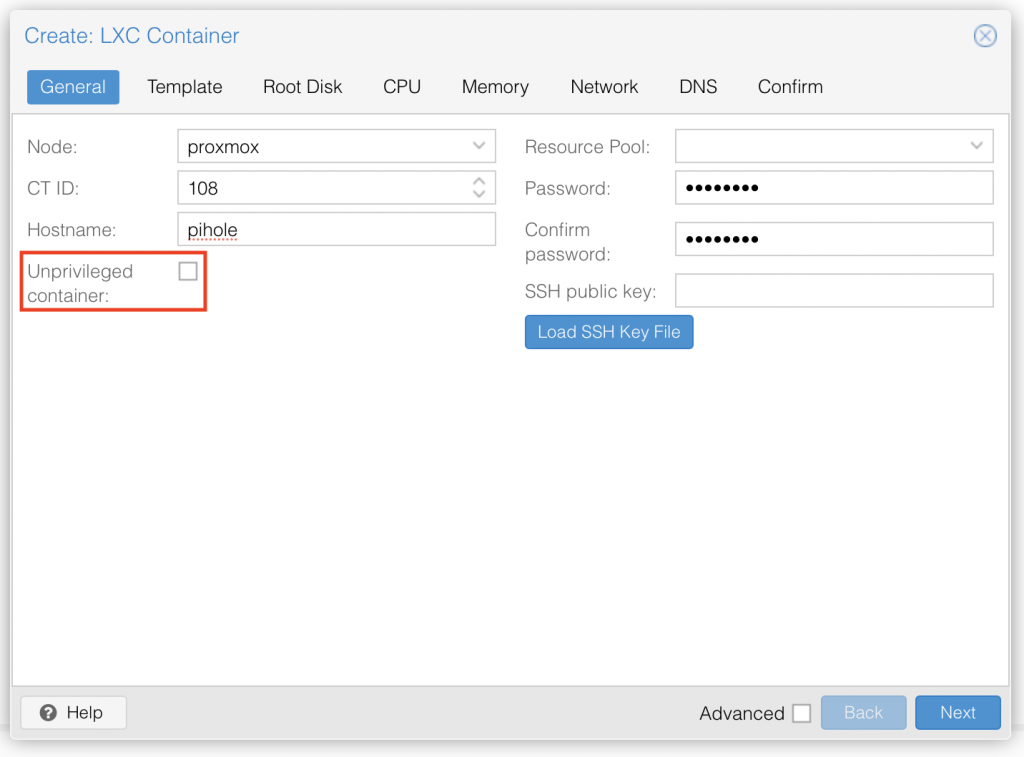
Step 1: Here you have to:
- choose a ID number (CAUTION: Can't be changed after creation) if you wish or plan for a certain order of your VM
- choose a Hostname
- IMPORTANT: UNCHECK the unprivileged container box! As we are needing for pihole to run a privileged container.
- choose a secure and long password
- if used, add your personal SSH public key
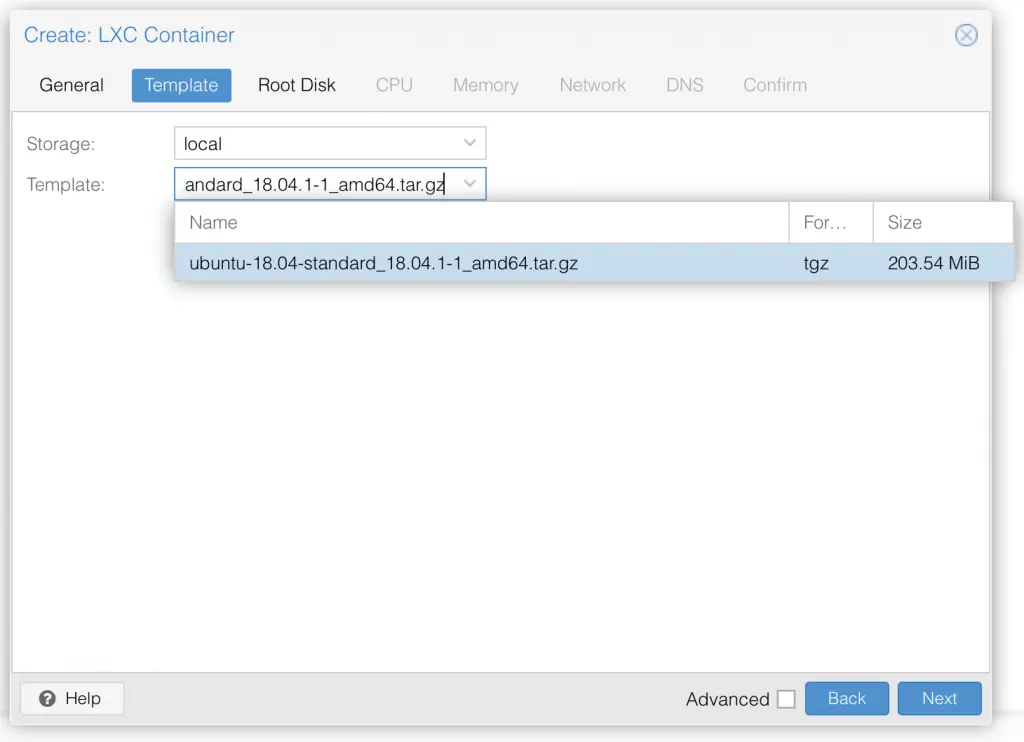
Step 2: Choose the storage where the template is on and under templates we select the prior downloaded ubuntu 18.04 lxc template.
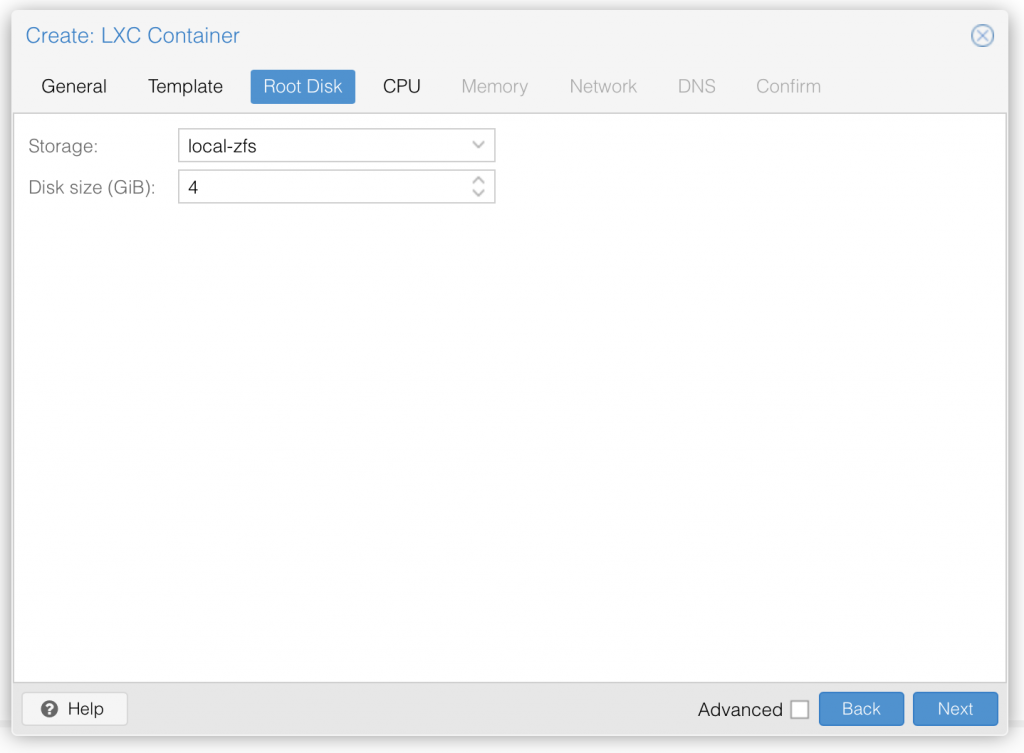
Step 3: Next we choose where you want to save the VM disk and how much storage you want to assign. 4 GB is more than enough for just pihole and as it is small, I will save it on the local zfs SSD raid to have maximum performance.
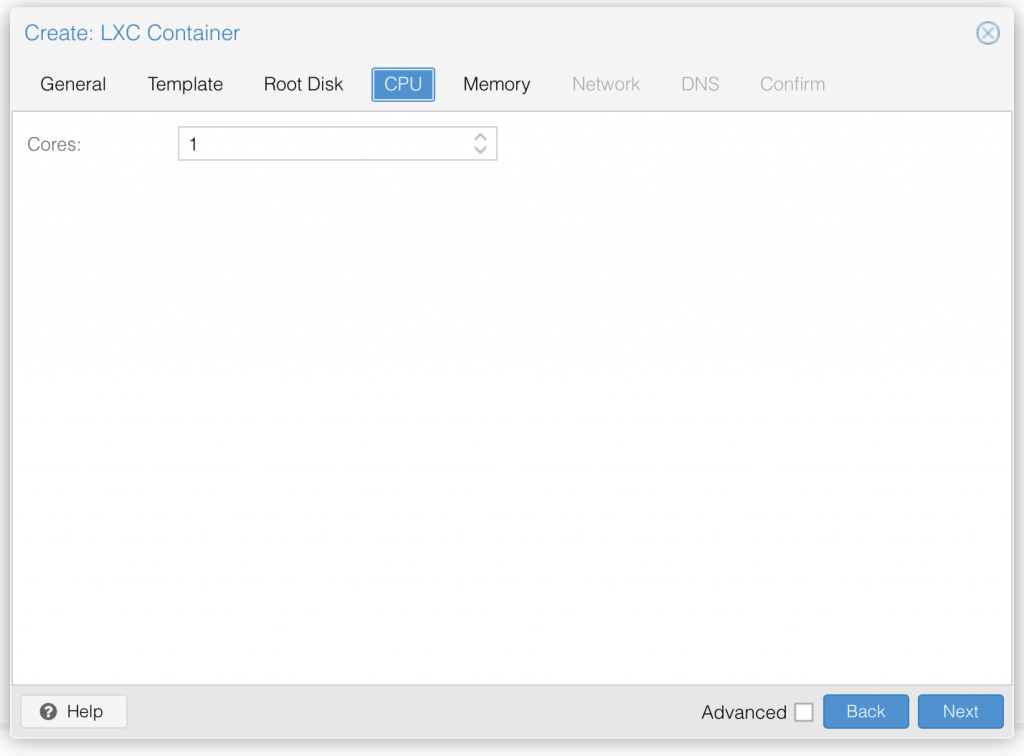
Step 4: Next choose CPU count, pihole is really only needing 1 CPU core.
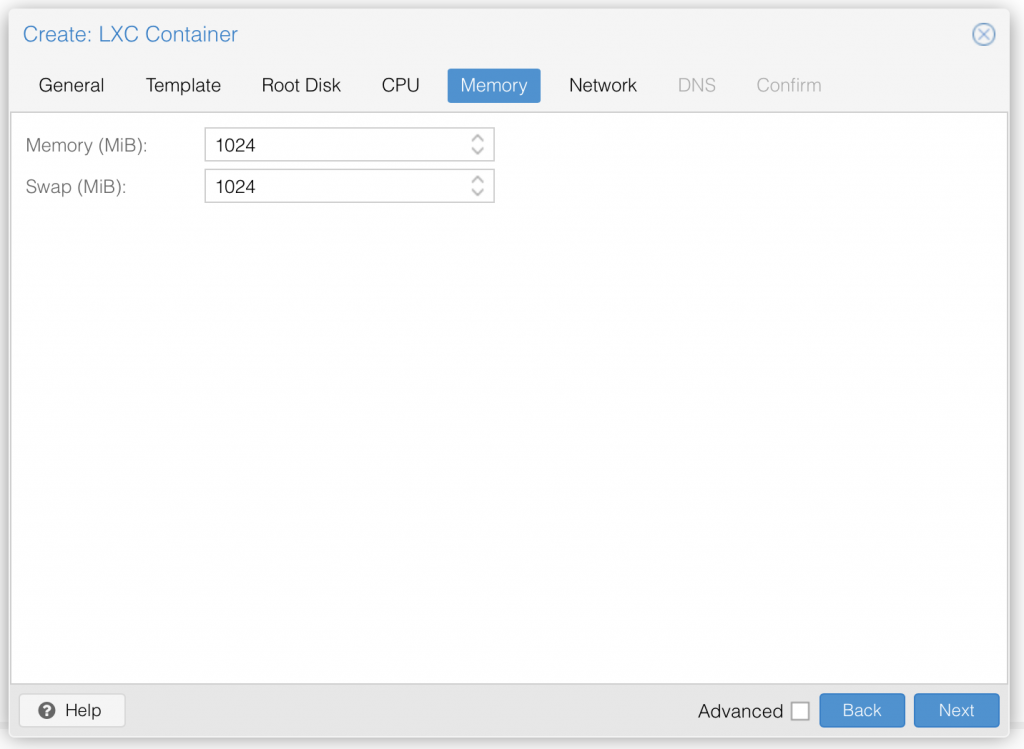
Step 5: Choose memory size, 1024 MB, 1gb should be enough. You can choose 2 GB to be save, but it will very probably ne overkill and unused.
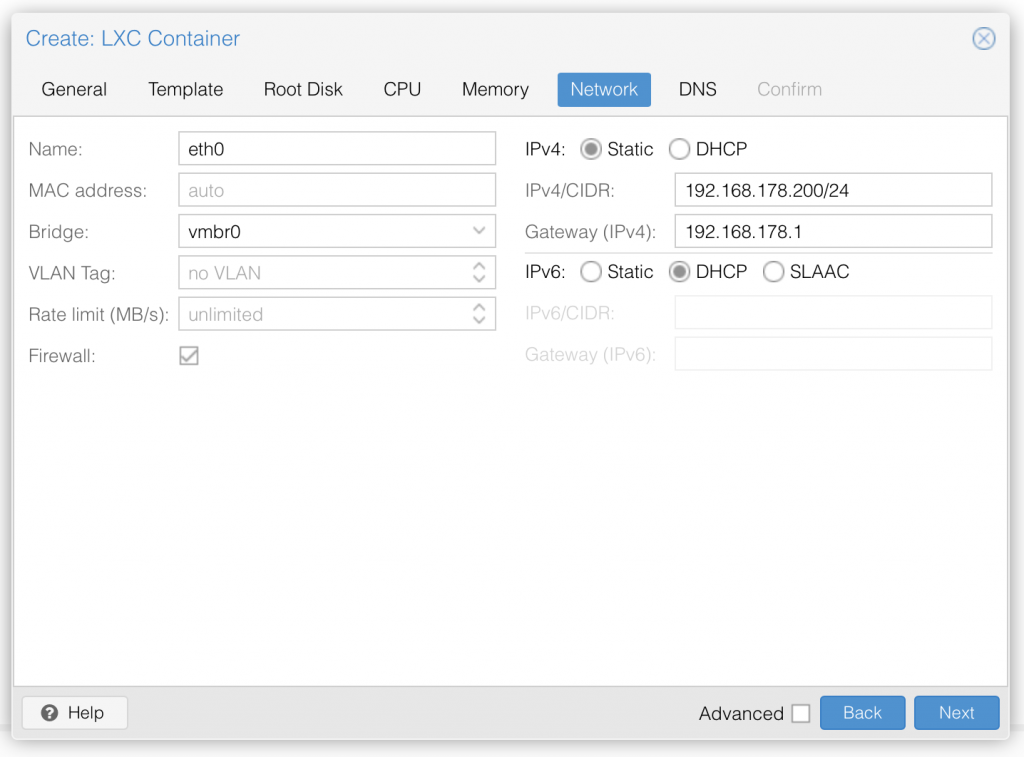
Step 6: Now we set our network preferences. It important to:
- choose the right interface, in my case eth0
- set brigde mode if enabled or used
- set IPv4 to STATIC IP. Should look like "192.168.x.x/24" (don't forget the "/24" in the end)
- set your right Gateway IP. If you use Unifi it is the IP of your Unifi Gateway, NOT YOUR CONTROLLER!
- set IPv6 to DHCP, so we don't get bothered by it. For sure if you use it, configure it.
Step 7: Click next, leave DNS empty as we will be THE DNS server anyway and finish the creation by confirming everything in the last step. Now your LXC container is created successfully and ready to boot up: check "Start after created" and click "Finish".

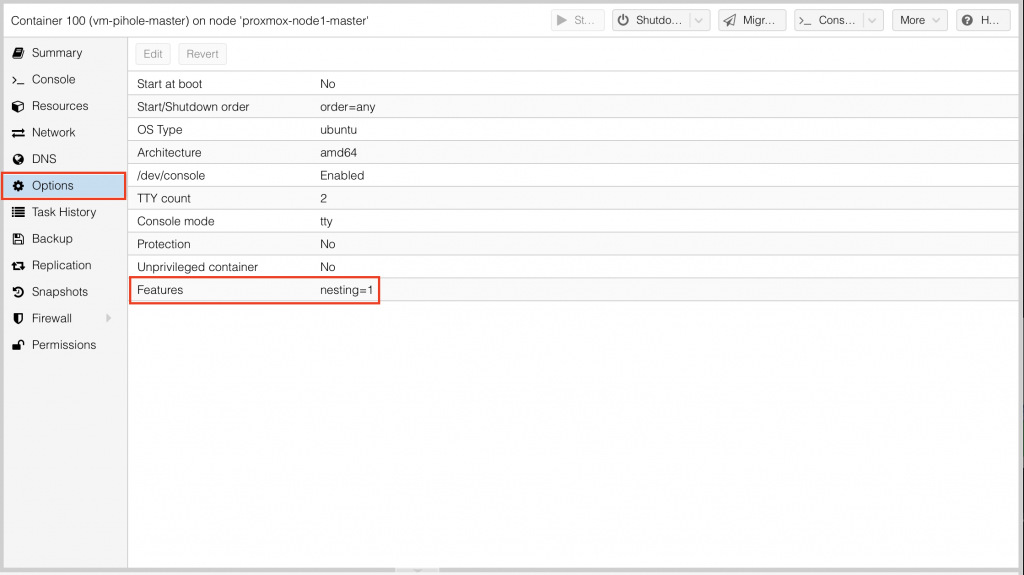
Step 8: Make sure that the containers security nesting option is set to 1 under the options menu:
Perfect, done! You now have the privileged ubuntu container up and running. We can now proceed logging into the ubuntu shell and install pihole.
Ubuntu initial login and pre-requisite setup:
These steps are recommended but not needed. So if you have another setup of security or just don't want to do it, you can skip this part to the "Install pihole" part of the article.
ssh into the container. You can eithe. use the proxmox built-in shell or your favorite shell. First standard user is always root.
ssh [email protected]Enter the password you set during container creation and you should be good to go.
Before we install pihole, we want to do some inportant security and user settings: update the system, disable root user, create our own user, install ssh keys, allow only these keys to login.
Update the system with:
sudo apt-get update
sudo apt-get upgrade -y
Add new admin user: (change piholeadmin to whatever you prefer!)
adduser piholeadmin
usermod -aG sudo piholeadmin
Generate and setup ssh key for that user:
ssh-keygenWhen asked where to put the file, take the default. You can choose whether or not to enter in a passphrase – having a passphrase means that you need both the private key and passphrase to gain access. It provides an additional layer of security.
Once your keys have been created, you will find them in /home/root/.ssh – there should be id_rsa (private key) and id_rsa.pub (public key) files in that directory.
Next, we need to copy that key to the newly created user’s account:
ssh-copy-id [email protected]Choose ‘yes’ when asked if you want to continue, and enter piholeadmin’s password when prompted.
This command will copy the public key to the piholeadmin user’s ~/.ssh directory as an authorized_keys file. You can now use the private key to authenticate with this server as user piholeadmin. So lets download our private key file. Start by logging of and back on as the new created piholeadmin user:
ssh [email protected]Then show the contents of the id_rsa file:
cat ~/.ssh/id_rsaAs we copied the ssh key earlier to the piholeadmin user directory you should get a view on the key file. Select the entire contents of the file with and copy the text to your clipboard.
Next, open up a text editor and paste the entire block of text into a blank file. Save this file in a secure location under "ssh_id_rsa_pihole", no file extension, or in your favorite ssh terminal like Termius.
Once saved, you can now logout and test the connection with the saved public key:
(change "/Users/flo/Downloads/ssh_id_rsa_pihole" to the file location of your public key)
ssh -i /Users/flo/Downloads/ssh_id_rsa_pihole -p 22 [email protected]If it is successful and you can connect, you have your ssh key up and running 🙂
Configure some ssh security options:
sudo nano -w /etc/ssh/sshd_configFind the line that says: "#Port 22" And change it to:
Port 77You can use any port number for your SSH connection, as long as it is BELOW 1024, for example 77. Running SSH on a non-privileged port ( any port >= 1024 ) is a security risk. This is because non-root users are allowed to open ports at 1024 and above. Now scroll down until you find the line that says: "PermitRootLogin yes" and change it to no.
PermitRootLogin noThis disables root user login. Next scroll down further and find: "#PasswordAuthentication yes". Remove the # at the beginning and again change ‘yes’ to ‘no’:
PasswordAuthentication noThis disables password based authentication. (Private key authentication should already be enabled by default – you can verify this by ensuring that PubkeyAuthentication is set to ‘yes’ in the SSH config file).
Save and exit with STRG + X and confirm with Y. Then restart the ssh service with:
sudo systemctl reload sshdNow if you did not got disconnected logout and log back in with this command to test the new config and port:
ssh -i /Users/flo/Downloads/ssh_id_rsa_pihole -p 77 [email protected]If you are able to login, you setup everything correctly and your ssh runs now on port 77. You can now delete the id_rsa file from the server:
sudo rm ~/.ssh/id_rsaNext setup your timezone and ntp server:
sudo dpkg-reconfigure tzdatasudo apt install ntp
service ntp statusTo confirm the ntp install, type "date" and see if result is correct.
Setup the UFW firwall:
sudo ufw enable
sudo ufw allow http
sudo ufw allow https
sudo ufw allow 80
sudo ufw allow 77
Confirm your rules and check them on the UFW overview:
sudo ufw statusNow we are ready to install pihole.
Install pihole:
We install pihole with the official script, it needs admin privileges, so make sure you are running it as a admin user:
curl -sSL https://install.pi-hole.net | bashFollow the onscreen install procedure, I used the default settings and let pihole setup everything. Also important to check to install webinterface (default) together with it.
After the install was successful, set the pihole admin password with:
pihole -a -p After setting your own custom admin password, you can now access pihole in your browser by:
https://192.168.178.200/Thats it, pihole installed! Great!
But you will notice that your browser will give you a security warning. This is because you don't have any SSL certificate installed yet on pihole.
Setup your own ssl certificate (optional):
- Ensure you have a standard fully qualified domain name (e.g:
domain.com,pihole.example.com, etc) that allows you to access your Pi-hole - Deploy an SSL certificate for your FQDN
- Configure
lighttpdto only enable the SSL engine for your FQDN
I suggest checking out Certbot by the EFF, which allows you to deploy a free SSL certificate issued by Let’s Encrypt. The Certbot site provides you with instructions as to how to install the package, and to generate your first certificate. You will also need to ensure you set up the auto renewal tool, so that your certificate does not expire after 90 days!
The lighttpd daemon will need a custom configuration to enable the SSL engine. Fortunately, you can configure all this from /etc/lighttpd/external.conf as this will not get overwritten when running a Pi-hole update.
To start, you will need to create a file called combined.pem as this is the ssl.pemfile that lighttpd expects to see. Run the following command (making sure to subsitute pihole.example.com for your FQDN):
  sudo cat /etc/letsencrypt/live/pihole.example.com/privkey.pem \
           /etc/letsencrypt/live/pihole.example.com/cert.pem | \
  sudo tee /etc/letsencrypt/live/pihole.example.com/combined.pem
Next, ensure the lighttpd user www-data can read the required certificates:
sudo chown www-data -R /etc/letsencrypt/liveNow, place the following into /etc/lighttpd/external.conf (again, making sure to subsitute pihole.example.com for your FQDN):
$HTTP["host"] == "pihole.example.com" {
  # Ensure the Pi-hole Block Page knows that this is not a blocked domain
  setenv.add-environment = ("fqdn" => "true")

  # Enable the SSL engine with a LE cert, only for this specific host
  $SERVER["socket"] == ":443" {
    ssl.engine = "enable"
    ssl.pemfile = "/etc/letsencrypt/live/pihole.example.com/combined.pem"
    ssl.ca-file =  "/etc/letsencrypt/live/pihole.example.com/fullchain.pem"
    ssl.honor-cipher-order = "enable"
    ssl.cipher-list = "EECDH+AESGCM:EDH+AESGCM:AES256+EECDH:AES256+EDH"
    ssl.use-sslv2 = "disable"
    ssl.use-sslv3 = "disable"
  }

  # Redirect HTTP to HTTPS
  $HTTP["scheme"] == "http" {
    $HTTP["host"] =~ ".*" {
      url.redirect = (".*" => "https://%0$0")
    }
  }
}
Finally, be sure to restart the service:
sudo service lighttpd restartYou can now take advantage of a HTTPS-secured Web Interface!
Setup your Unifi Network to use pihole as only DNS:
Go to your Unifi controller, login, and go to the settings tab. There under "Networks" you have to change and set the new pihole DNS for all networks you have there. In my case for example a standard LAN, a IoT and a guest network. The importance is to use the EXACT IP of your pihole DNS. In our example case it is: 192.168.178.200
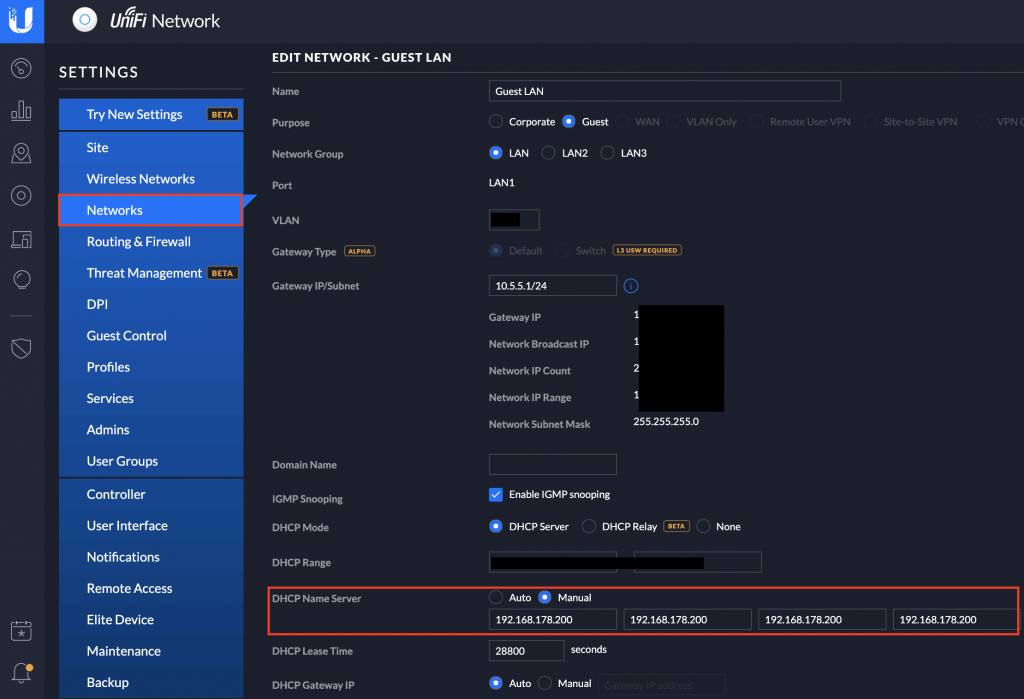
Edit all networks one by one, by going into their config on the Unifi controller and under the "DHCP Name Server" set it to "Manual" and then enter in all 4 fields your pihole IP: 192.168.178.200.
Save and deploy the changes. After a while you should see all your network traffic coming into your pihole. Make sure to give it a moment so the new DNS settings can take effect on all your network gear.
That's it, you completely successfully installed pihole on a Proxmox LXC container and set it as your primary DNS of your Unifi network!