Introduction
Over the years I piled up a lot of different projects running in my home on different Raspberry Pis. Because this amazing little piece of technology can literally do anything, I love to tryout and build things with it. Roughly every third project turned out to be one I will keep running and so the amount of Pis constantly increased. So this is when I decided to convert the most critical and constantly used Pis into lightweight virtual machines.
For me to start with this would be:
- pihole (DNS black hole)
- expressVPN with jdownloader and a kill switch
- Logserver with Logstash, InfluxDB and Grafana
- Cockpit to monitor/maintain all other servers
Additionally I also wanted to have two MacOS installations:
- Mojave VM to still be able to run x86 32bit Mac apps
- Newest Catalina or upcoming 10.16 BETA testing VM
I will cover the creation and installation of all of these containers in individual posts. Lets start first with setting up the Server and Proxmox.
The hardware
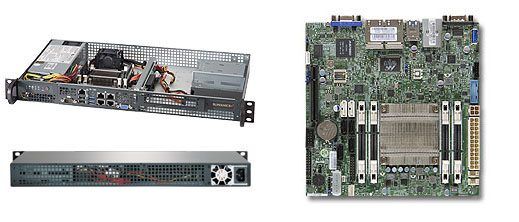
I use the SuperMicro SuperServer 5018A-FTN4 with 32GB Ram to run all of the above VMs. It is a very small and silent 1 u server unit, also thanks to using Noctua 40mm fans instead of SuperMicros stock ones. I use 2x 128gb SSDs in zfs RAID 1 mirror. Also its power consumption is very with 20watt TDP on 8-cores. All storage of images and larger files is handled over and nfs share.
Why PROXMOX and not xcp-ng?
PROXMOX was not my first choice. I started the first test build with xcp-ng, the open source version of Xenserver. Together with the web GUI XenOrchestra it is a super easy and useful system I would still recommend. BUT it had some downsides for me. First of all simple Hardware passthrough of a 10Gbit SFP+ adapter or a NVIDIA Quadro GPU was super complicated and did not really work well or sometimes not at all in the end. While researching for alternatives I also found out about PROXMOXs LXC containers. And I simply loved this. Having a Linux basically up in running in 3 seconds, super lightweight build (around 200 MB) and then build upon these was just a super cool system. So I decided to go with PROXMOX and convert every Raspberry Pi I had into a LXC container.
Install PROXMOX
Installing proxmox is pretty straight forward: you download the latest ISO installer from their website: https://www.proxmox.com/en/downloads
Then you either flash the ISO to a USB thumb drive with tools like Etcher or you load the ISO directly over your IPMI interface of your SuperMicro Mainboard. Either way you should end up with having the proxmox installer available on boot or as a boot option. Select it and you should come to PROXMOX install screen:
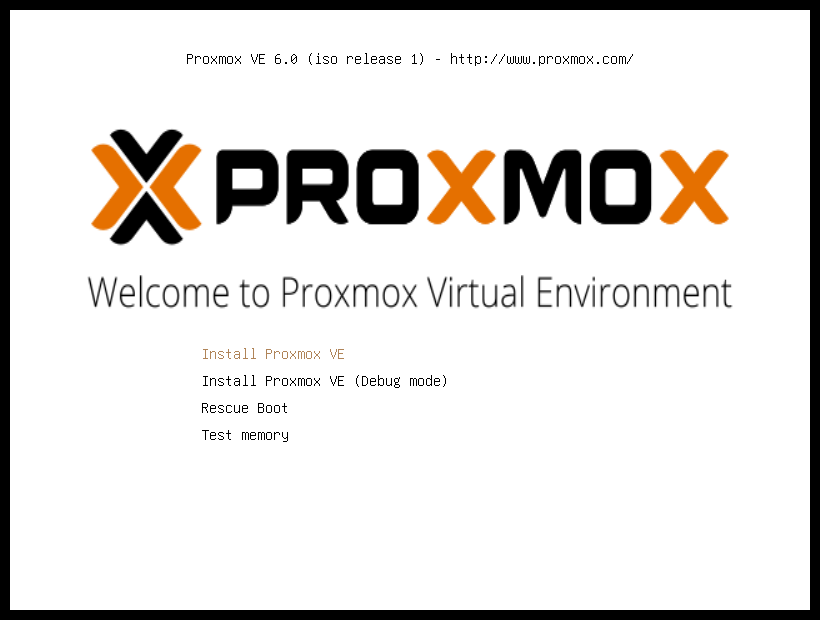
Select the first option "Install Proxmox VE".
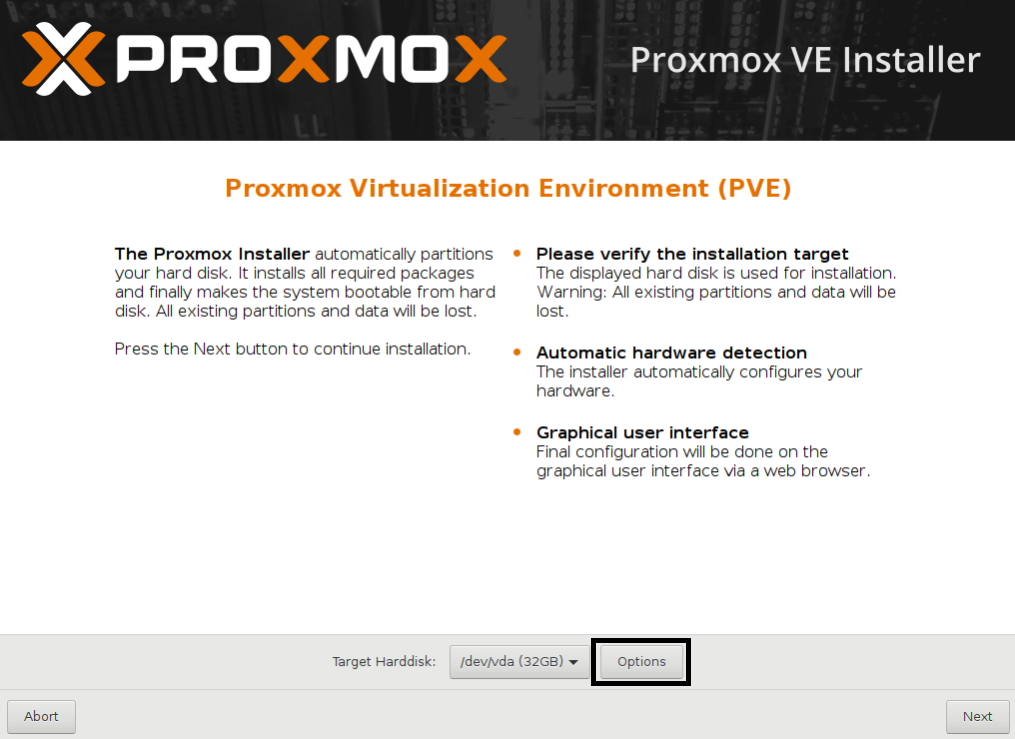
After checking your systems hardware the installer comes back to its GUI and asks you to accept its Terms of Service. Agree and now in the next screen select your hard drives you want to install to. Click the Options button besides the Hard Drive and select your style:
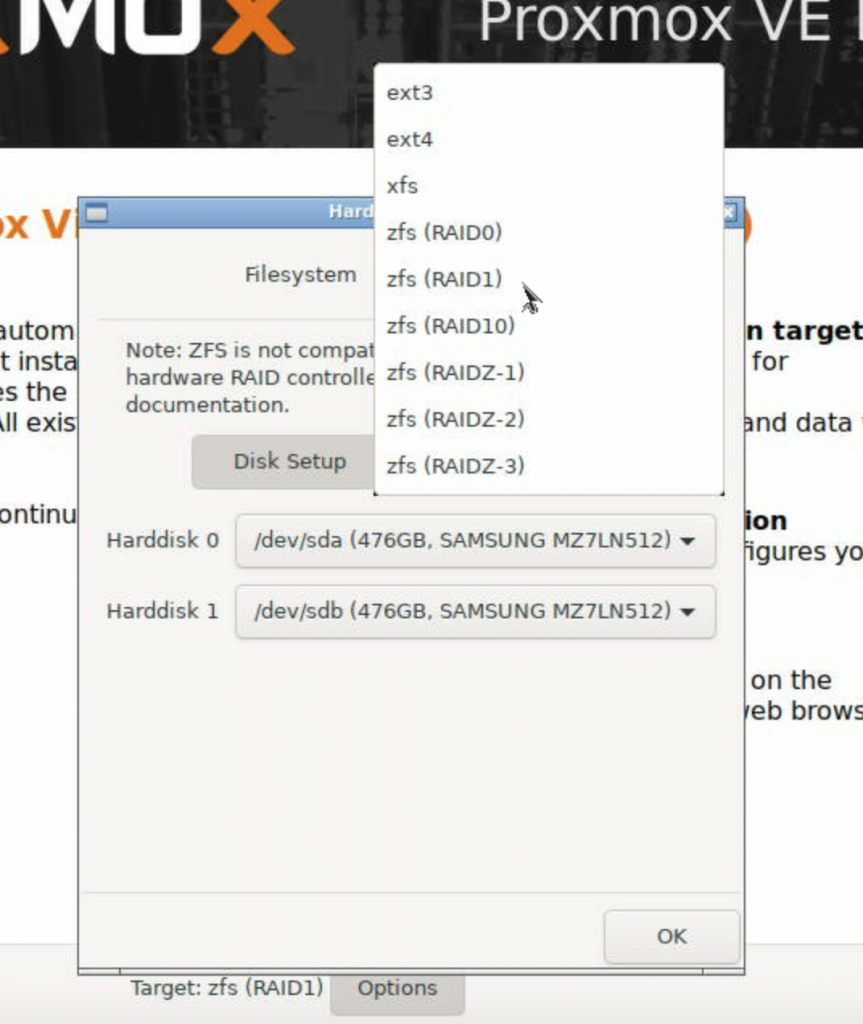
In my case I choose zfs Raid 1. Make sure HDD0 and HDD1 are the right ones and click OK to continue with the install process.
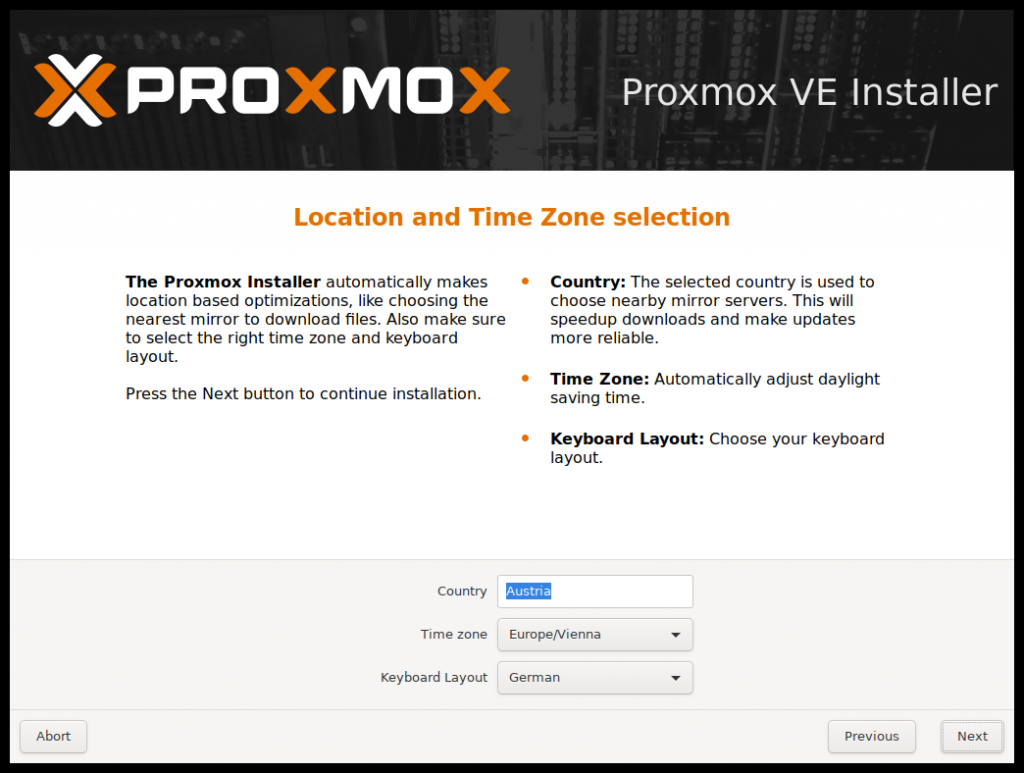
Next is the regional settings, so select your country and time zone:
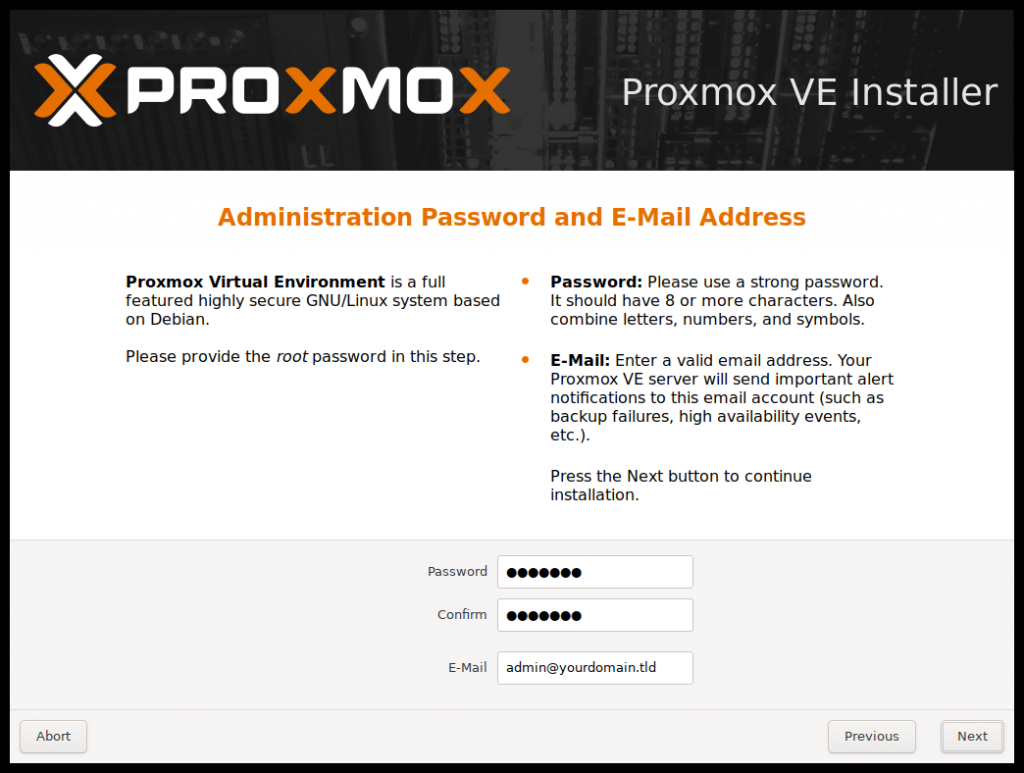
No its time to define your root password, please choose this carfully and secure if you going to use the installation in productive environment:
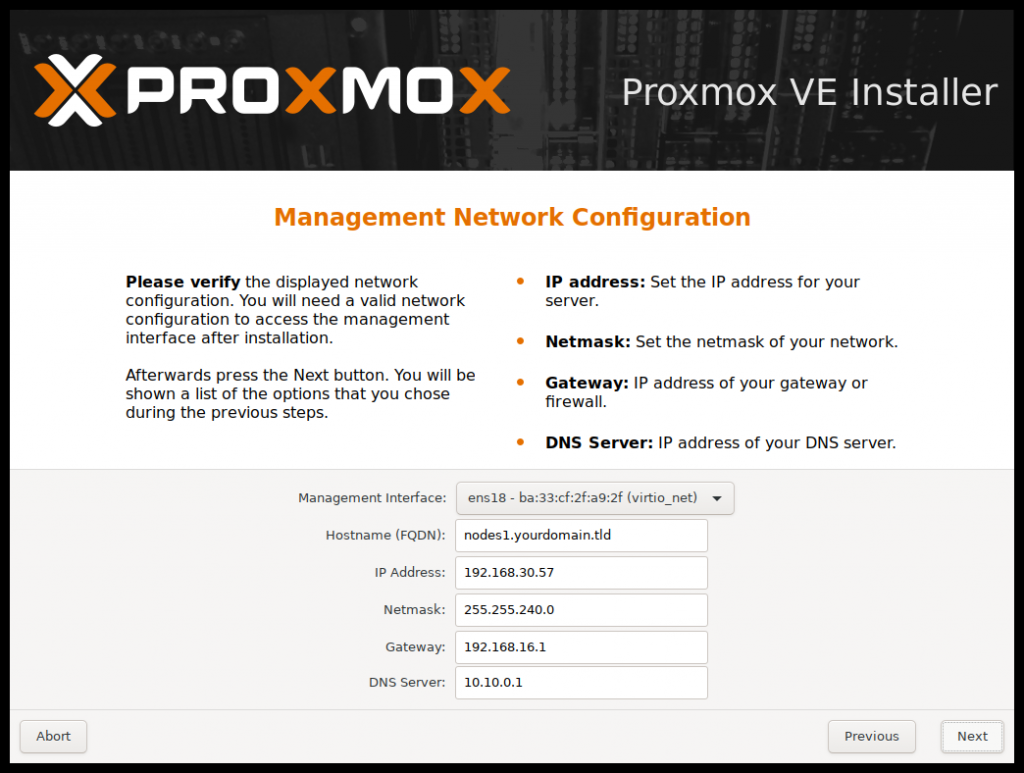
Hit next and last but not least you have to define your network parameters: choose the network adapter you want to use, the IP address, your router IP and your DNS IP.
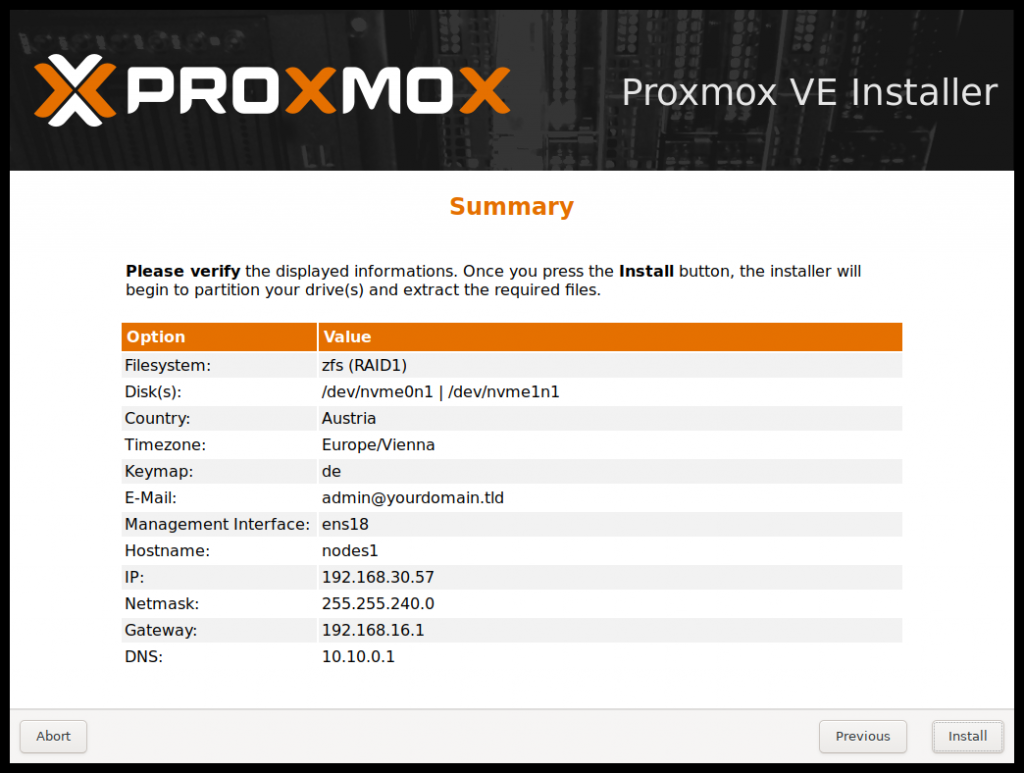
Hit Next to see a last overview of all settings you choose and after reassuring you like all the settings hit Install.
After the install finished you will see a reboot screen and the reminder to remove your install volume. So either remove the USB thumb drive or unmount the image in your IPMI admin. Then hit reboot and when you see the "Welcome to Proxmox" screen with the login CLI login prompt you have successfully installed Proxmox. Before you turn over to your browser please not the IP and port proxmox shows you on the welcome screen. This is the IP you need to reach the webinterface.
Setting up Proxmox and GUI the first time
Go to your browser now and enter the IP plus the Proxmox port, for example: http://192.168.178.50:8006/
This should take you to Proxmox login webinterface. Login the first time with username "root" and the secure password you defined during the install process. After login you will see the "No valid subscription" message. Don't worry this will always come when you login and it is the standard for using Proxmox legally free. If it bothers you, buy their support licenses from their website.
First thing you want to do after login is to go to your server on the left column and the select the "Updates" options in the column on the right. Select "Check for updates" and apply them all.
Then go to the System overview info pane and check if all your hardware is detected properly.
Congratulations you are now running Proxmox Virtual Server and you are ready to create and install your first virtual container or machine.
More in my next posts: