BEWARE: THIS GUIDE IS FOR AUTHELIA v4.37.5 OR EARLIER VERSIONS!
Authelia introduced major changes that break your config in v4.38.x. So please be cautious with this guide until its updated!
I was looking for a secure and reliable way to expose some of my homelab webinterfaces and APIs to the public. I decided to go for a Cloudflare Tunnel, so I don't need to open any port like 443 on my firewall and use Authelia and OpenID as an identity provider to securely authenticate and protect my public facing services via TOTP and 2FA hardware keys like Yubikey.
This is an advanced guide, and in no way meant for beginners to the topic. Especially the Authelia configuration.yml requires a lot of custom input besides my provided simplified example. Its setup also depends very much on your individual environment. That being said, I hope you enjoy the guide and can still learn and do something useful with it! 😉
Index
Setup the LXC container in Proxmox
Security: create a new admin user
Security: generate ssh keys for the new user
Security: hardening ssh settings and set custom port
Security: Disable root account
Security: Enable the firewall
Security: Install fail2ban
Install Authelia
Configure Authelia
Configure Authelia: Create Authelia secrets
Configure Authelia: Create Authelia users
Configure Authelia: Create your configuration.yml
Optional: configure LDAP as authelia user source
Install mysql database
Startup Authelia
Optional: Configure Authelia: set your own Authelia assets
Setup Cloudflare Tunnel and Zero Trust with OpenID
OpenID: Create a new tunnel
OpenID: Generate application service token
OpenID: Setup OpenID credentials with your tunnel
OpenID: Generate OpenID issuer private key
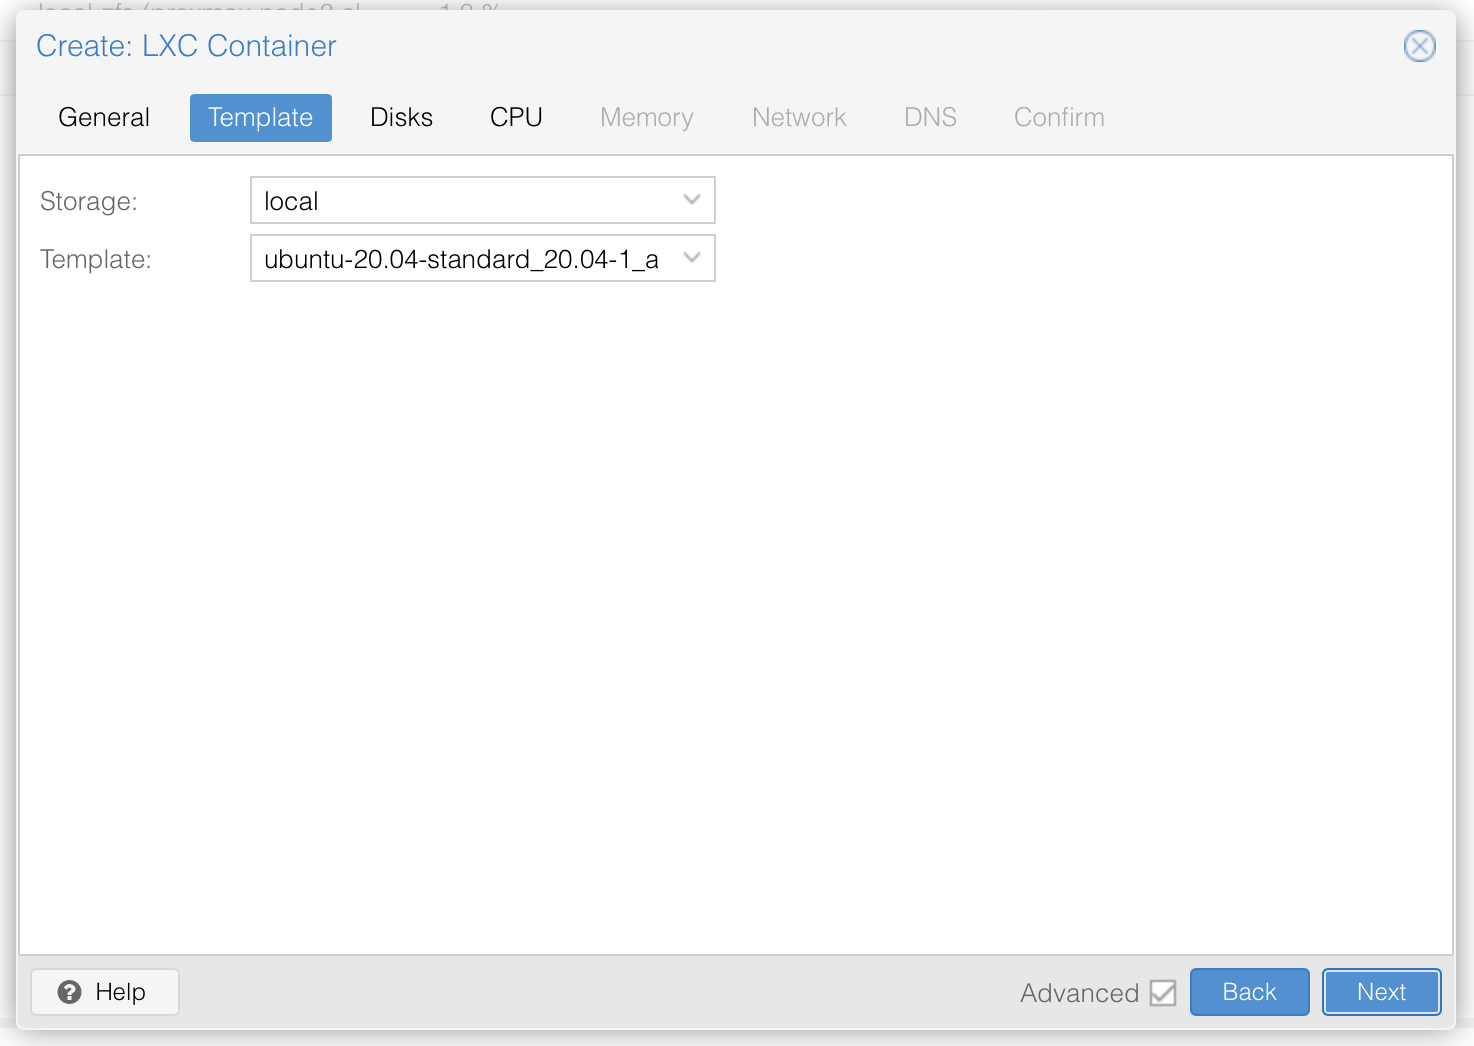
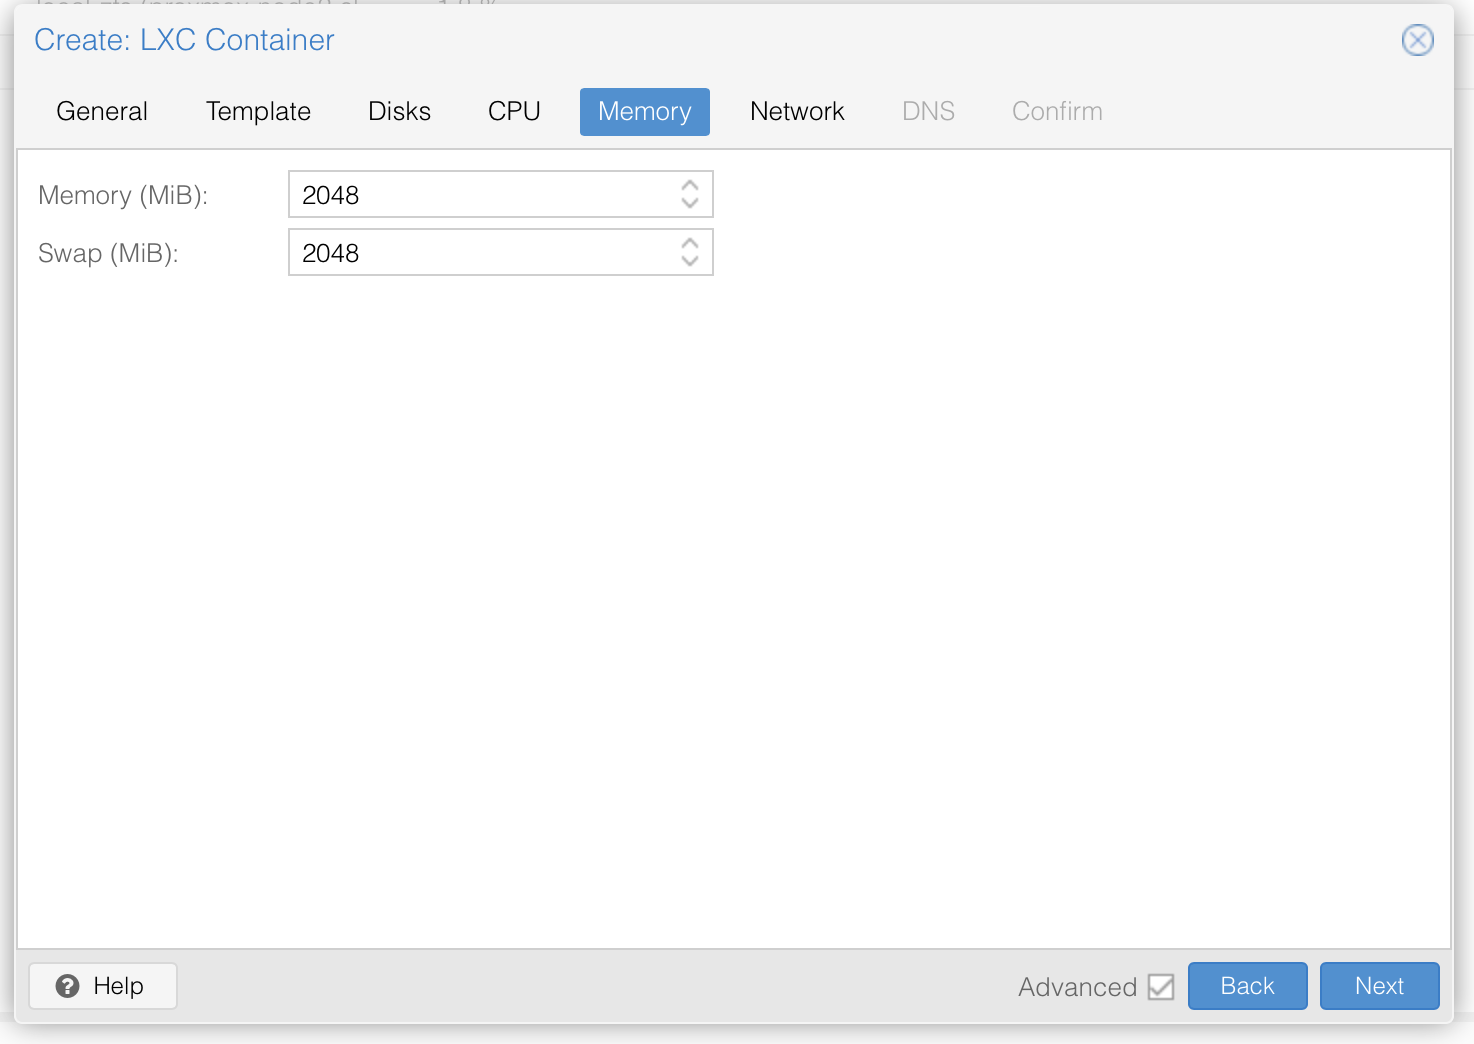
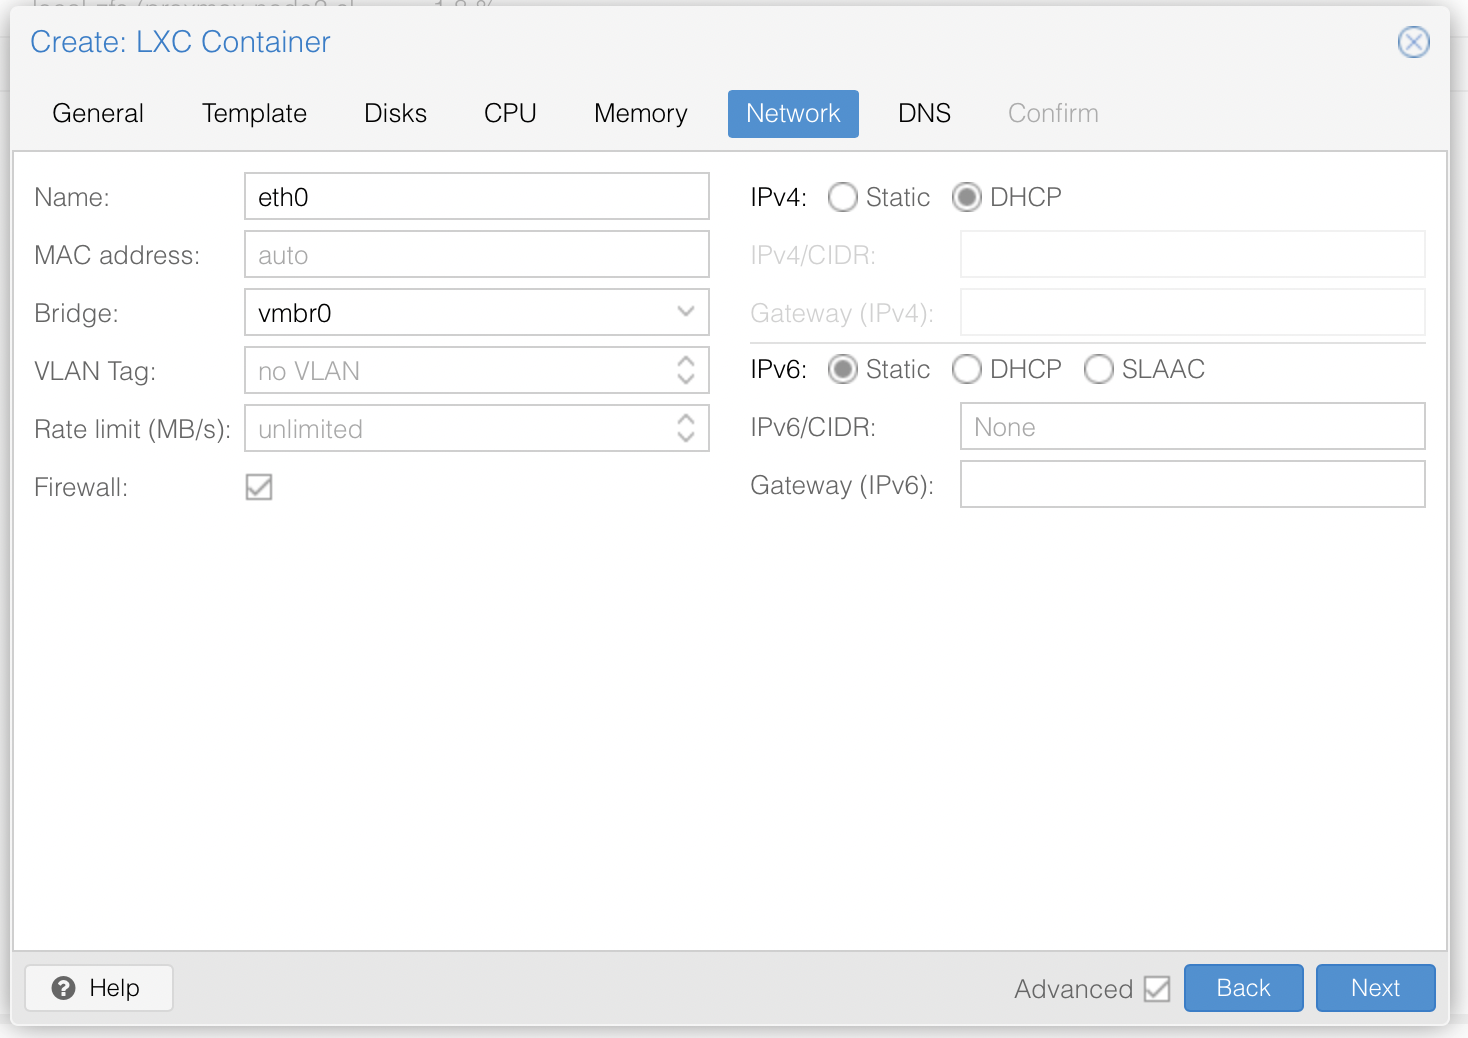
Setup the LXC container in Proxmox
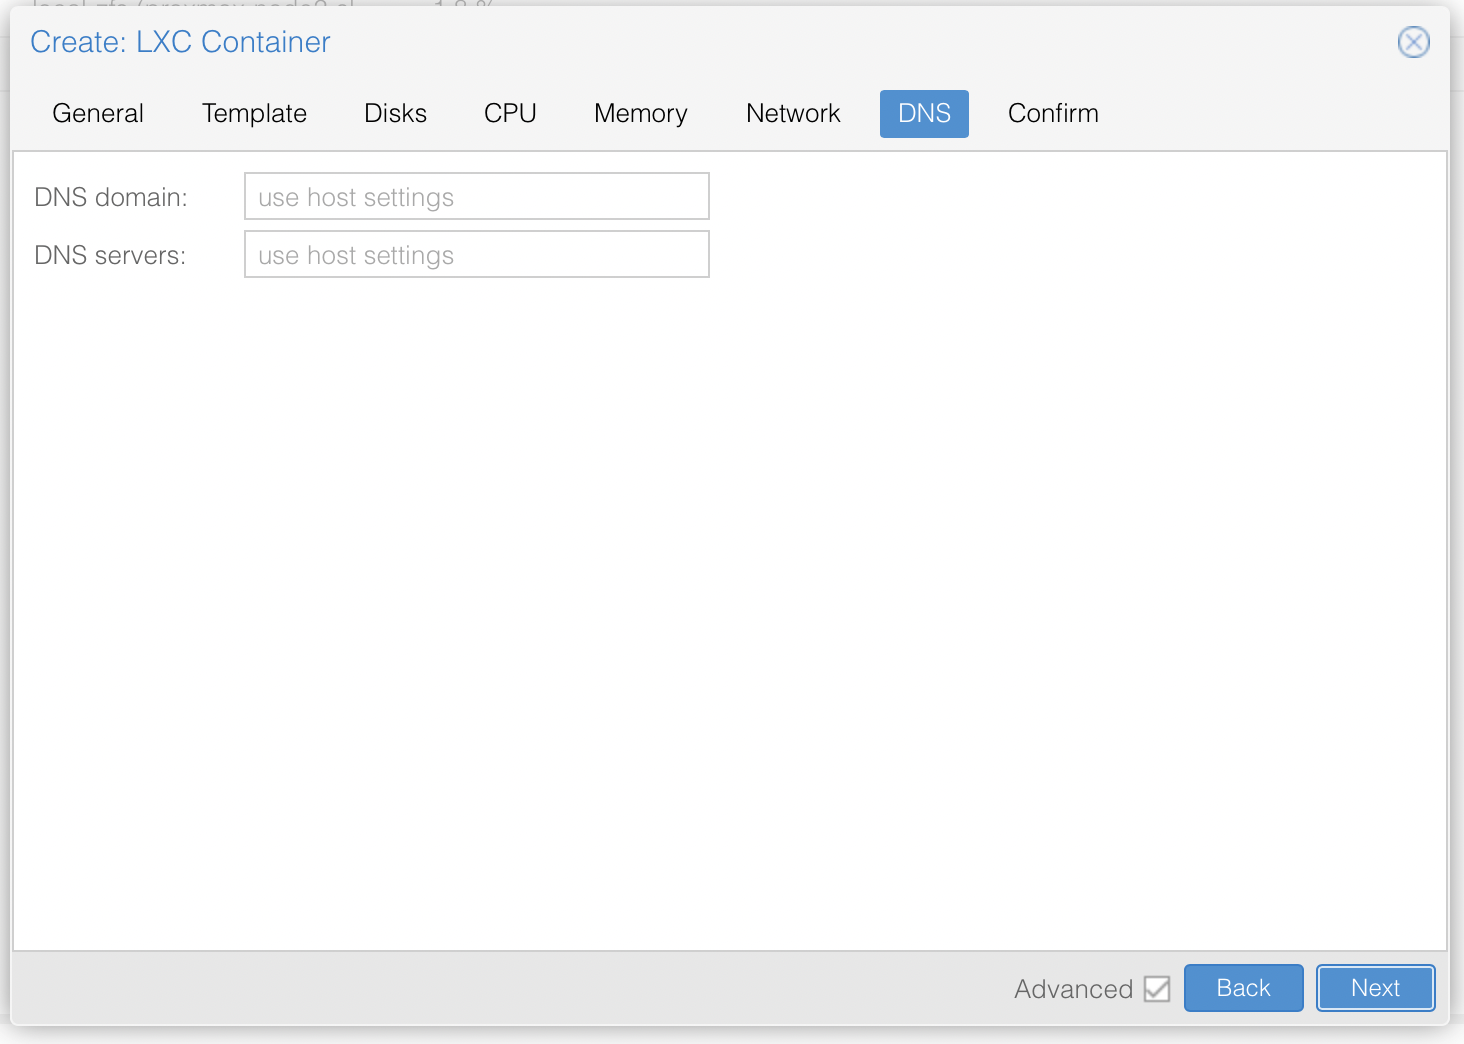
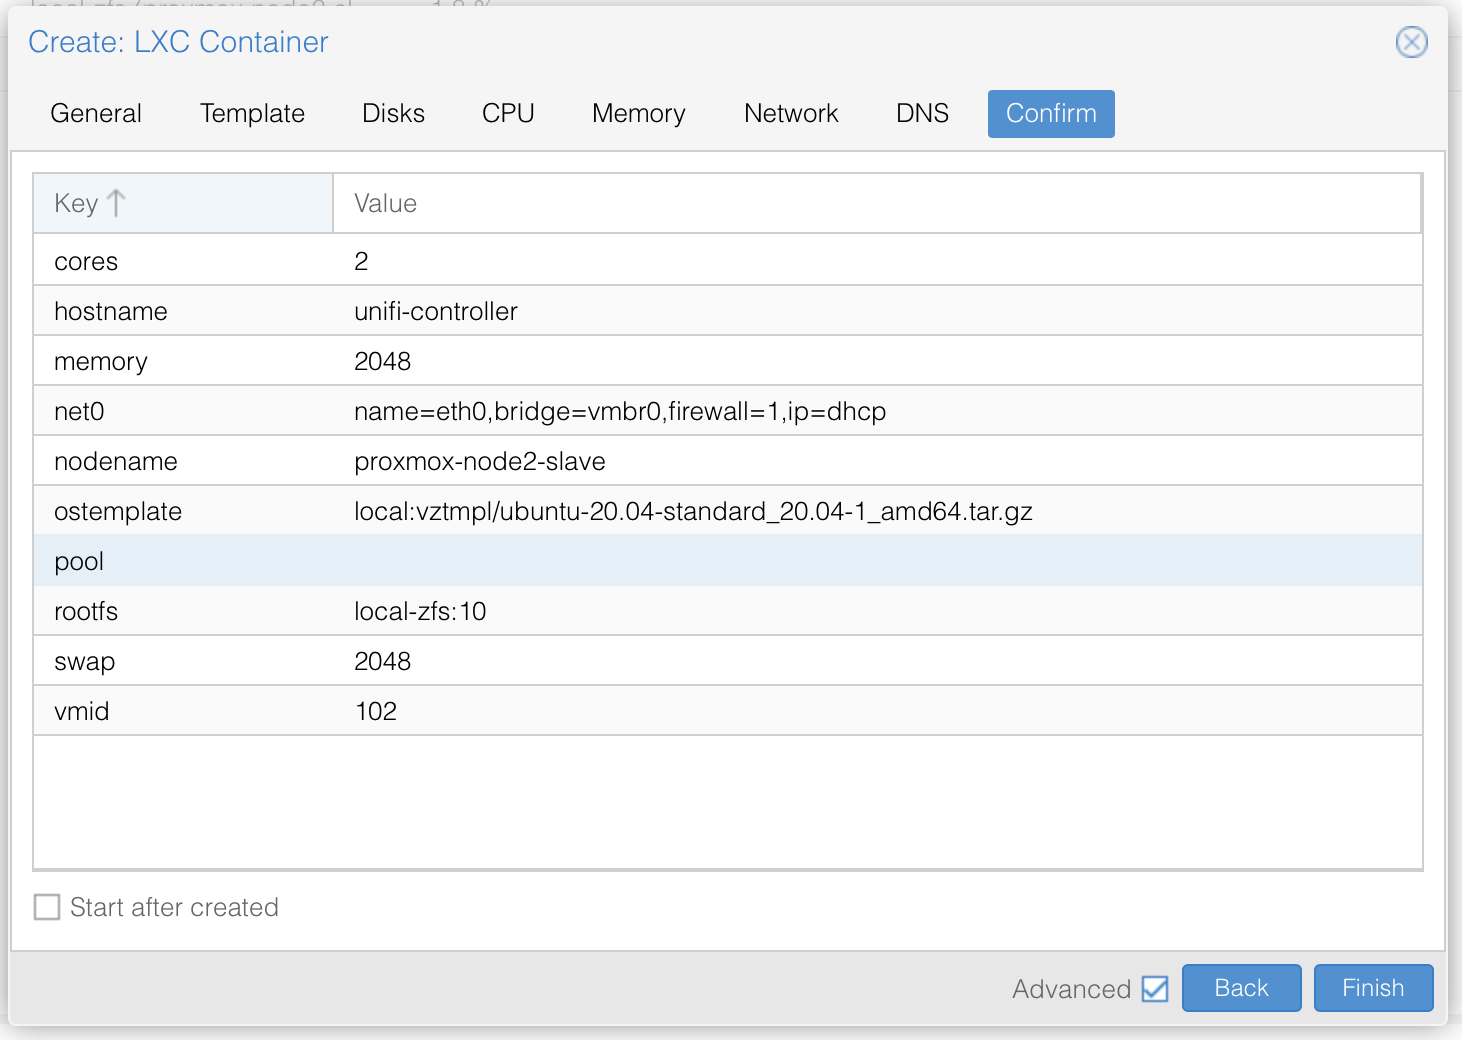
I am not deep diving into Proxmox, so I assume you already know your way around Proxmox, and therefore only share a series of screenshot examples of a LXC container setup (use your own appname and description text):
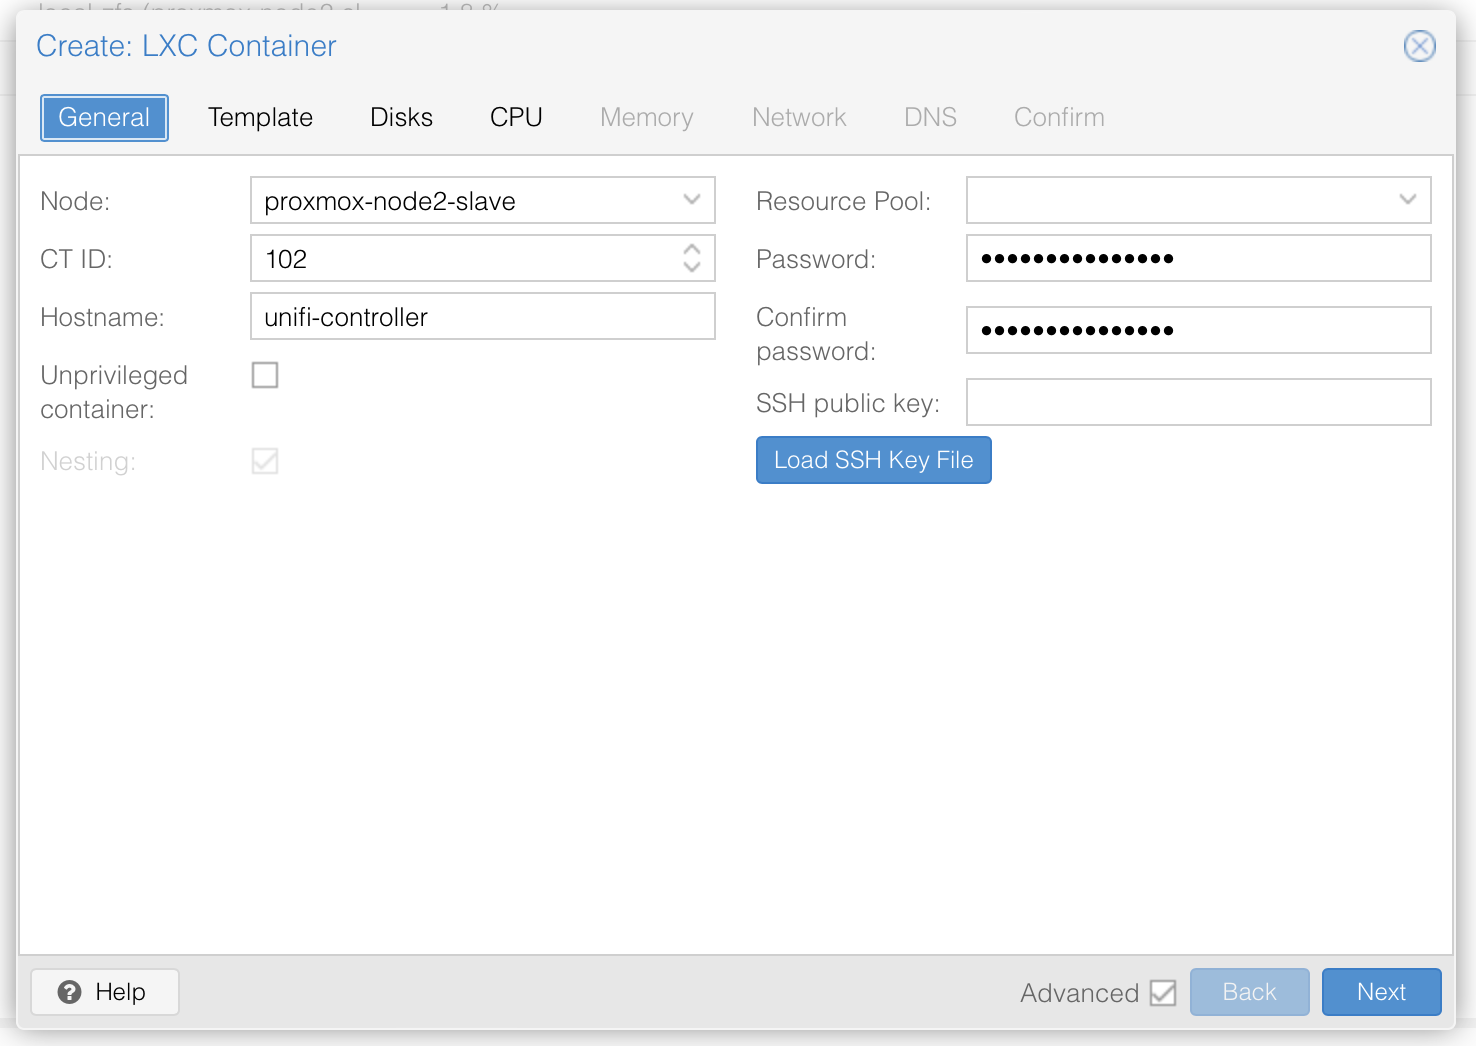


Once you have setup the LXC container with ubuntu 22.04 LTS, go ahead and start it up.
Update the lxc container to latest packages:
SSH into your container with the user root (default for LXC) and your previously set password in the Proxmox setup. (replace the IP with your own LXC container IP)
ssh [email protected]Now, before we start, we want to update our container with the latest available updates. Run:
apt update && apt upgrade -yOnce all upgrades are installed, reboot the container with:
reboot nowSecurity: create a new admin user
Once restarted, login back into the container using root and your previous set password. Next we want to disable root user and replace it with another not to obvious username.
adduser authyNow elevate that freshly created user to sudo privileges
usermod -aG sudo authyGreat your our new user authy is now able to use the sudo command to run things on root level.
Security: generate ssh keys for the new user
Next we create ssh keys for the new admin user:
ssh-keygen -b 4096That generates the ssh key pair and will ask you for the location. Keep the default which should be the root user location /root/.ssh/ and apply with enter. When asked for a passphrase for the ssh key, I would highly recommend you set one as the Authelia Server will be critical infrastructure.
Before we copy the keys to our new user authy we will need to find our given dhcp IP address. Inside the containers console enter:
ip address showIt will return something like this and shows your IP:
2: eth0@if15: <BROADCAST,MULTICAST,UP,LOWER_UP> mtu 1500 qdisc noqueue state UP group default qlen 1000
    link/ether 0a:30:45:31:5c:4f brd ff:ff:ff:ff:ff:ff link-netnsid 0
    inet 192.168.2.154/24 brd 192.168.2.255 scope global dynamic eth0
       valid_lft 85106sec preferred_lft 85106sec
    inet6 fe80::830:45ff:fe31:5c4f/64 scope link
       valid_lft forever preferred_lft forever
So in our case it is 192.168.2.154. Now with that info lets copy our keys to the new user:
ssh-copy-id [email protected]Choose yes when asked if you want to continue, and enter authy password when prompted. This command will copy the public key to the authy user ~/.ssh directory as an authorized_keys file. You can now use the private key to authenticate with this server as user authy.
Security: hardening ssh settings and set custom port
Now we will harden the ssh settings:
nano /etc/ssh/sshd_configFind the following parts, uncomment them if needed and set the below value:
Port 33
PermitRootLogin no
PasswordAuthentication no
StrictModes yes
MaxAuthTries 3
PubkeyAuthentication yes
AllowUsers authy
Exit and save the file with STRG + X and Enter to confirm. Now restart sshd service with:
systemctl restart sshdGreat, your changes on ssh are now applied and the service runs on the non default port 33. Remember: Don't use a custom port greater than 1024! Now we need to download our ssh private key file and save it in our favorite keychain. Output the private key with:
cat ~/.ssh/id_rsaPaste the key into a very secure location, like your keychain storage or your ssh client like putty or Termius.
If you are on Mac or Linux, you can for example save the key in your local users ~/.ssh directory. On your LOCAL TERMINAL run:
sudo nano ~/.ssh/id_rsa_authyCopy & Paste the private key you got just earlier from the output into the open text field. Save and exit the file with STRG + C and confirm with Enter.
Now you can logon from your local machines terminal using this command and the just stored key:
ssh -p 33 -i ~/.ssh/id_rsa_authy [email protected]It will ask you the first time to add the passphrase to your known hosts and then to enter your passphrase for the generated ssh key (if you set one). Congratulations you are now connecting with the new admin user, key based only, on a custom port.
As we are running a LXC container we need to make a small adjustment to make the lxc container use sshd service instead of ssh.socket file. So you can either adapt that (systemctl edit ssh.socket and add your port) or use ssh.service instead. We will use ssh.service instead:
For this enter first:
sudo systemctl disable ssh.socketthen:
sudo systemctl enable ssh.serviceGreat, your ssh.service is now ready and will survive restarts as well as normal.
Security: Disable root account
Before we disable root, you have to make sure your new authy user works and can use the sudo command. For that login with the above ssh command, and try to run a simple sudo command like:
sudo ls -l /It asks for your authy users password, and will then list your base filesystem right away. If thats the case, you are good to go!
To disable the root user (by expiring its password), enter now:
sudo passwd -l rootIf you ever want to re-enable the root user again, use this and set a very strong new root password:
sudo passwdSecurity: Enable the firewall
Now we will enable the ubuntu ufw firewall. We start by adding and allowing the ports we need for the Authelia server to run, and then disallow all other ports. We also add our custom ssh port, so we can still remote manage the system.
First we add our ssh port. This is the general, not so strict rule:
sudo ufw allow 33If you want to be more strict and secure, have a fixed IP address and only want to connect from this one IP location, please use this rule, which only allows you to ssh in from that specific IP:
sudo ufw allow from [YOUR IP ADDRESS] to any port 33Next we do the same for our needed Authelia server ports. Again, this is the general allow, if you want it stricter, use the below one:
sudo ufw allow 9091If you want to be more strict and secure, have a fixed IP address and only want to connect from this one IP location, please use this rule, which only allows you to ssh in from that specific IP:
sudo ufw allow from [YOUR IP ADDRESS] to any port 9091Next the NTP port for one-time password (OTP) time synchronization:
sudo ufw allow 123Now we are ready to enable the firewall. Check once again that you for sure added your previously set SSH port to the ruleset! Then enable the firewall with:
sudo ufw enableIf all went fine you should still keep your ssh connection and to check and see the status of the firewall run:
sudo ufw statusSecurity: Install fail2ban
fail2ban is a UNIX service (daemon) that automatically detects malicious behaviour and bans offenders by updating the firewall rules. Basically once fail2ban identifies a malicious user they can’t connect to the server at all, requests to connect go unanswered until the ban is lifted.
sudo apt install fail2ban -yOnce fail2ban installs you can check the service Status
sudo service fail2ban statusConfigure fail2ban
A full description of fail2ban configuration is beyond the scope of this article. However the main configuration file /etc/fail2ban/jail.conf which you should never edit directly. We’ll add some overrides in /etc/fail2ban/jail.local
sudo nano /etc/fail2ban/jail.local- I think the default ban time is too short, 8h should deter most people.
- Ignore any IP address that I own which do not change often (like my home IP address) and the server itself.
- Enable the jail for sshd.
 [DEFAULT]
 bantime = 8h
 ignoreip = 127.0.0.1/8 xxx.xxx.xxx.xxx
 ignoreself = true

 [sshd]
 enabled = true
Now restart the fail2ban service:
sudo service fail2ban restartGreat your fail2ban is running and protecting your user logins. Next we are ready to install Authelia and the mysql database!
Install Authelia
First we need to add authelias repository to our apt sources list. For that we need curl , gnupg and apt-transport-https to be installed:
sudo apt install curl gnupg apt-transport-https -yNow we download and add the authelia repository key with:
curl -s https://apt.authelia.com/organization/signing.asc | sudo apt-key add -And we add the authelia repo link to our apt sources lists:
echo "deb https://apt.authelia.com/stable/debian/debian/ all main" | sudo tee /etc/apt/sources.list.d/authelia-stable-debian.listBut as the key gets stored in the legacy trusted.gpg keyring, we need to move it to /usr/share/keyrings:
sudo apt-key listThis will create a list of keys, for example this:
Warning: apt-key is deprecated. Manage keyring files in trusted.gpg.d instead (see apt-key(8)).
/etc/apt/trusted.gpg
--------------------
pub   rsa4096 2021-05-06 [SCEA] [expires: 2031-05-04]
      7018 91B0 85F9 98B4 25F9  9382 0842 8AC4 C8E4 D80D

uid           [ unknown] Authelia hosted by Balto (Repository signing) <[email protected]>

/etc/apt/trusted.gpg.d/ubuntu-keyring-2012-cdimage.gpg
------------------------------------------------------
pub   rsa4096 2012-05-11 [SC]
      8439 38DF 228D 22F7 B374  2BC0 D94A A3F0 EFE2 1092
uid           [ unknown] Ubuntu CD Image Automatic Signing Key (2012) <[email protected]>
Important: Find the entry that say "Authelia" in the entry after uid. In my case its the first entry.
From here, we can export the key. Important: you have to take the last two blocks in the pub code, and combine it to 8 digits without a space. So in my case its "C8E4" and "D80D" that will be combined to "C8E4D80D"
sudo apt-key export C8E4D80D | sudo gpg --dearmour -o /usr/share/keyrings/authelia.gpgThe following message will likely appear:
Warning: apt-key is deprecated. Manage keyring files in trusted.gpg.d instead (see apt-key(8)).Now we can update our apt source file for the repository in /etc/apt/sources.list.d/authelia-stable-debian.list and add a signed-by tag:
sudo nano /etc/apt/sources.list.d/authelia-stable-debian.listMake sure to DELETE all contents of this file and then only copy & paste this one line in there:
deb [arch=amd64 signed-by=/usr/share/keyrings/authelia.gpg] https://apt.authelia.com/stable/debian/debian/ all mainSave and exit the file with STRG + X confirm with Yes and hit ENTER.
Now update the repositories with:
sudo apt updateThis should now update without any error.
Now, finally, we are ready to install Authelia! Run:
sudo apt install authelia -yConfigure Authelia
Before we can run Authelia, we need to create some folders and a fresh configuration file. To do so we run a couple of commands as superuser:
sudo suNo, as root, create the secret folders:
mkdir /etc/authelia/.secrets/
mkdir /etc/authelia/.users/
mkdir /etc/authelia/assets/
Next we need to generate our secrets and passwords for the Authelia config. In order to be secure and have long keys, we auto-generate 64 character long random keys and save them directly in a file in /etc/authelia/.secrets/. This way we don't need to remeber the passcodes and have them stored securly outside the config.
Create Authelia secrets
As you might not need all of the following keys and secrets, because you are not using all services, you can skip them. Just run the ones you need:
AUTHELIA_JWT_SECRET_FILE
tr -cd '[:alnum:]' < /dev/urandom | fold -w "64" | head -n 1 | tr -d '\n' > /etc/authelia/.secrets/jwtsecretAUTHELIA_SESSION_SECRET_FILE
tr -cd '[:alnum:]' < /dev/urandom | fold -w "64" | head -n 1 | tr -d '\n' > /etc/authelia/.secrets/sessionSTORAGE_ENCRYPTION_KEY
tr -cd '[:alnum:]' < /dev/urandom | fold -w "64" | head -n 1 | tr -d '\n' > /etc/authelia/.secrets/storageSTORAGE_MYSQL_PASSWORD
tr -dc 'A-Za-z0-9!#$%&*#' </dev/urandom | head -c 64 | tr -d '\n' > /etc/authelia/.secrets/mysqlImportant: The mysql password command is different. As we need the mysql password later to setup our database, it is important it is matching the requirements of also having special characters in there. Once generated read out and note the password somewhere save to use it later in this guide with:
cat /etc/authelia/.secrets/mysqlIf you already have a mysql server and want to use that, add its password in here with:
nano /etc/authelia/.secrets/mysqlAUTHELIA_NOTIFIER_SMTP_PASSWORD_FILE
tr -cd '[:alnum:]' < /dev/urandom | fold -w "64" | head -n 1 | tr -d '\n' > /etc/authelia/.secrets/smtpImportant: If you already have a smtp password, you need to write it in this file plaintext and replace any existing characters in there:
nano /etc/authelia/.secrets/smtpOr if you don't have a smtp provider yet, you may want to read out the previously generated password to use it in your smtp setup. For that just use:
cat /etc/authelia/.secrets/smtpAUTHELIA_IDENTITY_PROVIDERS_OIDC_HMAC_SECRET
tr -cd '[:alnum:]' < /dev/urandom | fold -w "64" | head -n 1 | tr -d '\n' > /etc/authelia/.secrets/oidcsecretAUTHELIA_IDENTITY_PROVIDERS_OIDC_ISSUER_PRIVATE_KEY_FILE
This generates the public and private key if you are going to use an OpenID Provider like cloudflare:
openssl genrsa -out /etc/authelia/.secrets/oicd.pem 4096openssl rsa -in /etc/authelia/.secrets/oicd.pem -outform PEM -pubout -out /etc/authelia/.secrets/oicd.pub.pemAUTHELIA_SESSION_REDIS_PASSWORD_FILE (optional)
tr -cd '[:alnum:]' < /dev/urandom | fold -w "64" | head -n 1 | tr -d '\n' > /etc/authelia/.secrets/redisCreate the environment variable mapping list file:
Next we need a file that lists all of your previously generated keyfiles and maps them to the Authelia ENV vars. You can find a list of all Authelia ENV vars here, if you need more.
Create a new secrets file with nano like this:
nano /etc/authelia/secretsAnd copy and paste the following list of mapped ENV vars into it. Please note, the unused ENV vars are deactivated with a # but for completion are part of the setup. Activate and deactivate whatever ENV vars you need:
### Authelia ENV vars mapping:
# basics:
AUTHELIA_JWT_SECRET_FILE=/etc/authelia/.secrets/jwtsecret
AUTHELIA_SESSION_SECRET_FILE=/etc/authelia/.secrets/session

# storage / mysql:
AUTHELIA_STORAGE_ENCRYPTION_KEY_FILE=/etc/authelia/.secrets/storage
AUTHELIA_STORAGE_MYSQL_PASSWORD_FILE=/etc/authelia/.secrets/mysql

# smtp notifications:
AUTHELIA_NOTIFIER_SMTP_PASSWORD_FILE=/etc/authelia/.secrets/smtp

# openid identity provider:
AUTHELIA_IDENTITY_PROVIDERS_OIDC_HMAC_SECRET_FILE=/etc/authelia/.secrets/oidcsecret
AUTHELIA_IDENTITY_PROVIDERS_OIDC_ISSUER_PRIVATE_KEY_FILE=/etc/authelia/.secrets/oicd.pem

# if you use LDAP for users
#AUTHELIA_AUTHENTICATION_BACKEND_LDAP_PASSWORD_FILE=/etc/authelia/.secrets/ldap

# if you user REDIS for session management (like kubernetes)
#AUTHELIA_SESSION_REDIS_PASSWORD_FILE=/etc/authelia/.secrets/redis

# if you user REDIS SENTINEL for high availability session management (like kubernetes)
#AUTHELIA_SESSION_REDIS_HIGH_AVAILABILITY_SENTINEL_PASSWORD_FILE=/etc/authelia/.secrets/redissentinel

# if you use DUO for push notification
#AUTHELIA_DUO_API_INTEGRATION_KEY_FILE=/etc/authelia/.secrets/duointkey
#AUTHELIA_DUO_API_SECRET_KEY_FILE=/etc/authelia/.secrets/duosecretkey

# if you use postgress
#AUTHELIA_STORAGE_POSTGRES_PASSWORD_FILE=/etc/authelia/.secrets/postgress
#AUTHELIA_STORAGE_POSTGRES_SSL_KEY_FILE=/etc/authelia/.secrets/postgresskey

# if you want to set extra TLS cert (default none) for using without a proxy like traefik
#AUTHELIA_SERVER_TLS_KEY_FILE=/etc/authelia/.secrets/tlskey.pem
Read more about Authelia secrets here: https://www.authelia.com/configuration/methods/secrets/
Now we need to set the right priviliges for the .secret folder and files with:
chmod 600 -R /etc/authelia/.secrets/
chmod 600 /etc/authelia/secrets
And exit the superuser mode with:
exitModify the systemd unit (.service) to use the ENV vars
In order to make Authelia use and run with our previously created ENV vars list, we need to modify its startup systemd script. For that open it with:
sudo nano /etc/systemd/system/authelia.serviceThis will open the already existing file which we need to modify so it looks exactly like this:
[Unit]
Description=Authelia authentication and authorization server
After=multi-user.target

[Service]
Environment=AUTHELIA_SERVER_DISABLE_HEALTHCHECK=true
EnvironmentFile=/etc/authelia/secrets
ExecStart=/usr/bin/authelia --config /etc/authelia/configuration.yml
SyslogIdentifier=authelia

[Install]
WantedBy=multi-user.target
Either you add the EnvironmentFile=/etc/authelia/secrets line or you just copy & paste that file over, up to you 😉
Great, save and exit the file with STRG + X , confirm with Y and hit enter. Now we just need to reload our serviced deamon to make the changes work:
sudo systemctl daemon-reloadCreate Authelia users
Next we create our login users. As in my case I am only using not more then three users, I will do the users in a very basic yml file based setup. If you want to do it via LDAP or AD check my optional LDAP configuration section here or check the official Authelia doc:
sudo nano /etc/authelia/.users/users_database.ymlCopy & paste this into that file:
###############################################################
#                         Users Database                      #
###############################################################

# This file can be used if you do not have an LDAP set up.

# List of users
users:
  admin:
    displayname: "Firstname Lastname"
### PASSWORD is an EXAMPLE and spells: "authelia"
    password: "$argon2id$v=19$m=65536,t=1,p=8$azlRYWI4RktCK0JQaWJVbg$fh+TDkULjzvGi6hb+5clAOGjJVjUbgxbm0/WiS+i308"
    email: [email protected]
    groups:
      - admins
      - dev
  bob:
    displayname: "Bob Dylan"
    password: "$argon2id$v=19$m=65536,t=3,p=2$BpLnfgDsc2WD8F2q$o/vzA4myCqZZ36bUGsDY//8mKUYNZZaR0t4MFFSs+iM"
    email: [email protected]
    groups:
      - dev
  james:
    displayname: "James Dean"
    password: "$argon2id$v=19$m=65536,t=3,p=2$BpLnfgDsc2WD8F2q$o/vzA4myCqZZ36bUGsDY//8mKUYNZZaR0t4MFFSs+iM"
    email: [email protected]
Before you save and exit, make sure to replace admin: with your disred username and generate your own argon2 password hash you enter there. In the above example the argon2hash is the password authelia.
You can gerneate your own hashed password with (replace password with your desirred passphrase):
authelia hash-password --salt abcdefghijklhijl -- 'password'This will return for example a hashed string like this:
Password hash: $argon2id$v=19$m=65536,t=3,p=4$YWJjZGVmZ2hpamtsaGlqbA$RH2OZwUNpAtVjVEFTRS+3WrBpPE0QDstSED4kehTAZUUse that for your own password and copy and paste it in the same manor as in the above user config example.
IMPORTANT: use a valid email address for your user, as this is the mail you will get reset links sent to.
You can read more about users in the yaml and passwords in the official Authelia doc:
Save and exit the file with STRG + X confirm with Yes and hit ENTER.
Lastly set the right priviliges for the .users folder and files with:
chmod 600 -R /etc/authelia/.users/Create your configuration.yml
First we create a backup of the default Authelia configuration.yml
sudo mv /etc/authelia/configuration.yml /etc/authelia/sample.configuration.ymlNext we open a blank fresh configuration.yml with:
sudo nano /etc/authelia/configuration.ymlAnd now you need to copy, EDIT and paste this config part to the file:
################################################################
#                   Authelia configuration                    #
###############################################################
theme: dark
default_redirection_url: https://auth.example.com/

server:
  host: 0.0.0.0
  port: 9091
  asset_path: /etc/authelia/assets/

log:
  level: debug
  file_path: /home/authy/authelia.log

totp:
  issuer: auth.example.com

webauthn:
  disable: false
  display_name: Authelia
  attestation_conveyance_preference: indirect
  user_verification: preferred
  timeout: 60s

ntp:
  address: "time.cloudflare.com:123"
  version: 4
  max_desync: 3s
  disable_startup_check: false

authentication_backend:
  file:
    path: /etc/authelia/.users/users_database.yml
    password:
      algorithm: argon2id
      iterations: 1
      key_length: 32
      salt_length: 16
      memory: 1024
      parallelism: 8

access_control:
  default_policy: two_factor #or deny
  rules: ### OPTIONAL SETTING
    # no auth
    - domain: magicmirror.local.example.com
      policy: bypass
    # one factor
    - domain: services.local.example.com
      policy: one_factor
    # 2fa
    - domain: server.example.com
      policy: two_factor

session:
  name: authelia_session
  expiration: 3600  # 1 hour
  inactivity: 300  # 5 minutes
  domain: auth.example.com
  same_site: lax
  remember_me_duration: 7d

regulation:
  max_retries: 3
  find_time: 120
  ban_time: 300

storage:
  mysql:
    host: 127.0.0.1
    port: 3306
    database: authelia
    username: authy

notifier: ### OPTIONAL SETTING
  disable_startup_check: false
  smtp:
    host: smtp.domain.com
    port: 465
    timeout: 5s
    username: [email protected]
    sender: "Authentication Service <[email protected]>"
    subject: "{title}"
    startup_check_address: [email protected]
    disable_require_tls: false
    disable_html_emails: false
    tls:
      skip_verify: false
      minimum_version: TLS1.2

identity_providers: ### OPTIONAL SETTING
  oidc:
    access_token_lifespan: 1h
    authorize_code_lifespan: 1m
    id_token_lifespan: 1h
    refresh_token_lifespan: 90m
    enable_client_debug_messages: false
    enforce_pkce: public_clients_only
    cors:
      endpoints:
        - authorization
        - token
        - revocation
        - introspection
      allowed_origins:
        - "*"
      allowed_origins_from_client_redirect_uris: false
    clients:
      - id: cloudflare
        description: Cloudflare ZeroTrust
        secret: YOURCLOUDFLAREZEROTRUSTSECRETHERE
        public: false
        authorization_policy: two_factor
        pre_configured_consent_duration: '365d'
        redirect_uris:
          - https://YOURNAME.cloudflareaccess.com/cdn-cgi/access/callback
        scopes:
          - openid
          - profile
          - email
        userinfo_signing_algorithm: none
Save and exit the file with STRG + X confirm with Yes and hit ENTER.
Lastly we should also set secure access rights to our configuration file:
sudo chmod 600 /etc/authelia/configuration.ymlBefore we can finally run Authelia, we need to install and setup a mysql database first.
Optional: configure LDAP as authelia user source
If you want to use user authentication via an LDAP server instead of the file based user setup above, you need to use the below config for authentication_backend: instead of the file based above one.
Please make sure to replace all variables like IP, bind_dn and base_dn or your authelia group dn.
Important: In my example below, I am using a user_filter that is only allowing users from a ldap group called "authelia". So if you want that too, you need to create or rename your ldap access group. If not, you need to delete that part from the user_filter.
There is also an alternative user_filter and username_attribute in case you want to switch to have the email address as the authelia login credential.
Important: the user_filter I use, are designed for a Synology LDAP Server. These my need adjustment if you use a different LDAP server!
authentication_backend:
  ldap:
    implementation: custom
    url: ldaps://IP-OF-YOUR-LDAP-SERVER-FOR-ME-SYNOLOGY-IP
    timeout: 5s
    start_tls: false
    tls:
      server_name: server.domain.com
      skip_verify: false
      minimum_version: TLS1.2
    base_dn: dc=server,dc=domain,dc=com

    ### IF USING Username to LOGIN
    users_filter: (&({username_attribute}={input})(objectClass=person)(memberOf=cn=authelia,cn=groups,dc=server,dc=domain,dc=com))
    username_attribute: uid
    ### IF USING MAILADRESS to LOGIN exchange below with the above 2 lines
    #users_filter: (&({username_attribute}={input})(objectClass=person)(memberOf=cn=authelia,cn=groups,dc=server,dc=domain,dc=com))
    #username_attribute: mail

    mail_attribute: mail
    display_name_attribute: displayName
    groups_filter: (&(member={dn})(objectClass=posixGroup))
    group_name_attribute: cn
    permit_referrals: true
    permit_unauthenticated_bind: false
    ### the user that can read or write on the ldap/ad and the password is stored in the ldap secret
    user: uid=root,cn=users,dc=server,dc=domain,dc=com
Install mysql database
Make sure we are using the latest repository:
sudo apt updateInstall the mysql server package:
sudo apt install mysql-server -yEnsure that the server is running using the systemctl start command:
sudo systemctl start mysql.serviceThen, check the status of the mysqlservice:
sudo systemctl is-active mysqlGreat, next we need to configure the mqsql database. Because of a setup bug we cannot just launch the mysql_secure_installation command, as it will fail to set the root password. Therefore we need to prepare our SQL database first to set a new root password.
Important: we use the previously generated secret mysql password from our secret file. So if you did not note it down already, get it now again and save it to use it in the following steps:
sudo cat /etc/authelia/.secrets/mysqlNow type into your shell:
sudo mysqlThis will log you into the mqsql console.
Now we set our own mqsql root password. Make sure that you choose a very strong one. The minimum requirments on default are minimum 1x special char, minimum 1x case sensitive letter, minimum 1x number. Replace the example in the command below "Mynewpassword#13":
ALTER USER 'root'@'localhost' IDENTIFIED WITH mysql_native_password by 'Mynewpassword#13';Error hint:
If you get a Error saying ERROR 1819 (HY000): Your password does not satisfy the current policy requirements you need to check the password security level. Enter this command in the mysql cli to query the current security level:
SHOW VARIABLES LIKE 'validate_password%';You can manually set the desired policy options, for example:
SET GLOBAL validate_password.length = 6;
SET GLOBAL validate_password.number_count = 0;
or
SET GLOBAL validate_password.policy = LOW;Now after you have set your password sucessfully exit the mysql cli:
exitNow lets setup the remaining parts of mysql with:
sudo mysql_secure_installationIt will ask for your mysql root password, which is the one you just defined in the step before.
Now the setup weill ask you the following questions which we answer as followed:
Change the password for root ? ((Press y|Y for Yes, any other key for No) : No

Remove anonymous users? (Press y|Y for Yes, any other key for No) : Yes

Disallow root login remotely? (Press y|Y for Yes, any other key for No) : No

Remove test database and access to it? (Press y|Y for Yes, any other key for No) : Yes

Reload privilege tables now? (Press y|Y for Yes, any other key for No) : Yes
Awesome! Now we just need to create our working authelia database. Login to mysql again with our new mysql root password:
sudo mysql -u root -pand create the new authelia database:
CREATE DATABASE authelia;Next we are going to create a new mysql user to avoid using root user and grant the new user priviliges for the new database authelia. Here we use our previously generated and noted password! :
CREATE USER 'authy'@'localhost' IDENTIFIED BY 'Mynewpassword#13';And grant the priviliges:
GRANT ALL PRIVILEGES ON * . * TO 'authy'@'localhost';Now make the changes active by flushing priviliges:
FLUSH PRIVILEGES;Great, lastly test the new user priviliges with:
SHOW GRANTS FOR 'authy'@'localhost';And exit the mysql cli:
exitBefore we install authelia now, we are testing the mysql connection from the "outside" with our new user authyto the new database authelia:
mysql -u authy -h localhost -p autheliaStartup Authelia
Finally, you made it! Its now time to start and run Authelia. Simply enter:
sudo systemctl restart autheliaIn order to debug or if issues encounter, please use these two points to validate and check the error messages from Authelia:
1. The systemd status:
sudo systemctl status authelia2. The Authelia debug log:
sudo nano /home/authy/authelia.logOptional: set your own Authelia assets
You can slightly modify the authelia look. So besides the configuration.yml option of theme you can copy two files to /etc/authelia/assets/ that will be used instead of the default ones:
- favicon.ico
- logo.png
Copy your favorite icon and logo with the EXACT from above to this folder and authelia will use it after a restart:
sudo systemctl restart autheliaSetup Cloudflare Tunnel and Zero Trust with OpenID
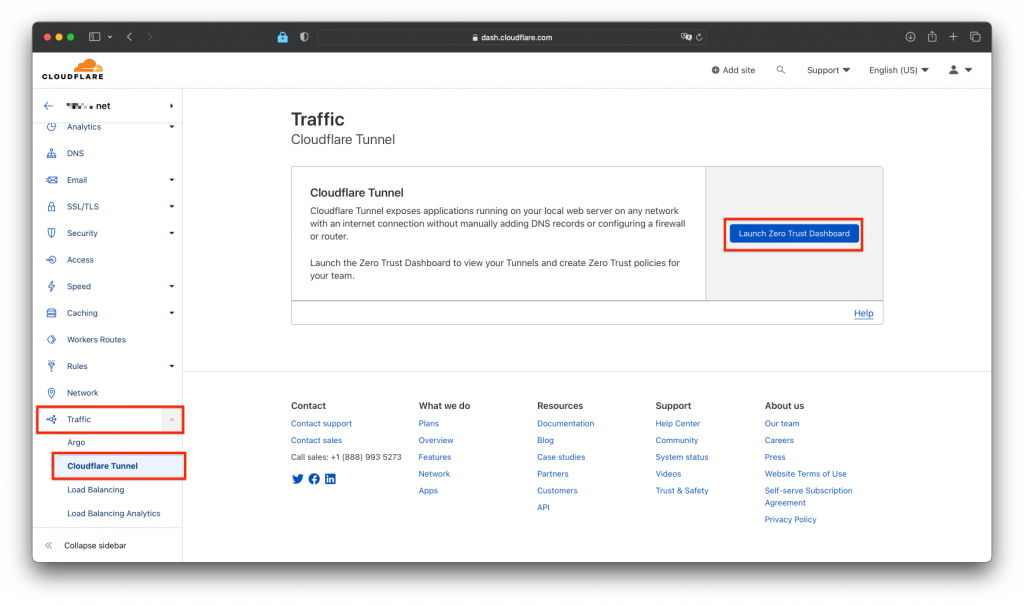
Assuming you already have and manage your domain over Cloudflare. Login into your cloudflare dashboard and go to the Zero Trust Dashboard like in the screenshot:
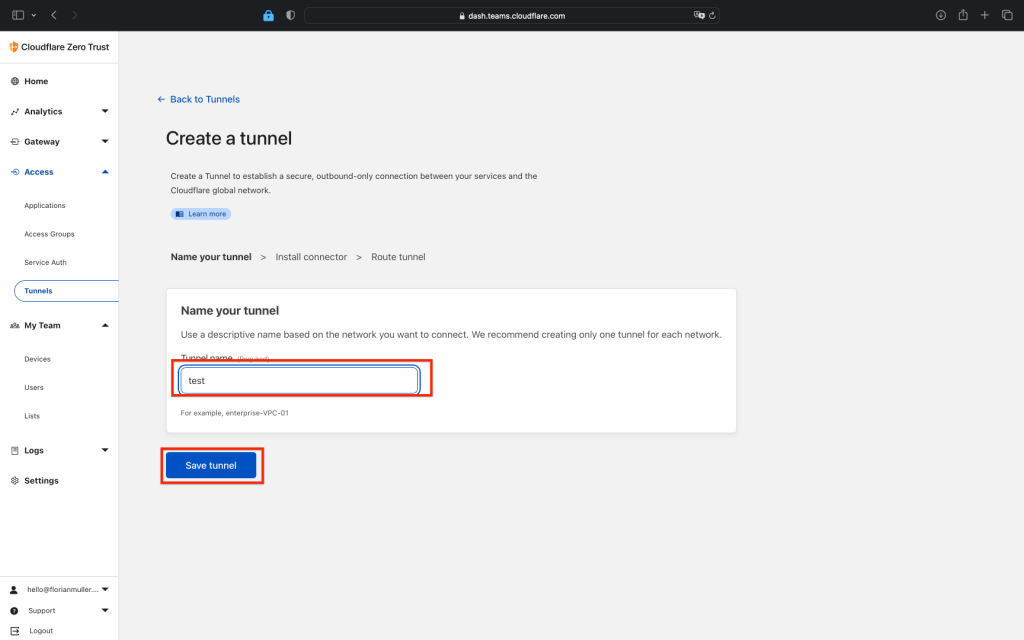
Create a new tunnel
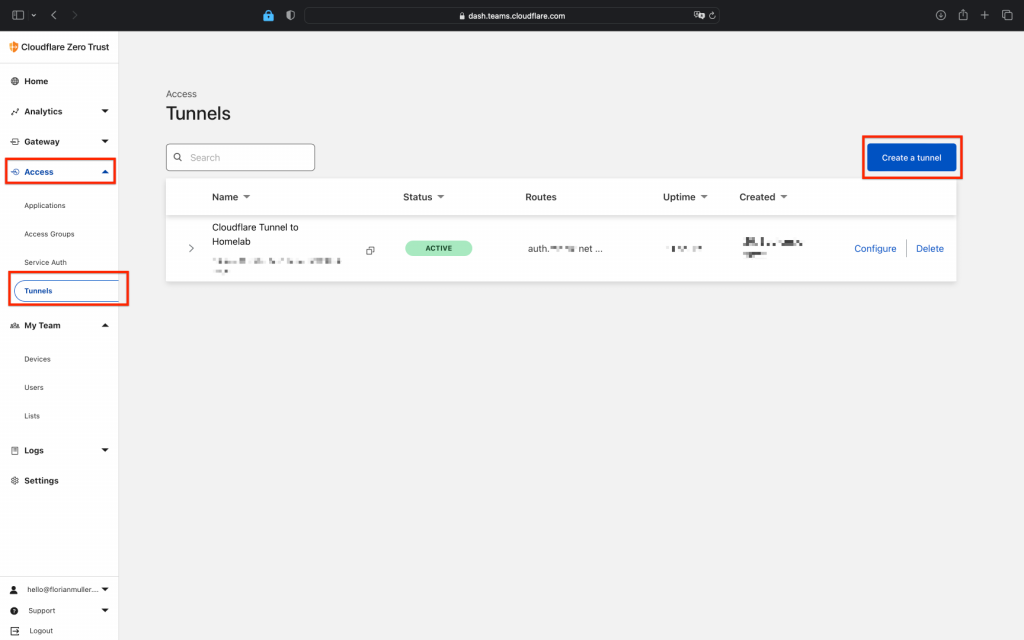
Once you are in the Zero Trust Dashboard, we create a Tunnel by clicking on "Access" -> "Tunnels" -> "Create new" (view screenshot):
Next enter your wished tunnel name (whatever you like) and then hit "Next":
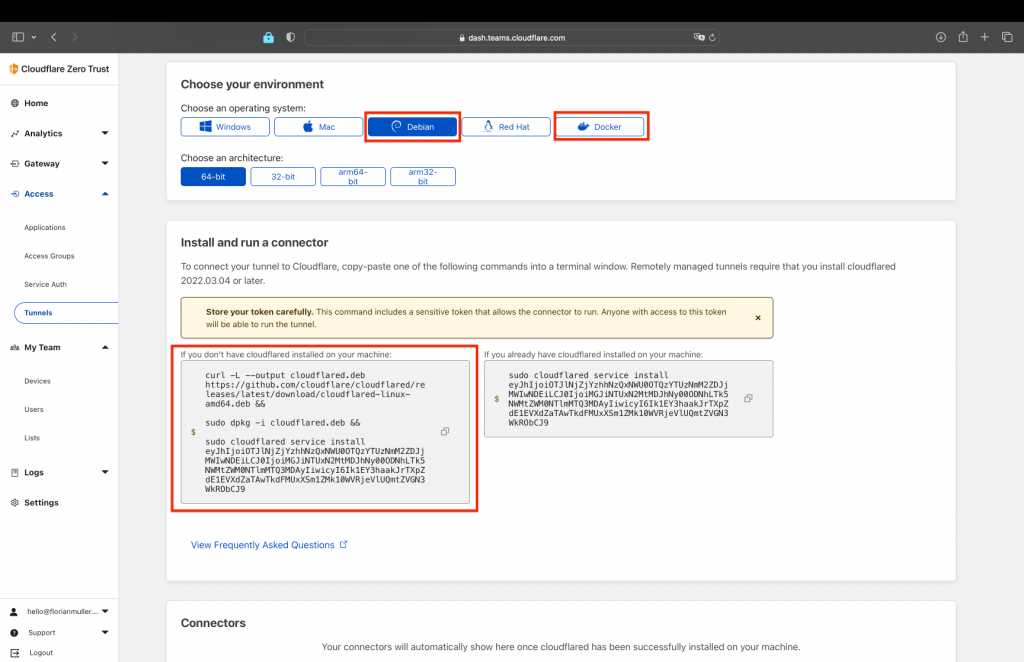
Now, in this step choose the OS environment you want the tunnel to run in, I recommend either Docker if you have that running already, or on a Ubuntu Server the debian code. Select your preference and then copy and paste the displayed code to run on your system.
After that click next and now we can setup a "reverse proxy target" to our local Authelia installation....its that simple 😉 For that choose your desired subdomain name (don't take one that you already configured in your DNS settings, must be fresh) and select your desired domain. In my case I choose "auth.example.com". Then select http and enter as our authelia app target 192.168.2.154:9091 (your IP may vary):
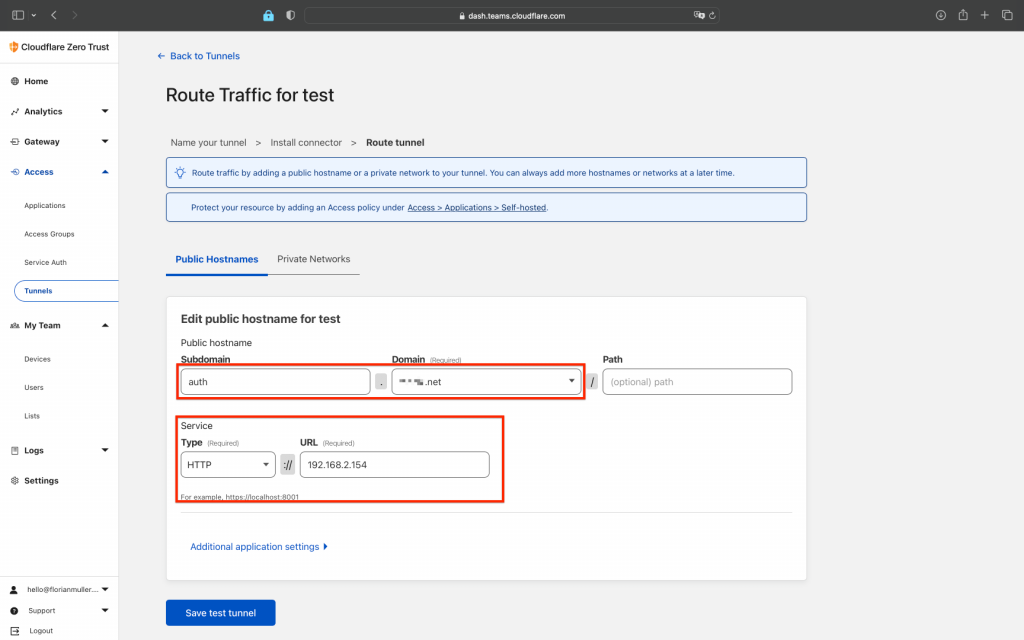
Press save and your tunnel is now setup and is running with a direct link to our authelia installation over "auth.example.com".
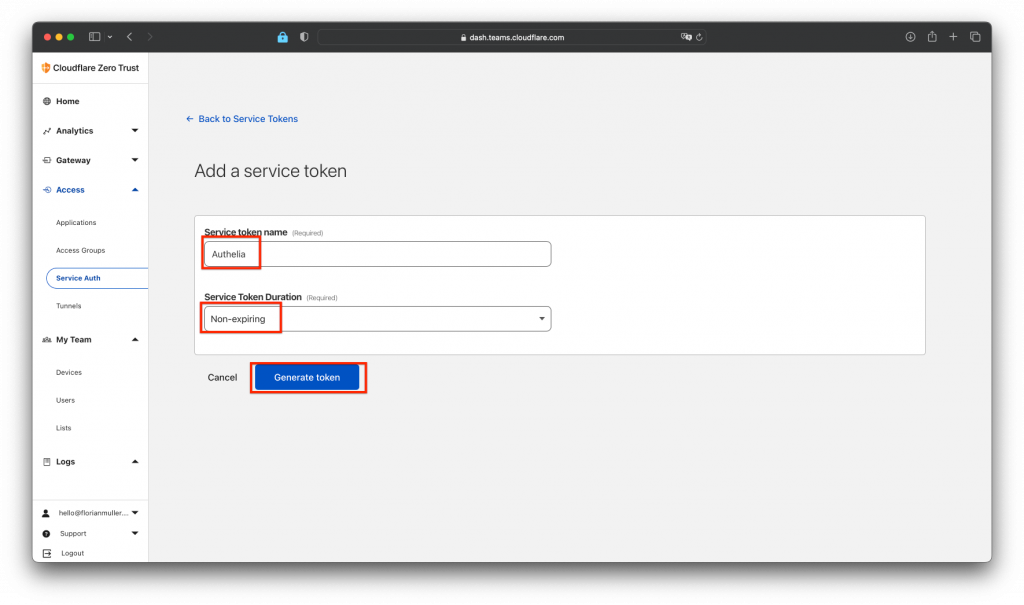
Generate application service token
Now we need to generate our zero trust clientid and token to use with openid connect later. For this create a new application under "Access" -> "Service Auth" -> "Create new token"
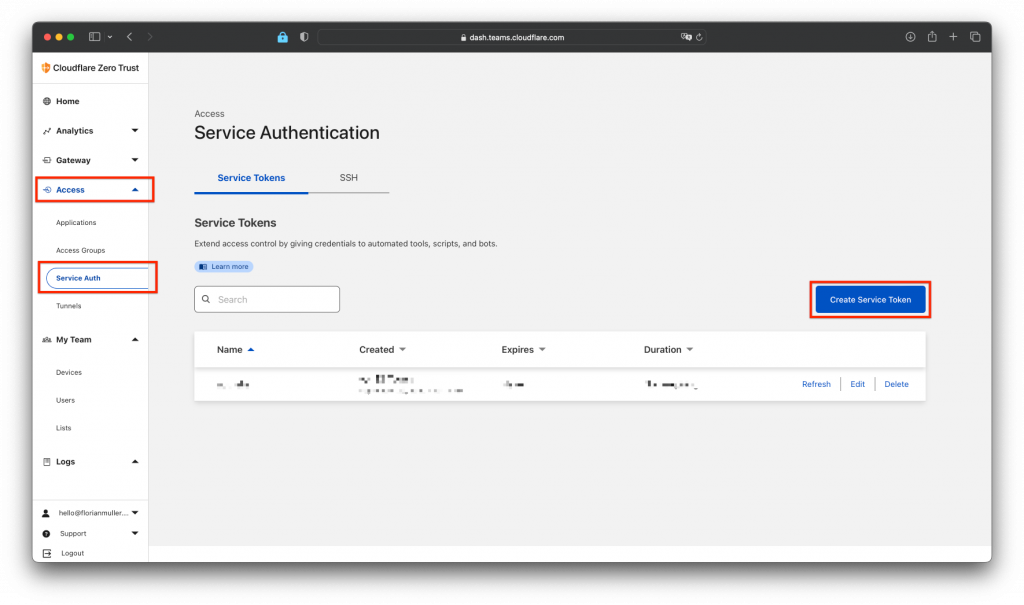
In the creation menu enter your desired token name e.g. "authelia" , select your token duration, I choose "no expire" and hit "Generate token":
This will show you the following screen, where you can now see your ID and token. Important: copy and paste both to a save file now, as you will not be able to see them again!
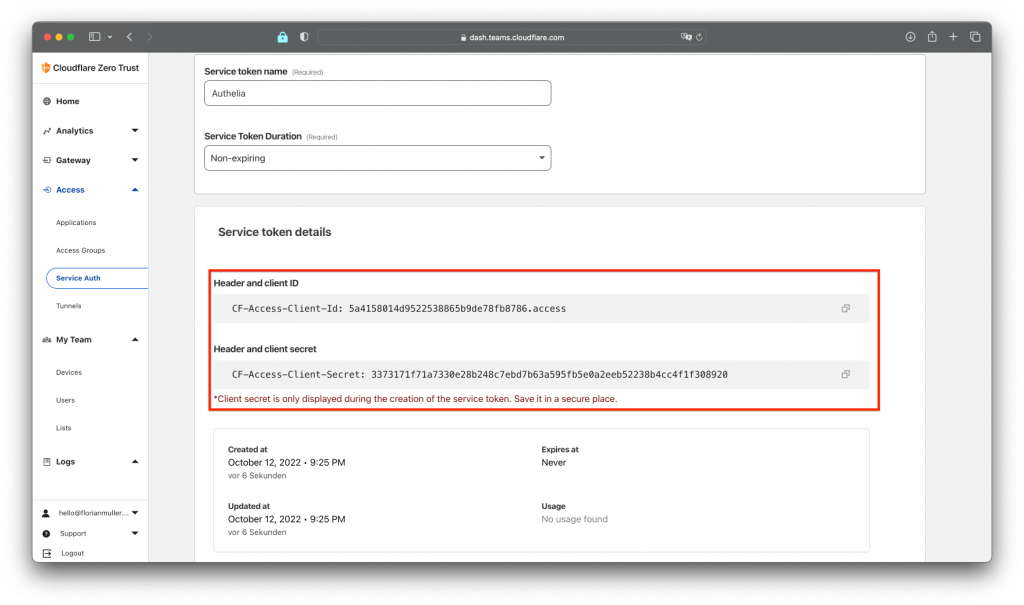
With this newly generated client_secret, we are now going to create our OpenID connection.
Setup OpenID credentials with your tunnel
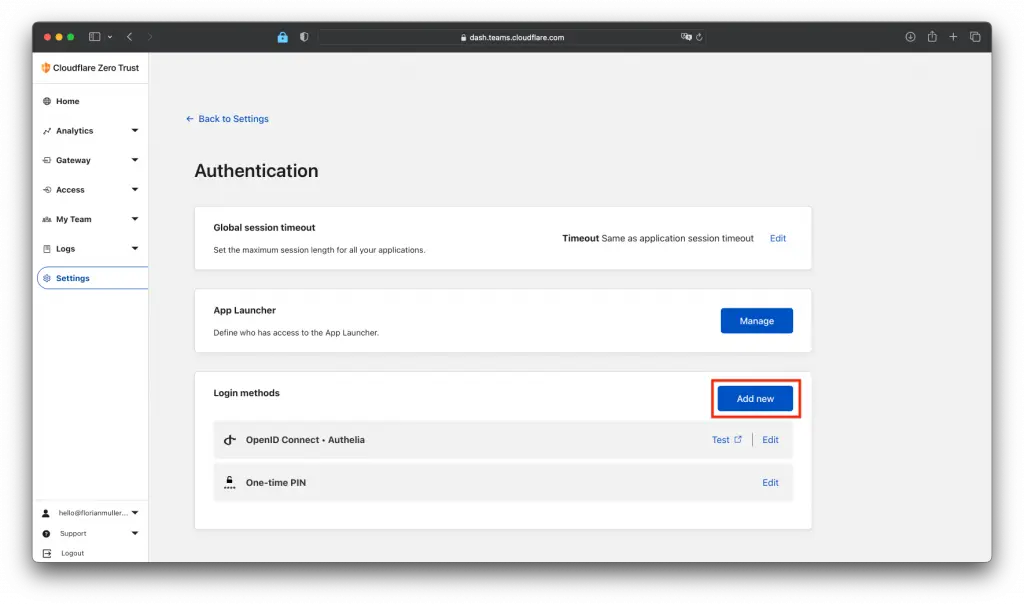
Next we want to use OpenID together with our Cloudflare Tunnel and the Authelia installation. For that we go in our Cloudflare Zero Trust dashboard to "Settings" -> "Authentication" (view screen below):

In there we click on "Add new" under "Login methods":
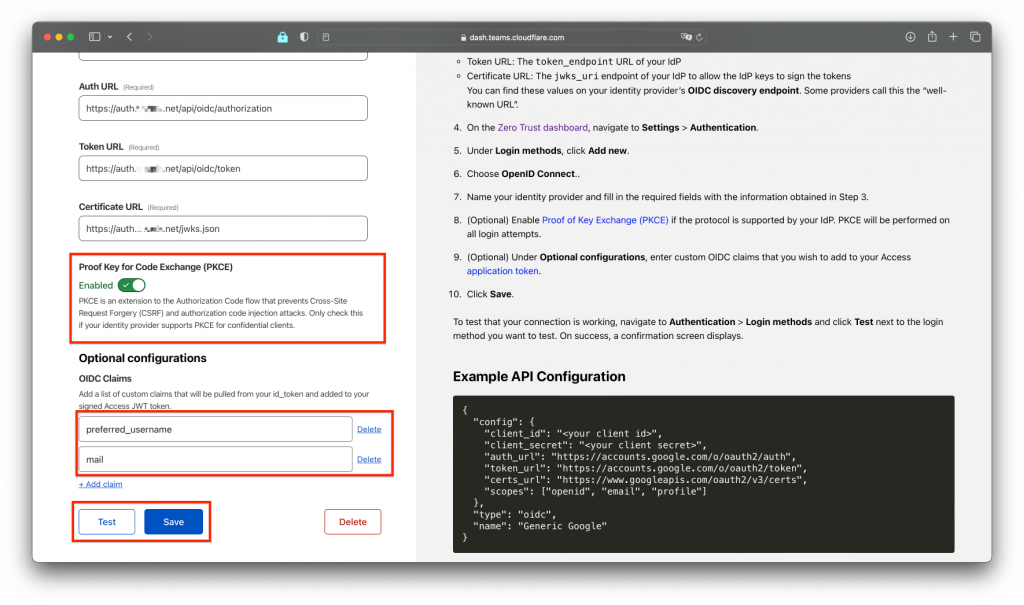
Now you need to fill in the reuqired fields in the form. Use your previously created client_secret and follow the instructions on the right:
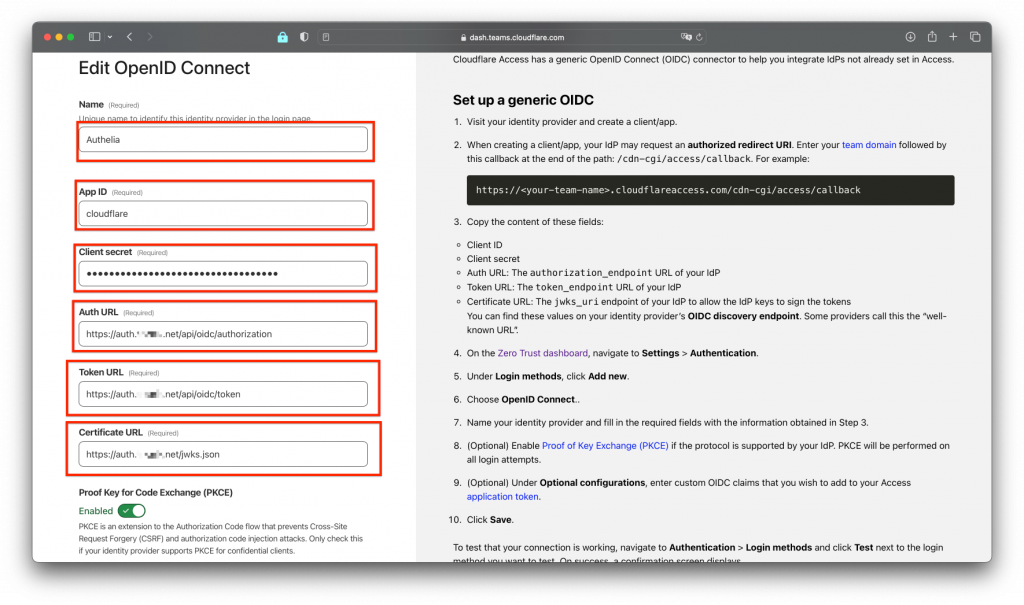
Also enable Proof key and set the other settings like in the screen. Then hit "Test" and "Save" to test and save your settings:
Congratulations! You can now enter and use the OpenID informations to enter within your Authelia configuration.yml file. Edit the part from the identity_providers: section in your configuration.yml like the snippet below:
    clients:
      - id: cloudflare
        description: Cloudflare ZeroTrust
        secret: YOURCLOUDFLAREZEROTRUSTSECRETHERE
        public: false
        authorization_policy: two_factor
        pre_configured_consent_duration: '365d'
        redirect_uris:
          - https://YOURNAME.cloudflareaccess.com/cdn-cgi/access/callback
        scopes:
Generate OpenID issuer private key
If you already did generate a private and a public pem key in the setup secrets step of this guide, you can skip this. If not, please go there and generate and activate the AUTHELIA_IDENTITY_PROVIDERS_OIDC_HMAC_SECRET and AUTHELIA_IDENTITY_PROVIDERS_OIDC_ISSUER_PRIVATE_KEY_FILE secrets.
Great! Now you have everything needed to finish your Authelia configuration.yml file. Once you have entered all info make sure to restart authelia service and check the /home/authy/authelia.log file to find issues:
sudo systemctl restart authelia

sudo nano /home/authy/authelia.log
Happy authenticating! 🙂