Its very important to keep the order of this guide and not add and setup things prior or later, as this will create errors. Also I tried to keep it as detailed as possible, therefore it is going to be a fairly long article. Use this index to quickly jump to the area you need:
- Preparations
- Prepare the BIOS and Proxmox sysctl-proxmox-tune.conf
2.1 Create sysctl-proxmox-tune.conf
2.2 Prepare the ROMED8-2t BIOS
2.2.1 SVM Mode
2.2.2 Onboard/Ext VGA Select
2.2.3 IOMMU, ACS & PCIe ARI
2.2.4 Global C-State Control
2.2.5 OPTIONAL: AER errors - Create the VM
- Install Windows 10 Pro
4.1 Install missing drivers
4.2 Install guest os driver
4.3 Enable RDP - Prepare the VM config for PCIe GPU
5.1 Remove all mounted IDE devices (ISO mounts)
5.2 Add IOMMU support to grub bootloader
5.3 Add required kernel modules
5.4 Test interupts and IOMMU isolation
5.5 Find GPU ID and pass it to vfio modprobe
5.6 Create driver blacklists
5.7 Edit and finalize your vm.conf
1. Preparations
First thing we want to do is create a fresh VM install in Proxmox for Windows 10 Pro. I recommend the Pro version, as we want to use and have RDP (Remote Desktop) in the OS. Best to download the Windows ISO from Microsoft here.
We also need a second ISO for drivers, which is the virtIO iso from the Fedora Project. We need this ISO to load drivers to even be able to install Win10. Download it here and just select the latest folder version and download the file "virtio-win-0-1-XXX.iso". Should be around 477 MB.
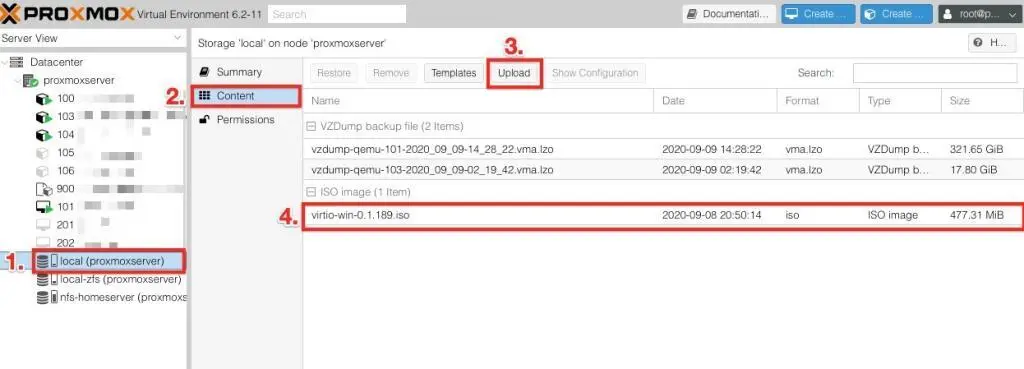
Once you have downloaded these two ISOs, we have to upload them to our Proxmox storage. For this login to your webinterface and than select the storage you want to upload it to (step 1 in screenshot). In my example we choose local storage. When you click on it a new window opens in the middle where you have three section. Choose "content" (step 2 in screenshot) and then hit the upload button (step 3 in screenshot). There select you iso and make sure the content is set to "ISO image". Then hit upload and wait until its done. If all went well, you can see you uploaded ISO in the overview of the storage (step 4 in screenshot).
Great, now we have all source files we need to start the VM install process. Next is BIOS and proxmox config preparations.
2. Prepare the BIOS and Proxmox sysctl-proxmox-tune.conf
2.1 Create sysctl-proxmox-tune.conf
Be AWARE this is a very sensitive area...things can get you very quickly to the point of messing up your system and you need to start from scratch again. I highly recommend to read through these two posts first, as they give a very good overview of what you are about to do:
- Level1Tech by wendell: https://forum.level1techs.com/t/how-to-get-the-most-out-of-your-new-gigabyte-epyc-server/151602
- Very good explained and commented proxmox sysctl-proxmox-tune.conf: https://gist.github.com/sergey-dryabzhinsky/bcc1a15cb7d06f3d4606823fcc834824
Don't just copy and paste from the above articles! Read the inline statements, understand and just take over to your config what you want and need to have!
Now ssh into your proxmox server (or master node) and create your own sysctl-proxmox-tune.conf with:
nano /etc/sysctl.d/sysctl-proxmox-tune.confI used this bar minimum setup for my GPU passthrough VM:
# https://tweaked.io/guide/kernel/
# Don't migrate processes between CPU cores too often
kernel.sched_migration_cost_ns = 5000000
# Kernel >= 2.6.38 (ie Proxmox 4+)
kernel.sched_autogroup_enabled = 0

### NETWORK ###
# max # connections
net.core.somaxconn = 512000
net.ipv6.conf.all.disable_ipv6 = 1


### MEMORY ###
# try not to swap
vm.swappiness = 1

# https://major.io/2008/12/03/reducing-inode-and-dentry-caches-to-keep-oom-killer-at-bay/
vm.vfs_cache_pressure = 10000

# allow application request allocation of virtual memory
# more than real RAM size (or OpenVZ/LXC limits)
vm.overcommit_memory = 1

# time in  centi-sec. i.e. 100 points = 1 second
# delayed write of dirty data
vm.dirty_writeback_centisecs = 3000
# flush from memory old dirty data
vm.dirty_expire_centisecs = 18000

##
# Adjust vfs cache
# https://lonesysadmin.net/2013/12/22/better-linux-disk-caching-performance-vm-dirty_ratio/
# Decriase dirty cache to faster flush on disk
vm.dirty_background_ratio = 5
vm.dirty_ratio = 10
If you don't have a sysctl-proxmox-tune.conf yet, you can just run with the above example and copy and paste. Especially the settings under "Memory" are needed to avoid problems with virtual machines with more than 16GB Ram.
No save and exit your sysctl-proxmox-tune.conf with STRG+X and confirm with Y. Then reboot your proxmox server and ensure everything is still running as expected:
reboot now2.2 Prepare the ROMED8-2t BIOS
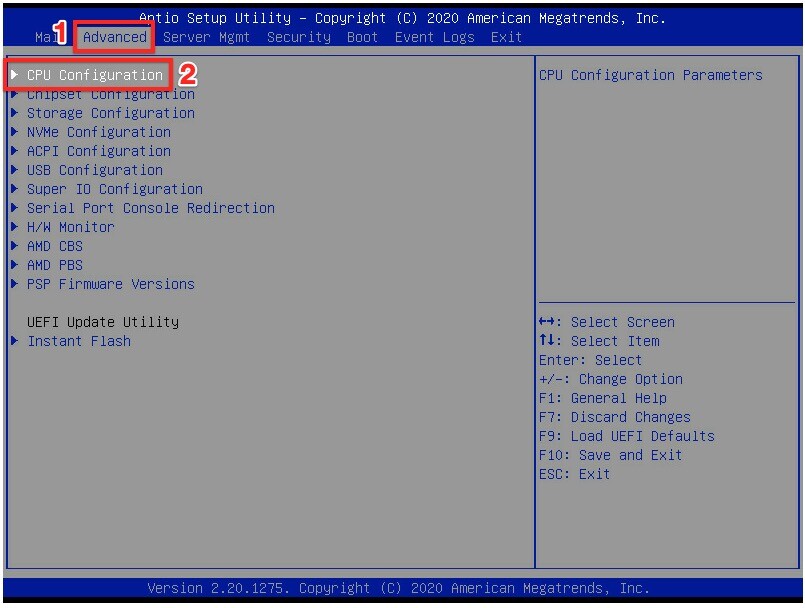
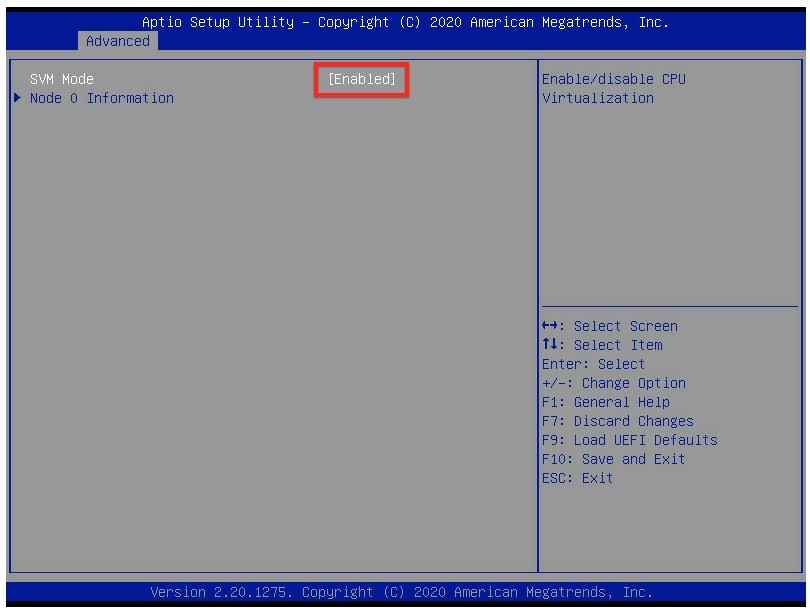
After you ensured your system is running stable with the previous created sysctl-proxmox-tune.conf, restart your whole system and enter the BIOS with "DEL" on boot. In our case we do this over the very nice IPMI interfaces of ASROCK Rack on the ROMED8-2t mainboard.
2.2.1 SVM Mode
In the BIOS go to "Advanced" -> "CPU Configuration" and ensure SVM Mode (CPU virtualization) is set to "ENABLE" (screen 2 below).
2.2.2 Onboard/Ext VGA Select
Next go to "Advanced" -> "Chipset Configuration": Here its very important for GPU passthrough to ensure "Onboard/Ext VGA Select" is set to "Onboard", so the PCIe GPUs are kept free from the system for passthrough. (see screen below)

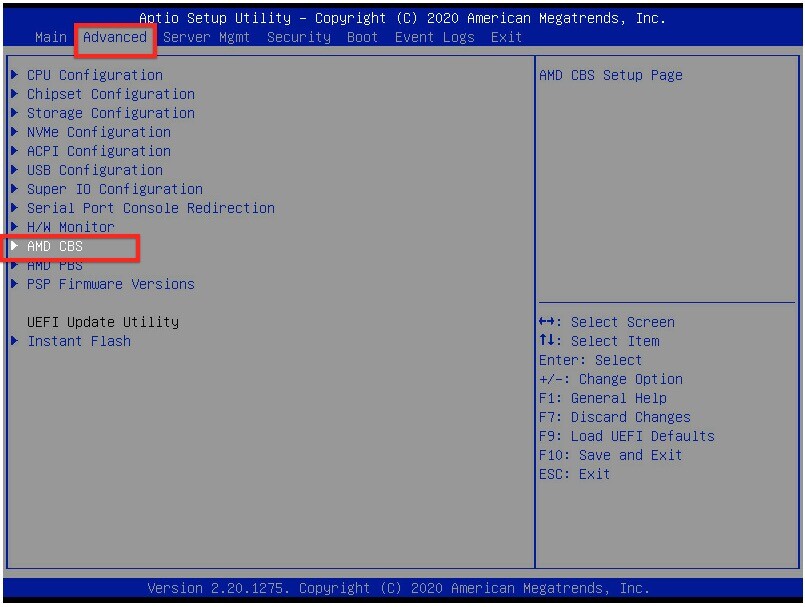
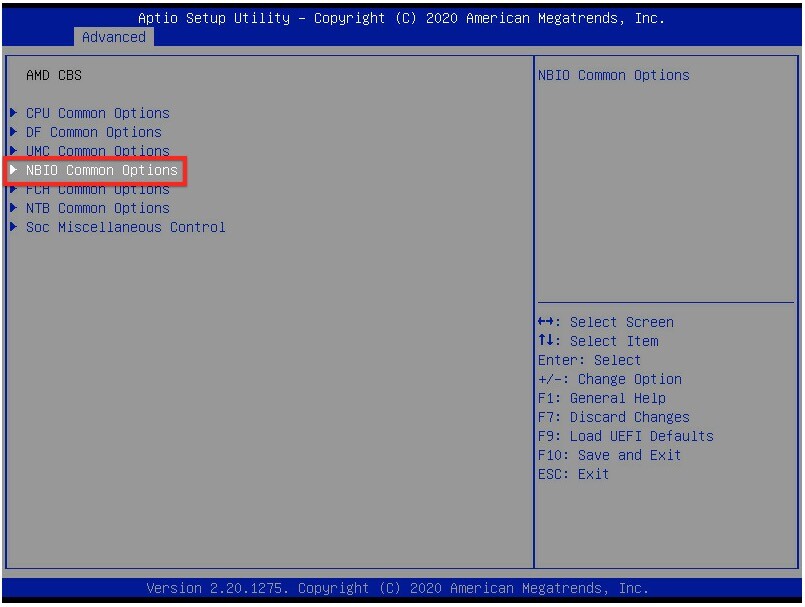
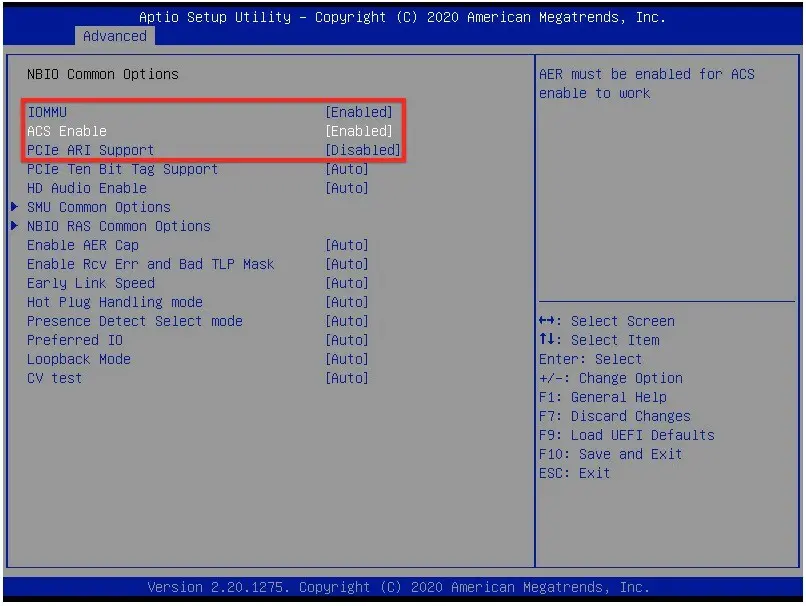
2.2.3 IOMMU, ACS & PCIe ARI
Now go to "Advanced" -> "AMD CBS" -> "NBIO Common Options" and enable the three following values:
- set "IOMMU" to "Enabled"
- set "ACS" to "Enabled"
- set "PCIe ARI" to "Disabled"
(see the three screenshots below)
2.2.4 Global C-State Control
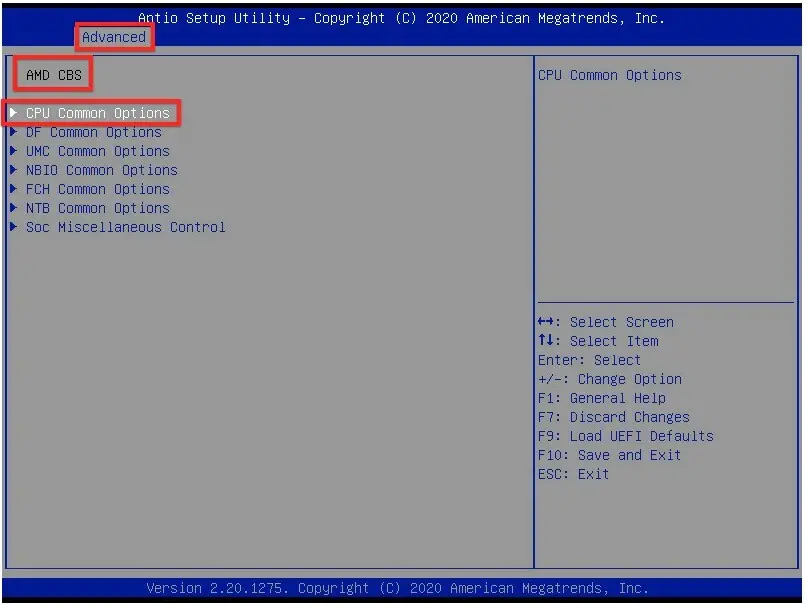
Now we are going to disable global C-States. Go to "Advanced" -> "AMD CBS" -> "CPU Common Options" and set "Global C-State Control" to "Disabled"
(see the two screenshots below)

Now we have all necessary BIOS settings. Save and exit the BIOS and restart the machine.
2.2.5 OPTIONAL: AER errors
This is optional, but you might run later during the install or the running Virtual Windows 10 machine into the following errors on your proxmox server console:
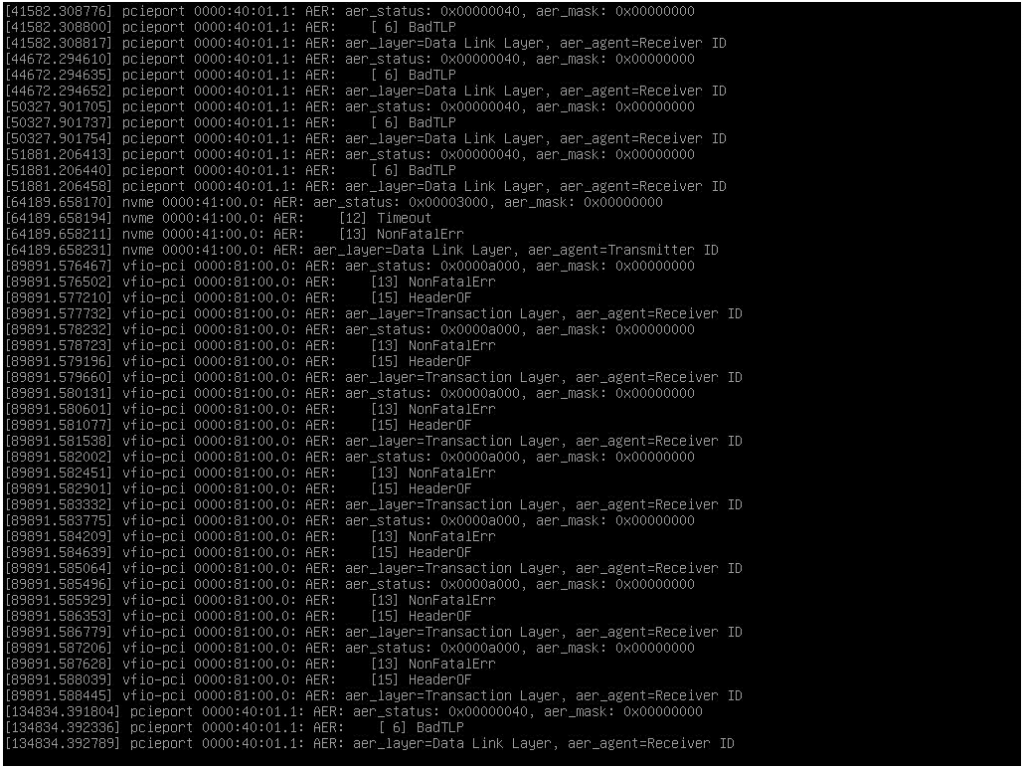
These AER interrupt errors are not really bad and you can hide them in the BIOS under "Advanced" -> "AMD CBS" -> "NBIO Common Options" -> "NBIO RAS Common Options" with:

3. Create the VM
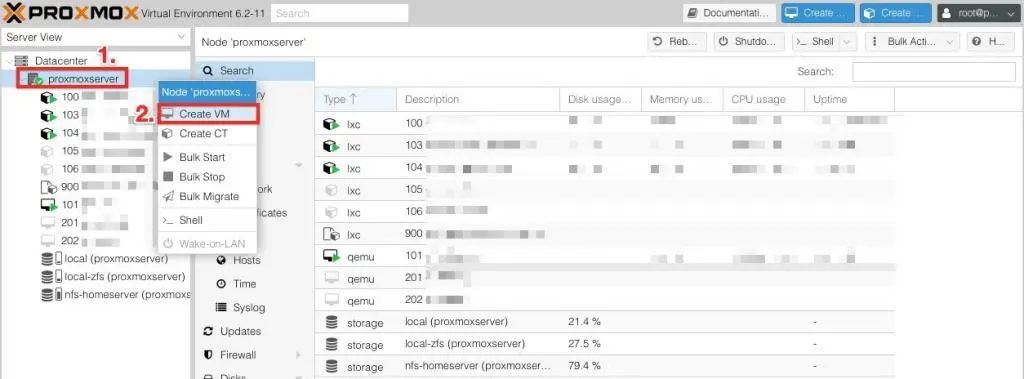
Its time to go to our Proxmox Webinterface and create the Windows VM we want the GPU to passthrough to. Select your server node and right click on it (step 1 in screenshot). In the menu thats opening select "Create VM" (step 2 in screenshot).
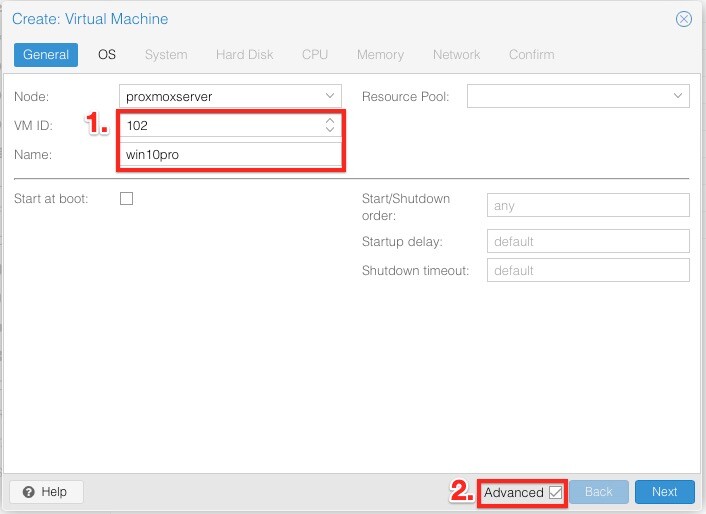
Now the VM creation process starts. In the first TAB select a ID for the VM and a name (step 1 in screenshot). Make also sure to hit the checkmark under "Advanced" (step 2 in screenshot). Then click "next".
Next is OS and we define our OS settings. Select your storage where you uploaded the 2 ISO files earlier and then select your Windows 10 ISO (step 1 in screenshot). Under "Guest OS" make sure to select "Type = Microsoft Windows" and "Version = 10/2016/2019" (step 2 in screenshot). Then click "next".

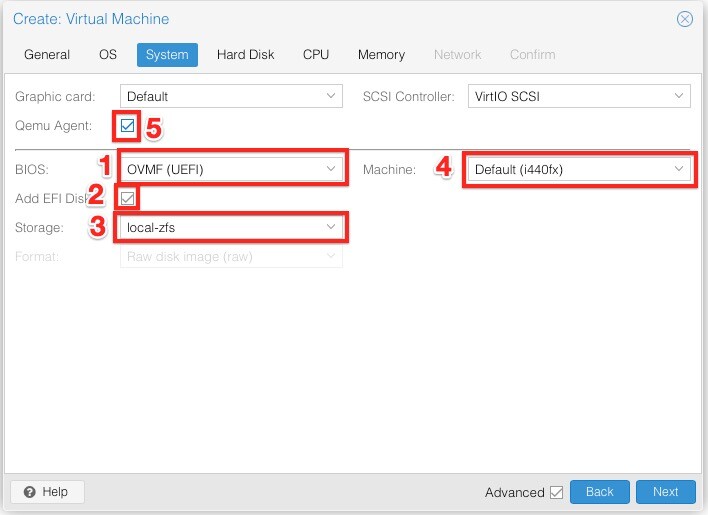
Next is SYSTEM and thats an important point, make sure to hit all the right settings here. First we need to change "BIOS = OVMF (UEFI)" (step 1 in screenshot). Then make sure "Add EFI Disk" is checked (step 2 in screenshot) and that you choose a location for the EFI disk. We choose local and I recommend local (step 3 in screenshot). Also under "Machine" ensure it is still set to "Default i440fx" (step 4 in screenshot). We will change this later, but for the first install this needs to be set. Also enable the "QEMU Agent (step 5 in screenshot). Then click "next".
This is one speciality I found on my way to a stable and great working GPU proxmox passthrough: first install of OS needs to be under OVMF UEFI but still with i440fx instead of q35.
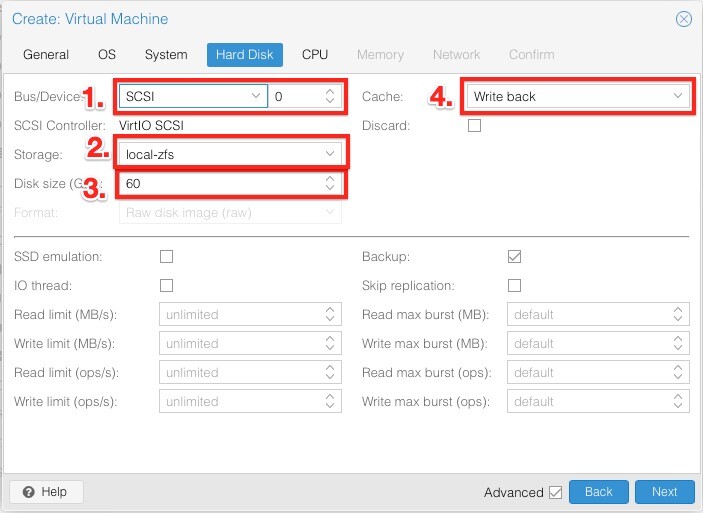
Next is HARDDISK. Set "Bus/Device = SCSI" (step 1 in screenshot). Then select a place were you want to store your Hard Disk file for this VM. I choose "local" (step 2 in screenshot) and define the size of the hard disk, I would go with 60 GB (step 3 in screenshot). Last set the "Cache = Write back" (step 4 in screenshot). Then click "next".
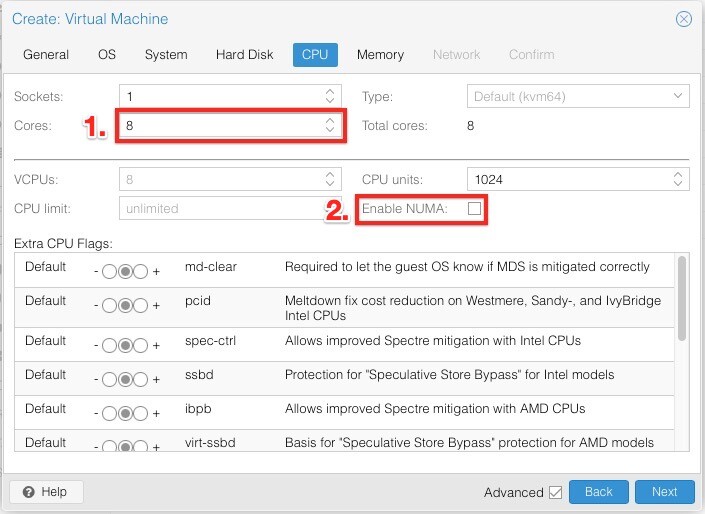
Next is CPU. Here shoose the amount of cores you want to dedicate (step 1 in screenshot) and uncheck "Enable NUMA" as this may cause troubles (step 2 in screenshot). We may re-enable NUMA after we have everything working under fine-tuning. Then click "next".
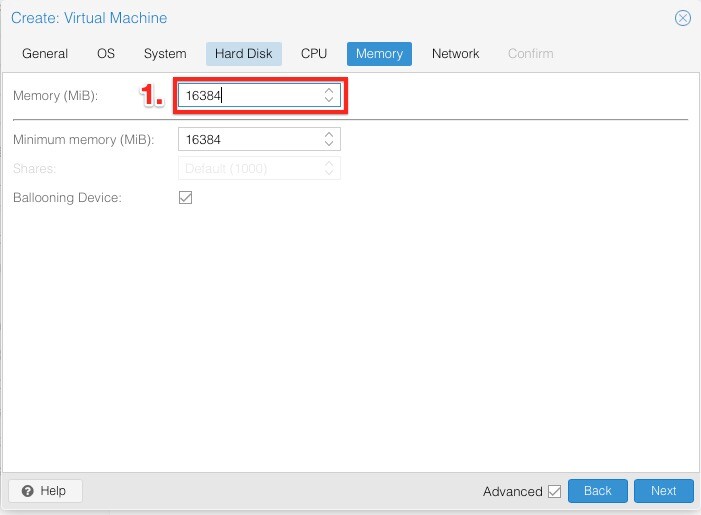
Next is Memory and this is a quick one, just allocate your memory, we take 16GB RAM (step 1 in screenshot). Then click "next".
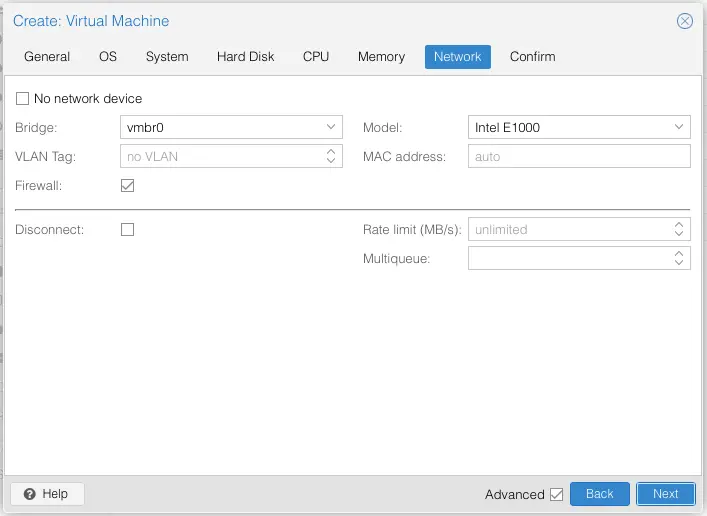
Next is NETWORK which we just keep the default settings for now (see screenshot below). Just click "next".
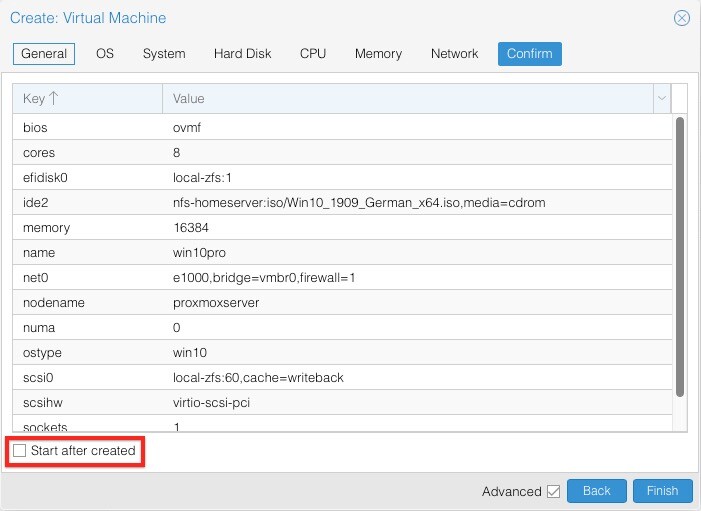
Last step is CONFIRM, check and make sure you set everything right and according to this guide and choose the CPU and Memory possible on your machine. Important is to NOT check "Start after created" (see screenshot below). Now click "Finish".
Proxmox is now creating the virtual machine. When finished you will have a new "win10pro" virtual machine listed under your server. Now click on it (step 1 in screenshot) and then it shows you the details of the new VM in the middle. from the Virtual Machine tabs select "Hardware" (step 2 in screenshot) and then click "Add" (step 3 in screenshot) which will open a dropdown menu where you have to select "CD/DVD Drive" (step 4 in screenshot).
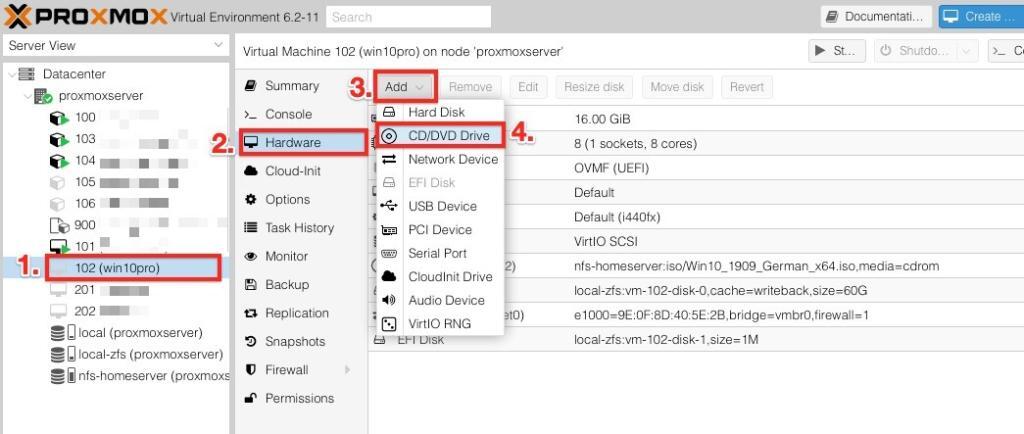
This will open the context menu for adding another CD/DVD device to your virtual machine, we will select "IDE" as Device/Bus and then select the storage where we had uploaded the two ISOs earlier. Then select the virtio-win-xxx.iso. Click "Create".
Under your virtual machine Hardware summary you should now see 2 ISOs mounted to the virtual machine (see screenshot below).

That was the initial creation for the VM, now lets start up the machine in Proxmox and install Windows 10 Pro!
4. Install Windows 10 Pro
For installing select your VM (step 1 in screenshot), switch to the "console" (step 2 in screenshot) click on the power button (step 3 in screenshot) and hit "Start" (step 4 in screenshot).
Now you have to be VERY QUICK when you see the screen below where it asks you to press any key to boot from CD/DVD, you have to press some key. Be aware that this will be just a very short window and you need to be quick (see screenshot below).
If you miss pressing any key, you will get a error, don't panic, this is normal but it is some pain to get the machine off and back on so you have a second chance of hiting the key at the right time. Eventually you can make it to the VM bios and say reset there, or in some cases only a full restart of Proxmox helped.

If you managed to hit the key in the right time you will see for some time the orange PROXMOX logo and thats all right. It can take some time until you end up on the familiar blue Windows 10 Install screen:
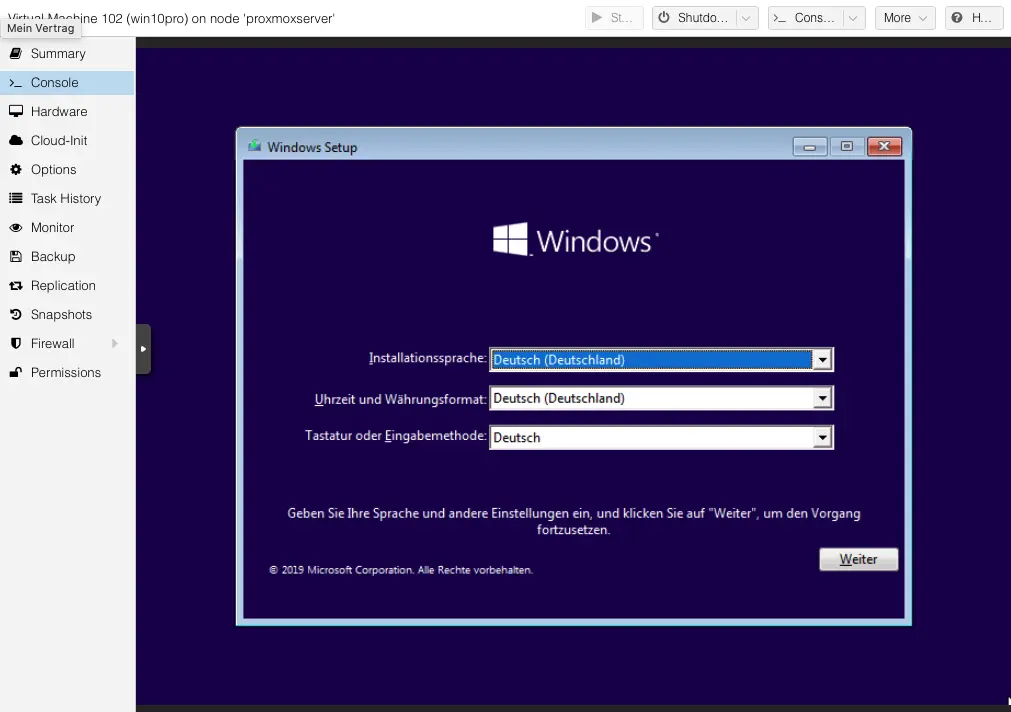
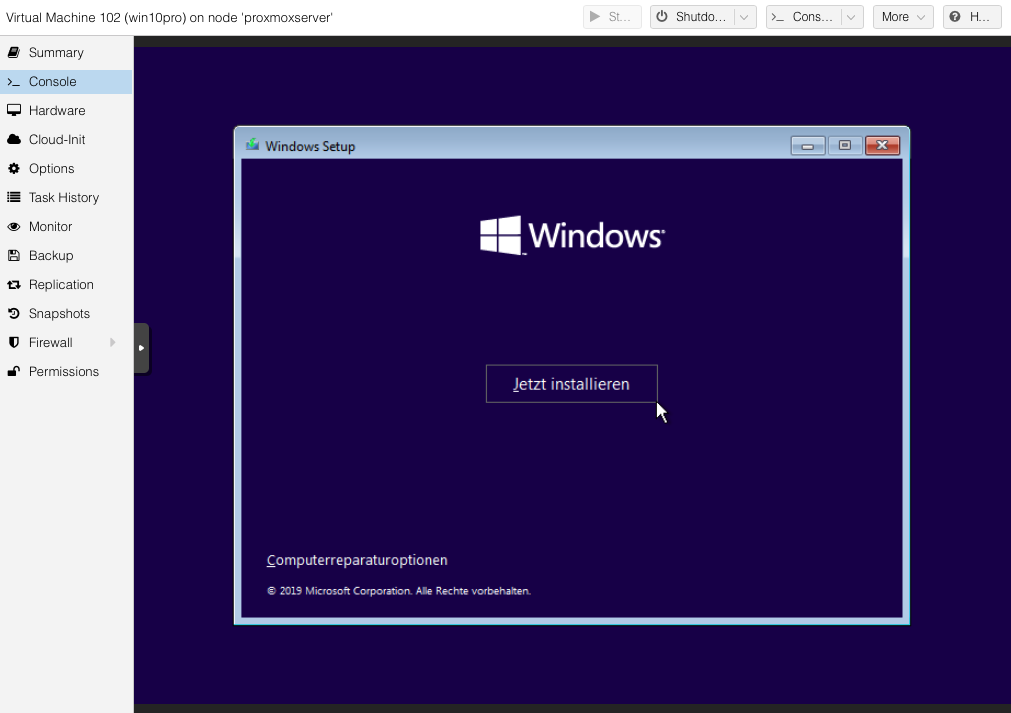
Select your install parameters and language and click "next" and then click "Install now" on the next screen.
Now Windows will ask you for your license key, you can either enter it right now or add it later and skip it now by clicking "I don't have a product key now".

Next you select your version of Windows 10. As we want to use Microsoft Remote Desktop its important for us to Select "Windows 10 Pro". Click next.

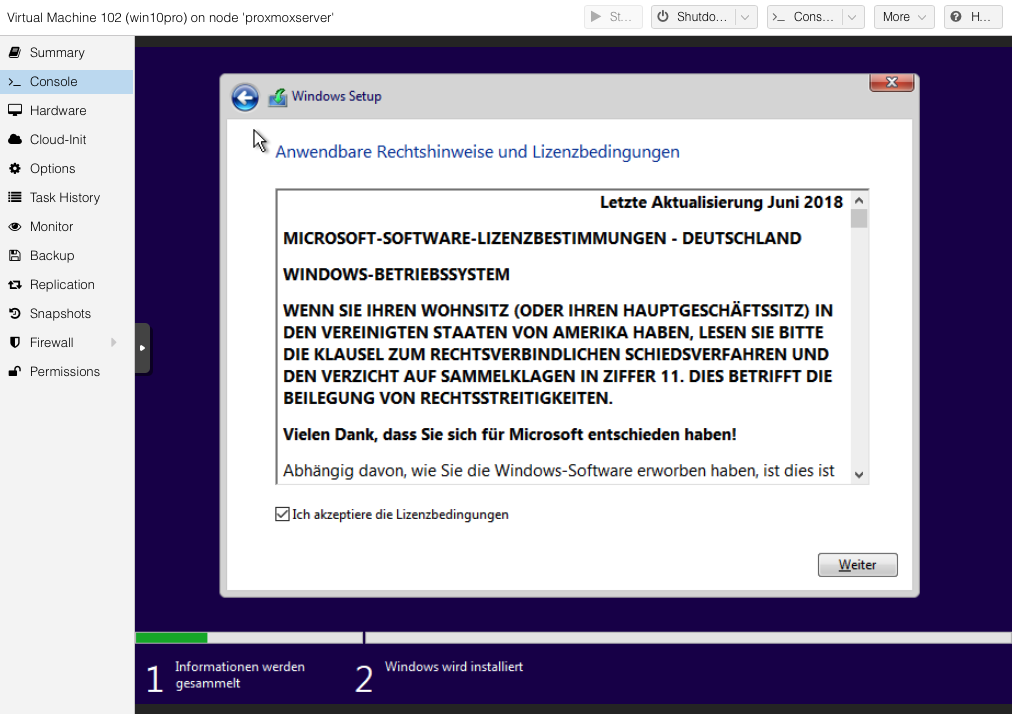
Accept the "Terms of use" and on the next screen select the second option "User defined installation":
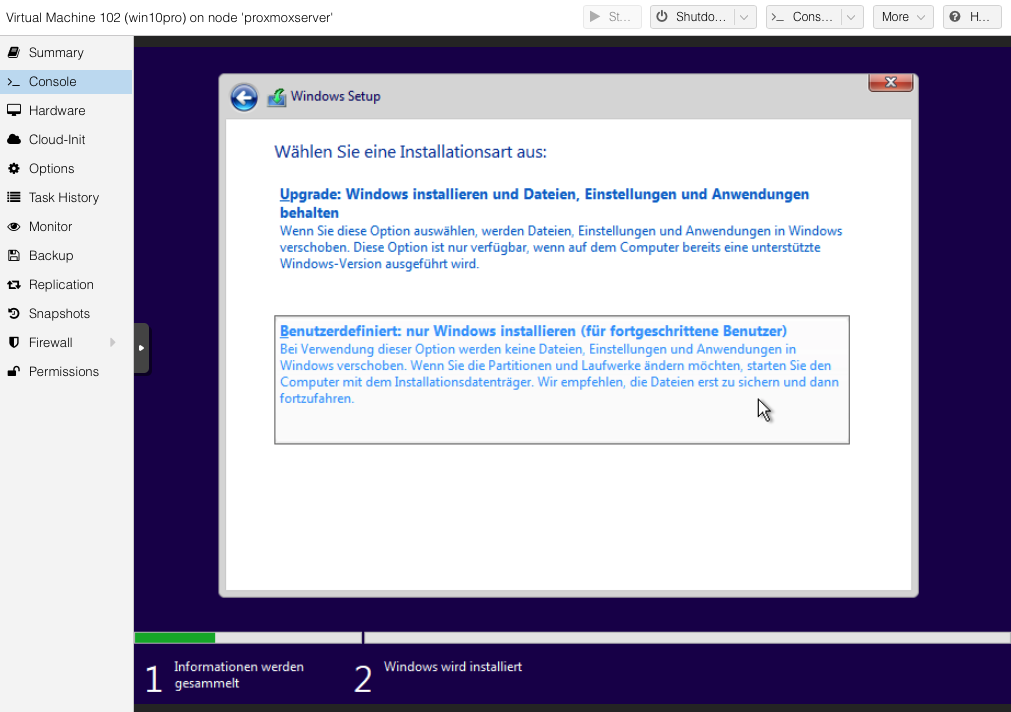
This will let us choose the destination hard drive for our Windows installation....but you will not see any available disk. That is normal and due to the missing drivers. So we have to load the drivers manually. For this click in the bottom left "Load drivers".

A popup will open and we select first option "Browse...".

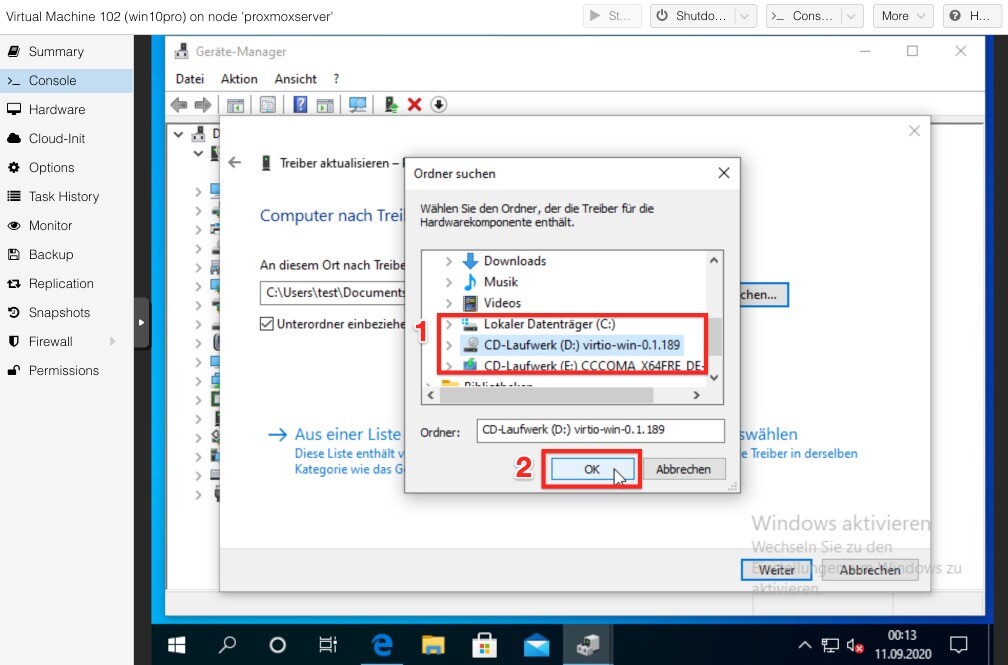
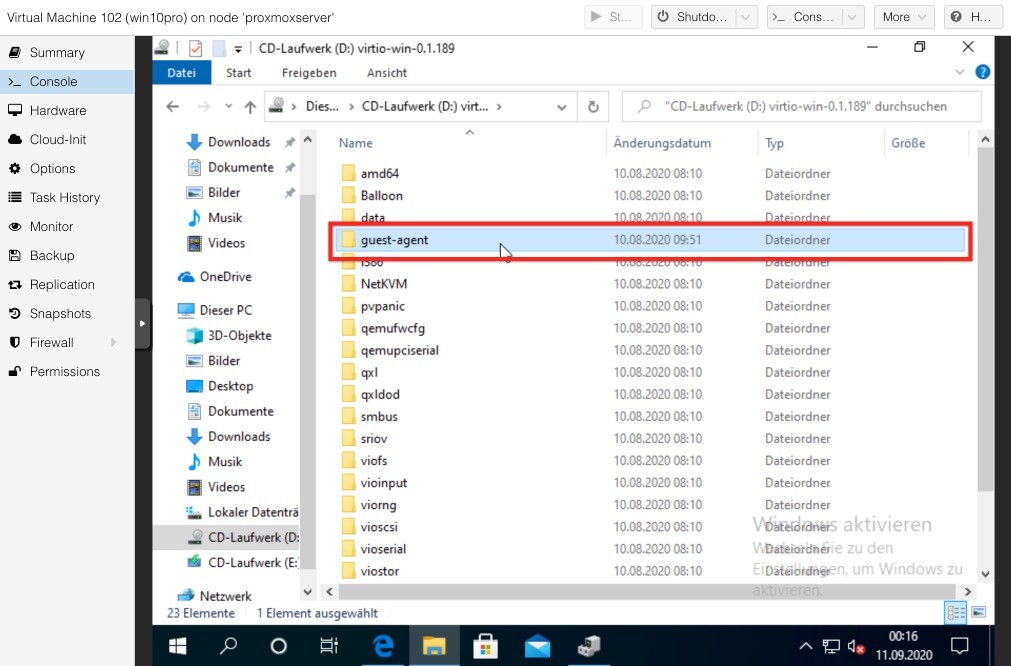
Now we can browser to our previously mounted "virtio-win-0-1-189.iso" which appears as a DVD drive.
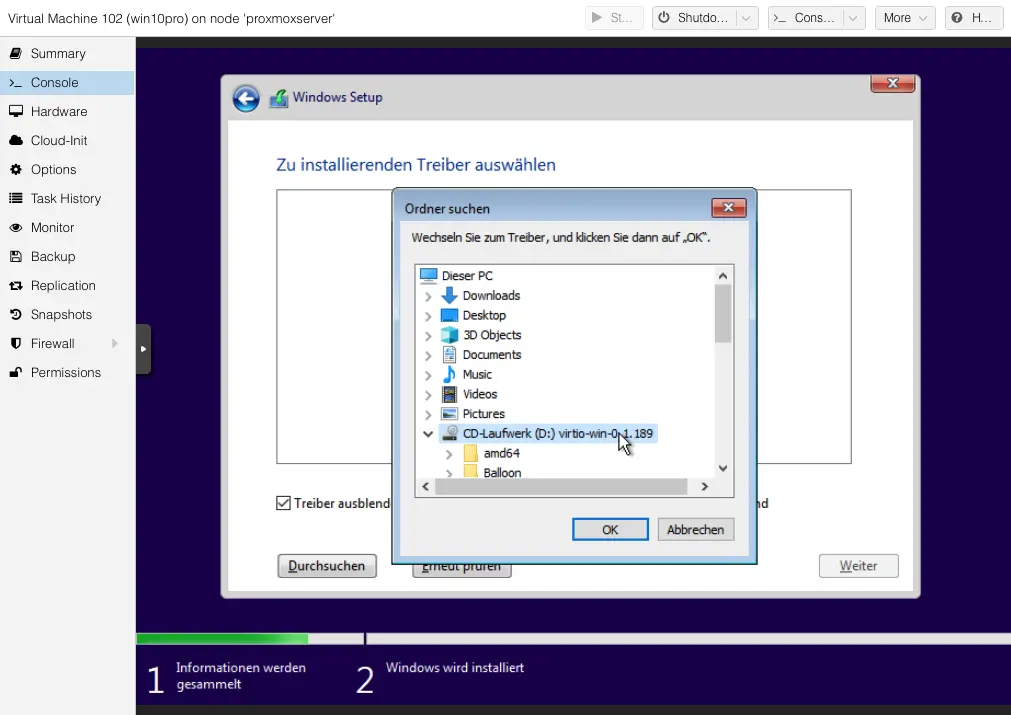
In there browse to the subfolder "vioscsi" -> "w10" -> "amd64". Make sure "amd64" (step 3 in screenshot) is selected and click OK (step 4 in screenshot).
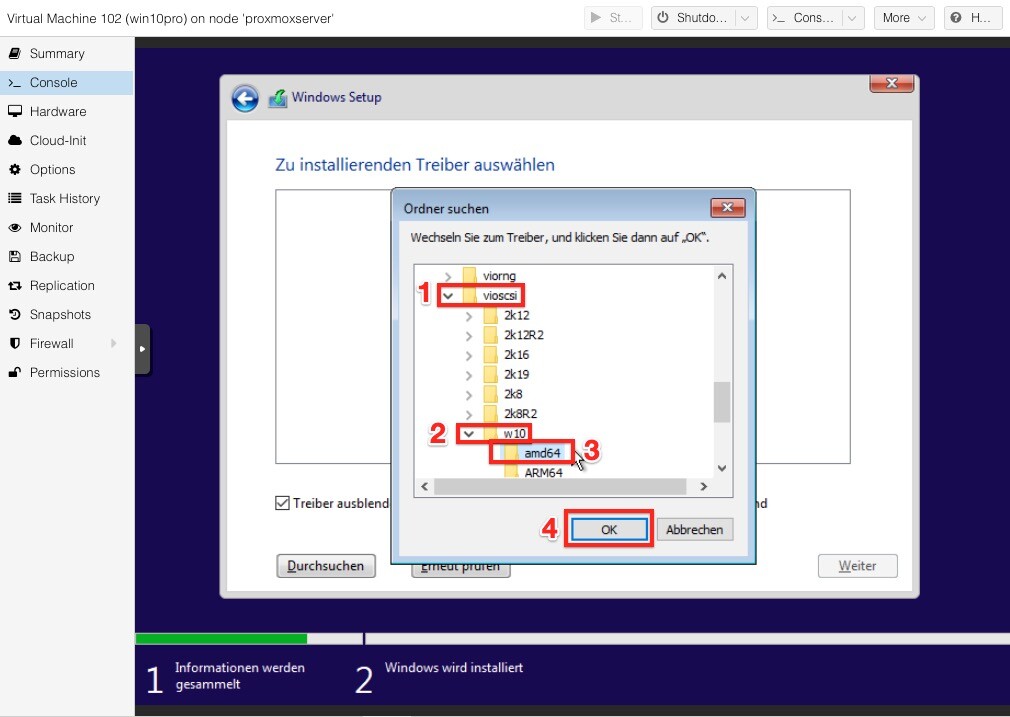
After a short loading screen you will see the below screen where it tells you that the Red Hat VirtIO SCSI pass through controller driver have been loaded successfully. Great! Click "next".

This will bring you back to the hard drive selection screen, but this time we see our virtual disk with the amount of previously defined unallocated disk space. Select the hard drive and click Next.

The Windows 10 install will now start and install the OS.
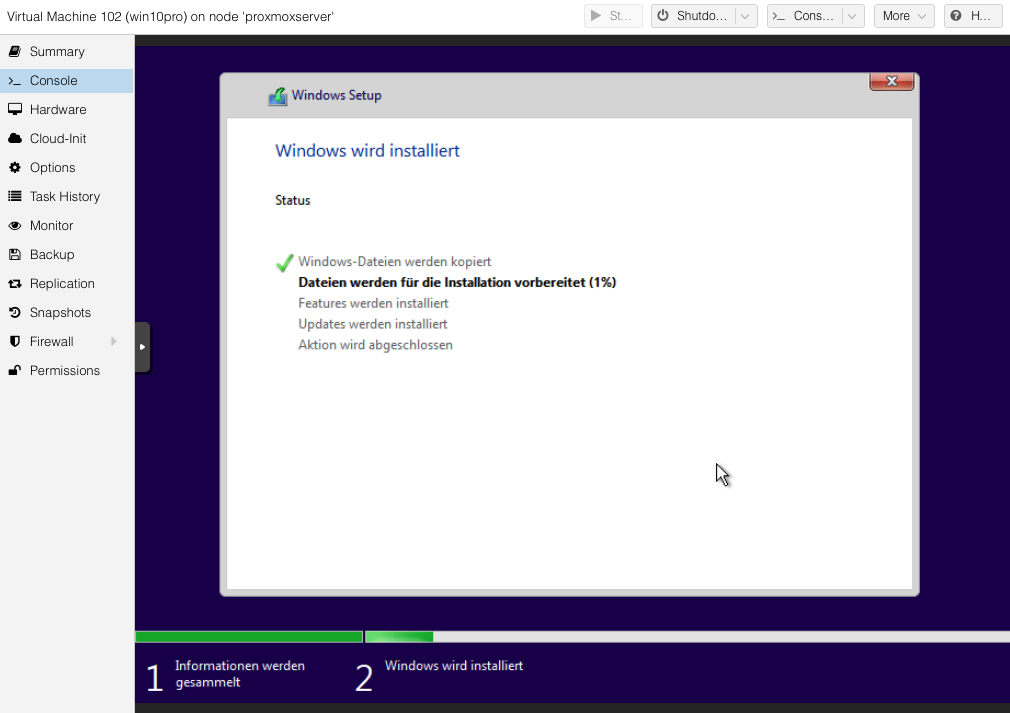
Cool, Windows is now installing and you let it run to the end and finish the setup.
4.1 Install missing drivers
After the install finished, follow through the first steps setup assistant where you create your username and password and also have to decline a ton of privacy stuff until you are released to the Windows 10 Desktop.
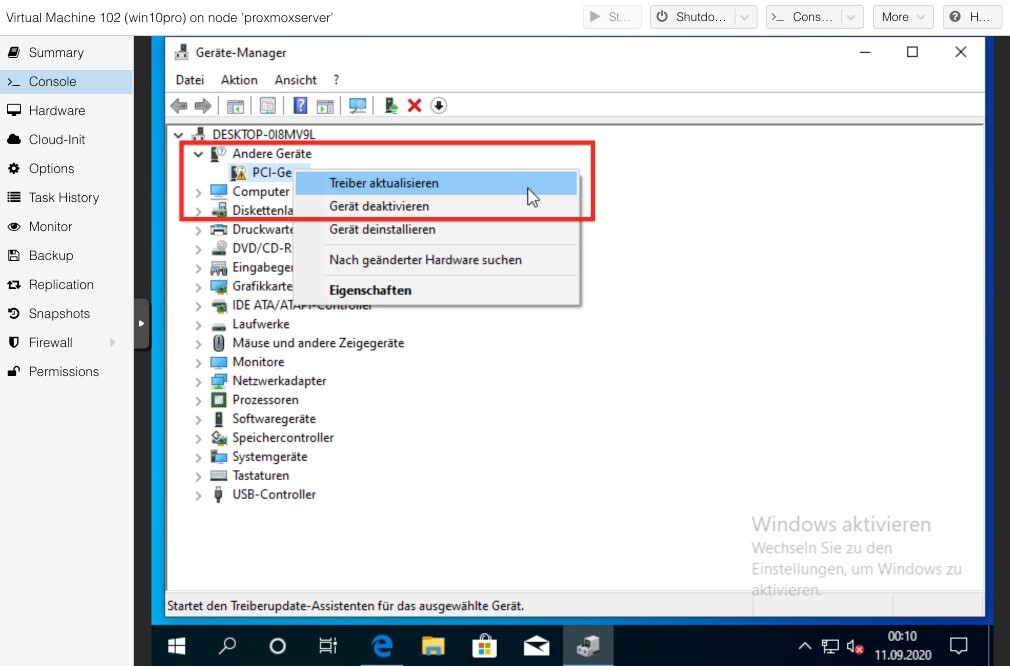
There right click on the Start Menu button and open the "Device-Manager".

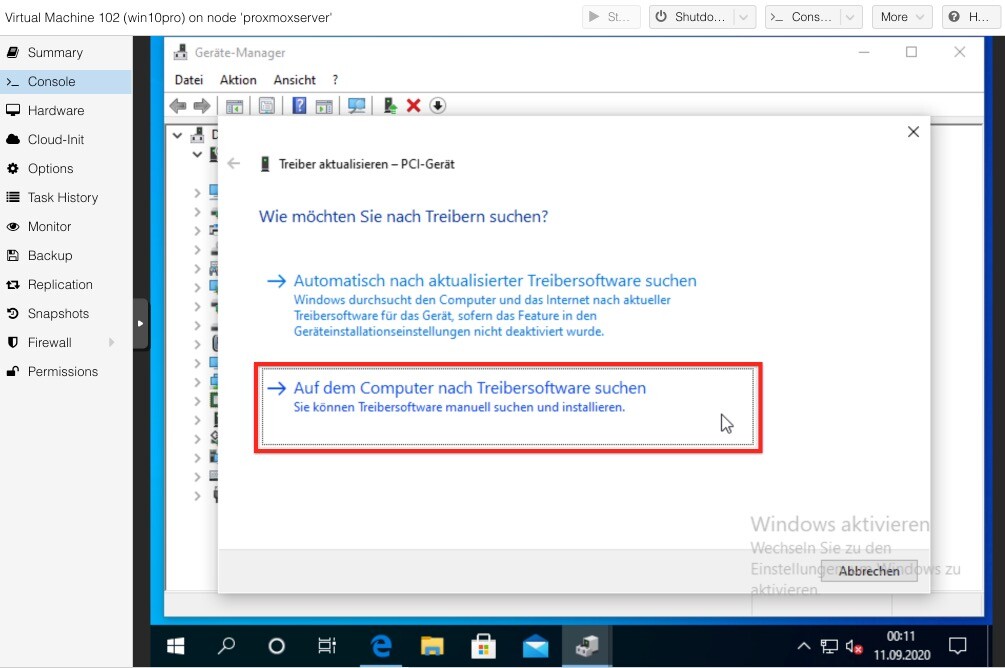
Check in there if there is any device with a Warning sign. In my case I have a unknown PCI device, so lets install the missing driver for it. Right click on the device and select "Update driver".
A window will open and we select option 2, Search on my computer for drivers.
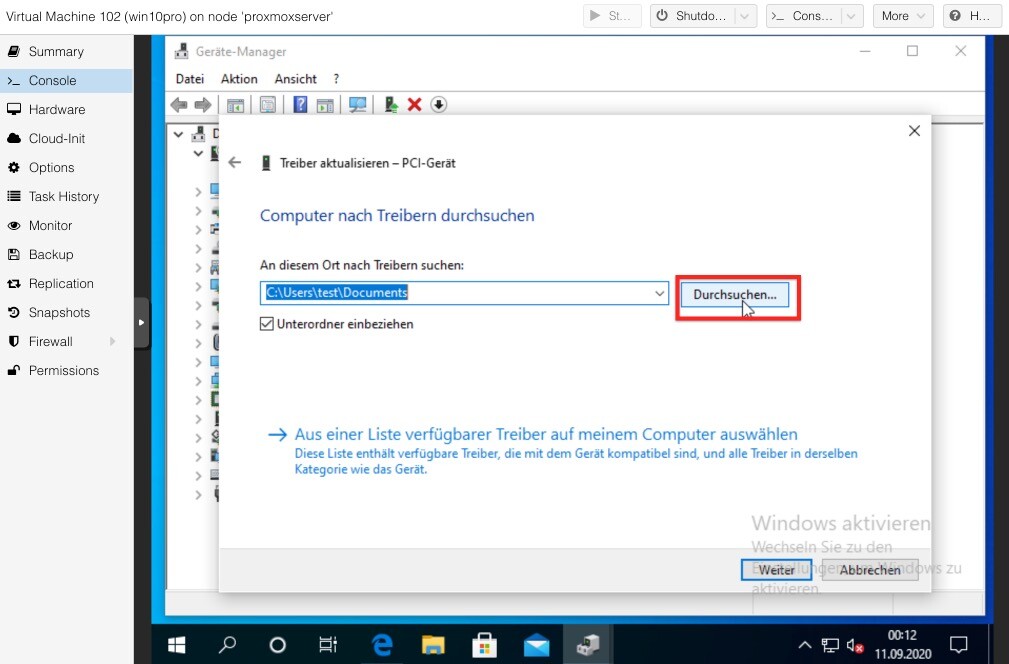
In the next screen click "Browse" and select the "virtio-win-x.iso". Don't brows in subfolders, just select the hole DVD drive (screenshot 2 below) and click OK.
Then we are back to the driver selection screen and click Next.

Now windows searches for matching drivers on our virtio-win ISO file. Once it founds the matching ones you will see the success screen below.

Thats it. Repeat this process for as many unknown and missing devices you have in your Device Manager.
4.2 Install guest drivers
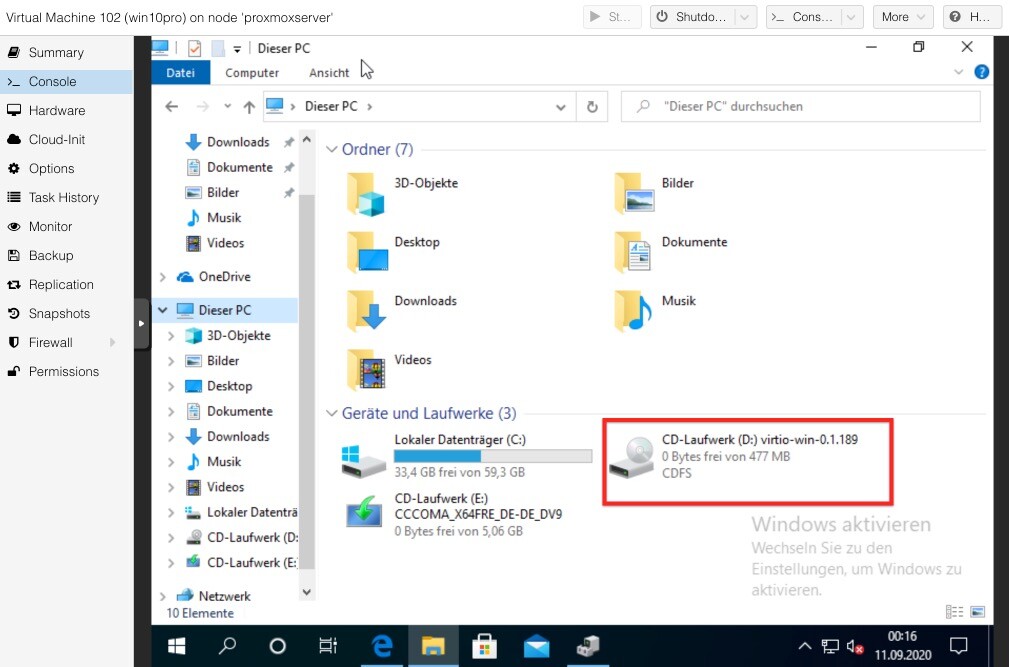
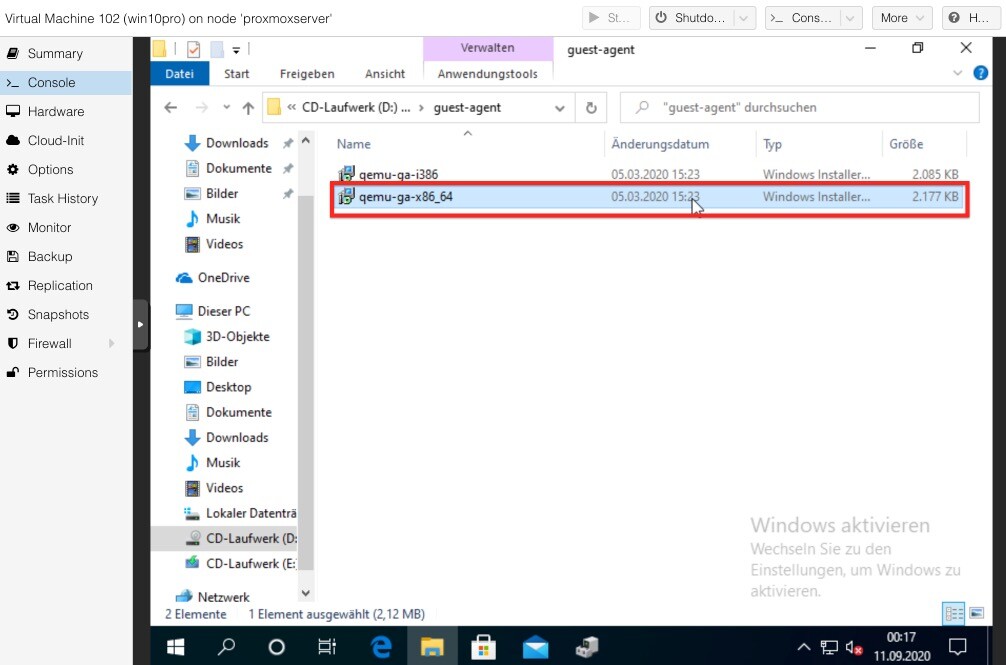
Next we install the QEMU guest drivers for windows so our proxmox host can get more informations and can communicate better with the virtual machine. In Windows file explorer go to the virtio-win ISO file thats still mounted in our case to drive D.
In there open the folder "guest-agent" and select and open the file "qemu-ga-x86_64.exe".
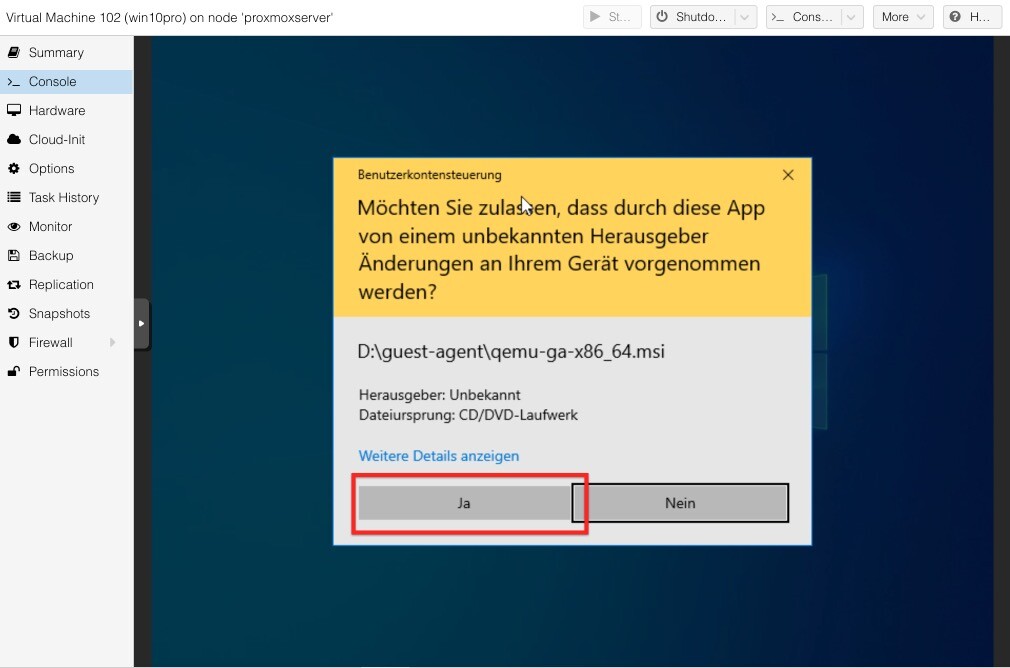
We will get a prompt for admin rights and say "Yes, allow".
Great, qemu guest agent is now installed. Next we enable the Remote Desktop Protocol.
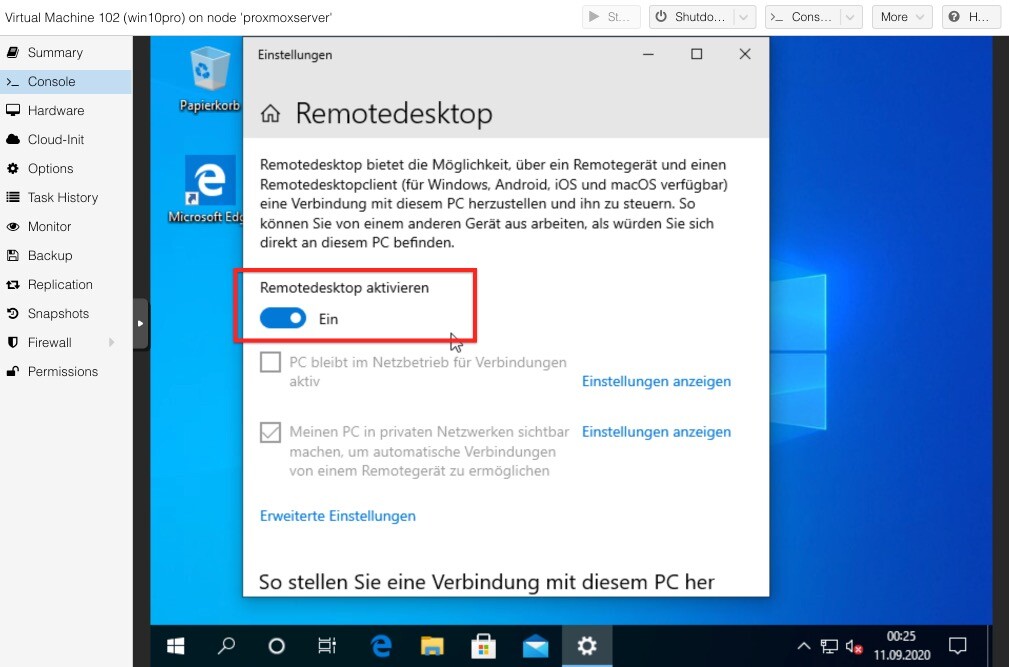
4.3 Enable RDP
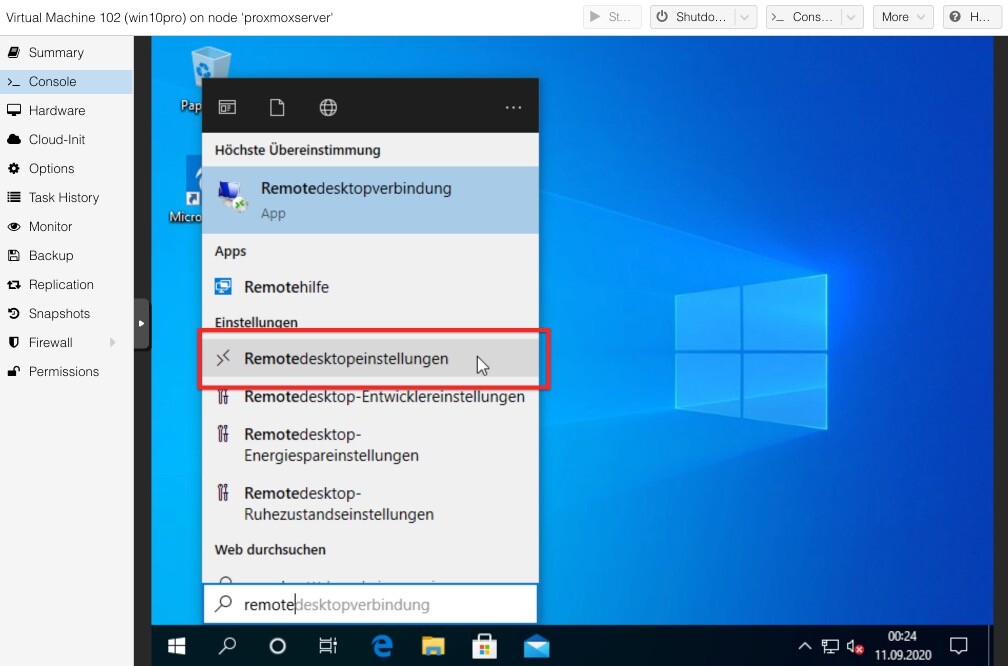
On your windows desktop hit the search button or press the windows key, then type "Remotedesktop" and you should get a finding that says "Remotedesktop settings". Open it.
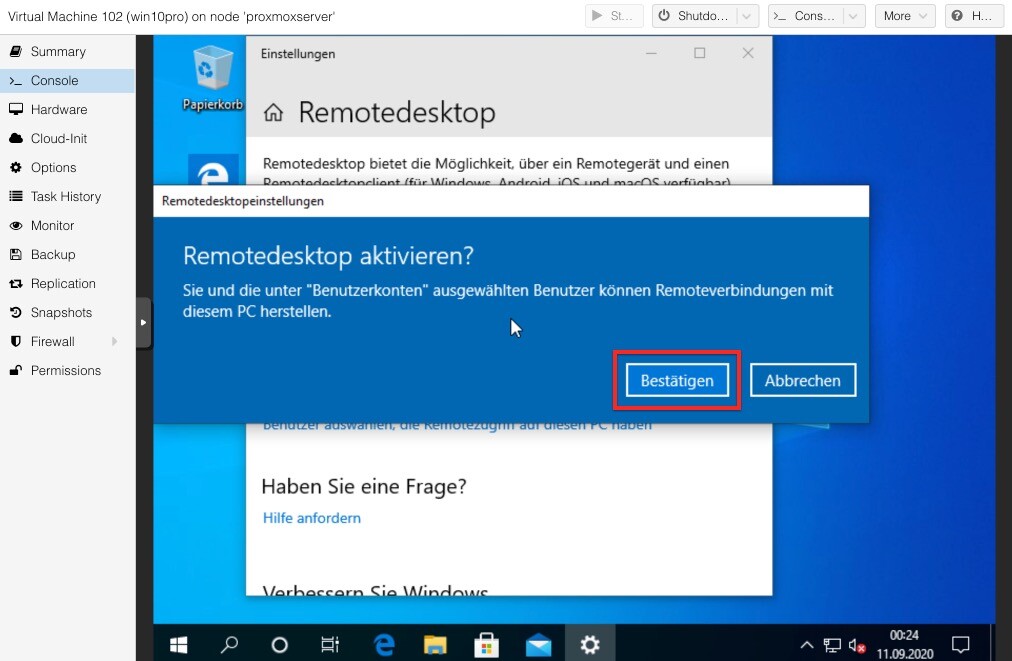
In there is a switch button, "Enable remote desktop" and we set it to "ON". A security prompt will pop up and ask if we really wnat to and we confirm it with "Confirm".
Great! You can now connect remotely from any device to the Desktop with the IP of your VM. Best you try if it works before continuing
5. Prepare the VM config for PCIe GPU
As a last step to pass through our GPU to the VM, we need to make some adjustments to the existing VM. For the following steps, make sure to shut down your Windows VM properly if it runs.
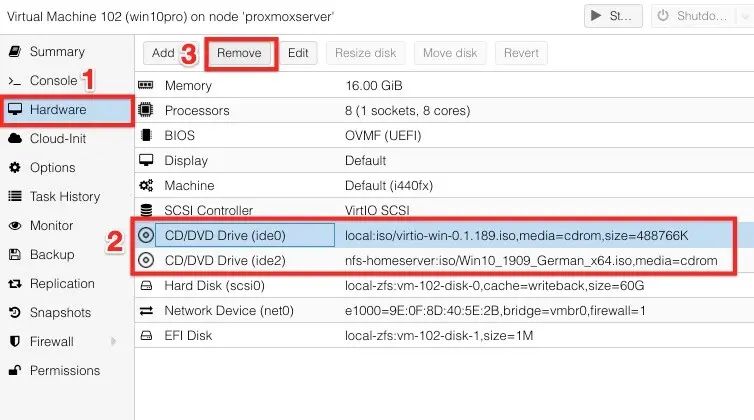
5.1 Remove all mounted IDE devices (ISO mounts)
First we need to remove all IDE mount points we have, as we will switch to q35 and it won't like IDE. If you need an ISO later, use SCSI. But for now we don't need any ISOs mounted to the VM anymore and therefor remove them all:
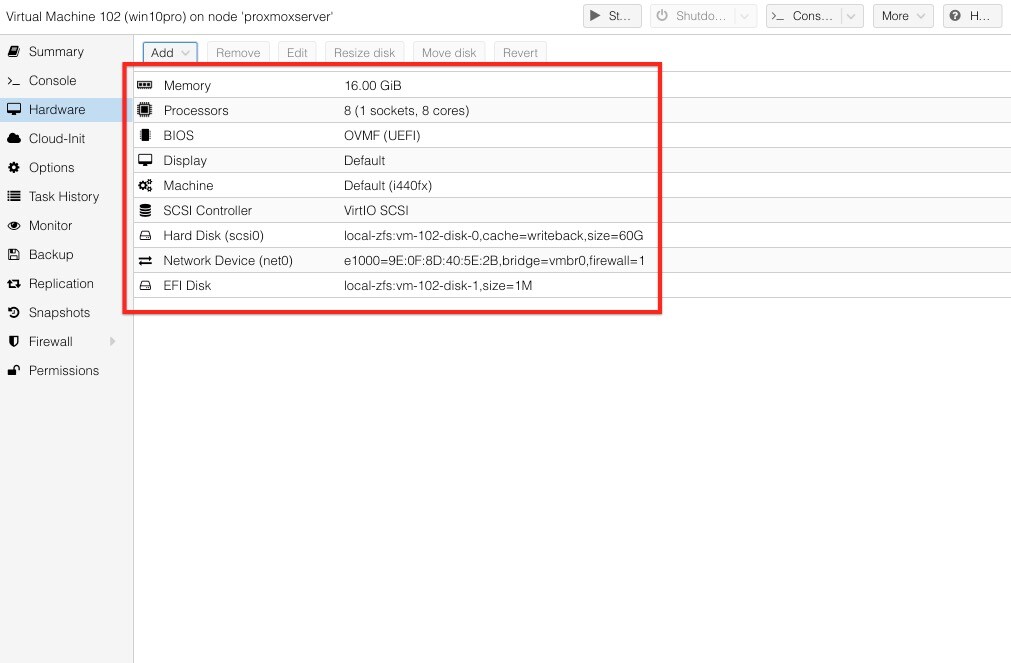
This is how your hardware with NO IDE devices should look like:
Now we are going to setup our PCIe passthrough parameters.
HINT: In case you get into troubles, following step by step through the official passthrough documentation helped me a lot!
5.2 Add IOMMU support to grub bootloader
First ssh into your proxmox server and open your bootloader kernel command line config file, for grub:
nano /etc/default/grubFind the line with "GRUB_CMDLINE_LINUX_DEFAULT" and replace it with this:
GRUB_CMDLINE_LINUX_DEFAULT="quiet amd_iommu=on"Then save and exit with STRG+X and confirm saving with Y. Now we need to update and generate the changes we made on grup:
update-grub5.3 Add required kernel modules
Open modules file with:
nano /etc/modulesAnd copy & paste these four modules into it:
vfio
vfio_iommu_type1
vfio_pci
vfio_virqfd
Save and exit with STRG+X and confirm saving with Y. Now reboot your Proxmox server:
reboot now5.4 Test interupts and IOMMU isolation
Back on our ssh console after the server reboot, we have to test if our previous settings did take effect and are working correctly.
First we test the remapping interrupts:
dmesg | grep 'remapping'This should result in a positive return like:

Great, interrupt remapping is now enabled!
Next test the IOMMU isolation, run:
find /sys/kernel/iommu_groups/ -type lIf it works, it will give you a long list of all PCI device groups. Looks like this:
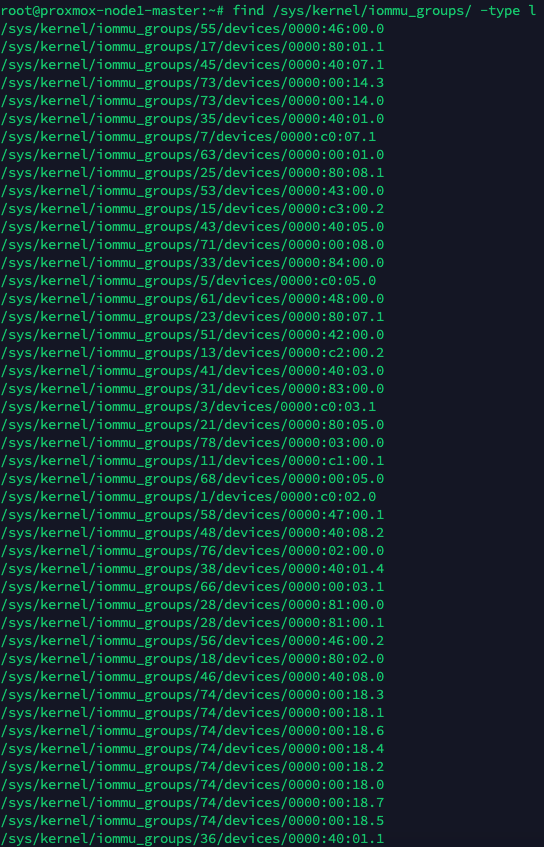
Perfect! All settings are working!
5.5 Find GPU ID and pass it to vfio modprobe
Now we can search for our GPU ID and pass it through to our VM. First find the ID of your GPU. On your proxmox console enter:
lspciThis will give you a long list of all available PCIe devices and their IDs
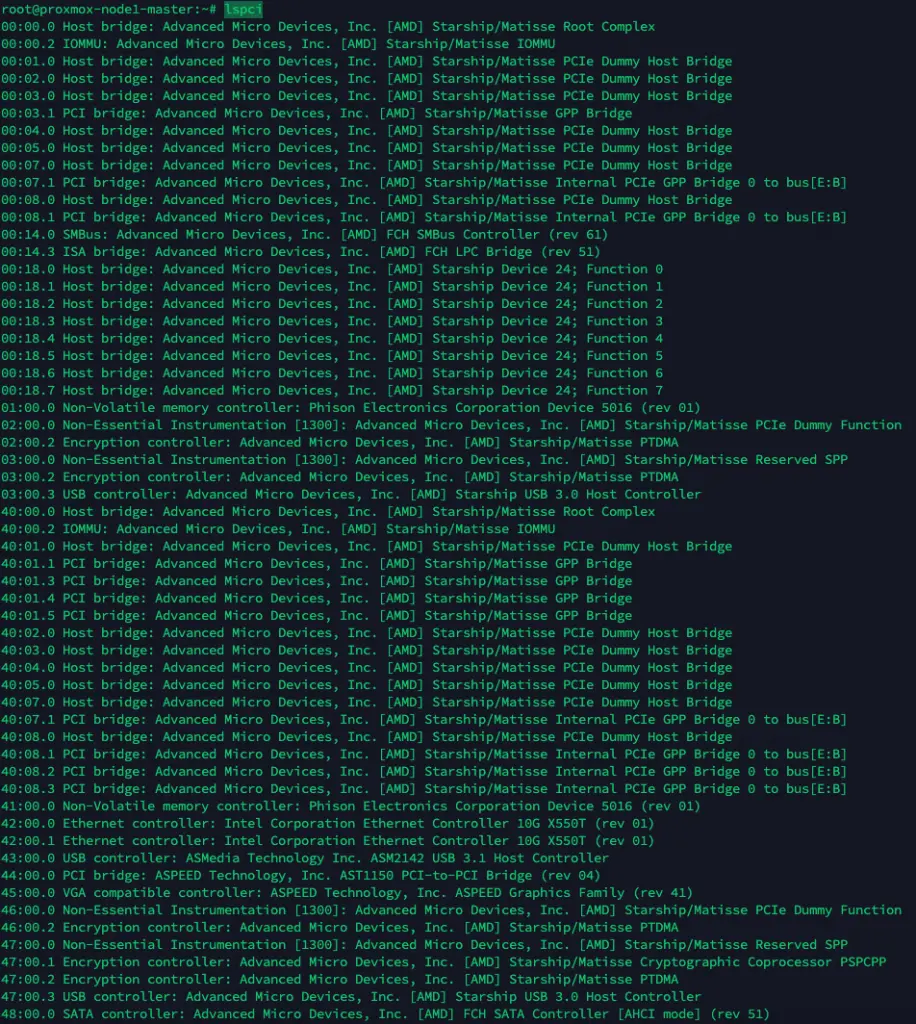
Scroll through it and find your GPU and mark down the ID. In my case its the ID "81:00.0" and "81:00.1".

Its totally normal that you will find multiple devices. Normally Audio and Graphics are seperated, so this is why we have a device 0 and 1. For us its only important to note the main group, which is always the number without the ".GROUP". So in our case just "81:00".
Now we need to get the details of our graphics card with (remember to replace the "81:00" with YOUR DEVICE ID:
lspci -n -s 81:00This will show us the GPU details:

Its important to note down these codes:
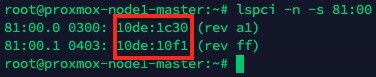
In our case its "10de:1c30" and "10de:10f1".
We have to pass these codes over to /etc/modprobe.d/vfio.conf with this command: (remember to replace the codes below with YOUR DEVICE CODES)
echo "options vfio-pci ids=10de:1c30,10de:10f1 disable_vga=1" > /etc/modprobe.d/vfio.conf5.6 Create driver blacklists
As a last step we need to blacklist some of the drivers. Execute these commands on your proxmox console:
echo "blacklist radeon" >> /etc/modprobe.d/blacklist.conf
echo "blacklist nouveau" >> /etc/modprobe.d/blacklist.conf
echo "blacklist nvidia" >> /etc/modprobe.d/blacklist.conf
5.7 Edit and finalize your vm.conf
As a last step we add the GPU now in our vm.conf. For this remember the ID of your VM, we created in the above example VM with ID 102. So open your VM config with (remember to change the "102" with your VM ID):
nano /etc/pve/qemu-server/102.confIn there we are going to change the following settings: set machine to q35
machine: q35and assign your GPU to the VM:
hostpci0: 81:00.0,pcie=1,x-vga=onAs a help, this is how your vm.conf should look like. Please note that custom variables like "name", "vmgenid" or the ID of the GPU are probably different in your case:
agent: 1
bios: ovmf
bootdisk: scsi0
cores: 8
efidisk0: local-zfs:vm-103-disk-1,size=1M
hostpci0: 81:00.0,pcie=1,x-vga=on
machine: q35
memory: 8096
name: gputest2
net0: e1000=D6:EF:0D:29:68:46,bridge=vmbr0,firewall=1
numa: 0
ostype: win10
scsi0: local-zfs:vm-103-disk-0,cache=writeback,size=300G
scsihw: virtio-scsi-pci
smbios1: uuid=0182286f-163e-4524-809d-2af63315c053
sockets: 1
vmgenid: 59822793-5fac-407e-af84-70b1b98a1096
Now save and exit the file with STRG+X and confirm with Y.
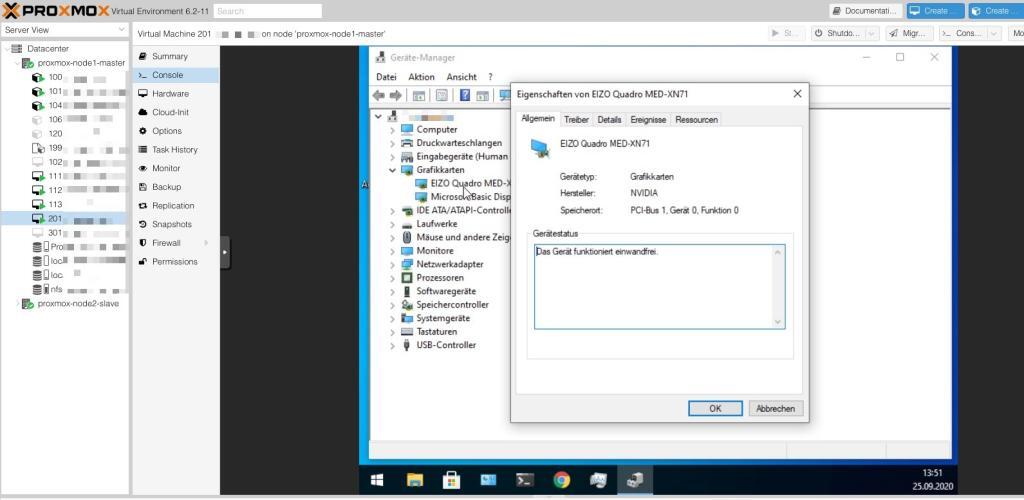
Go to your proxmox interface and startup the VM. It should start now without any errors and when you are back to your Windows desktop, check your device manager. There you will see now the passed through GPU:
Don't forget to download and install the latest drivers for your GPU.
Congratulations! You have successfully passed through a GPU to your virtual proxmox machine. You can now use it for gaming or transcoding and more!
Appendix:
Optional settings for fine tuning:
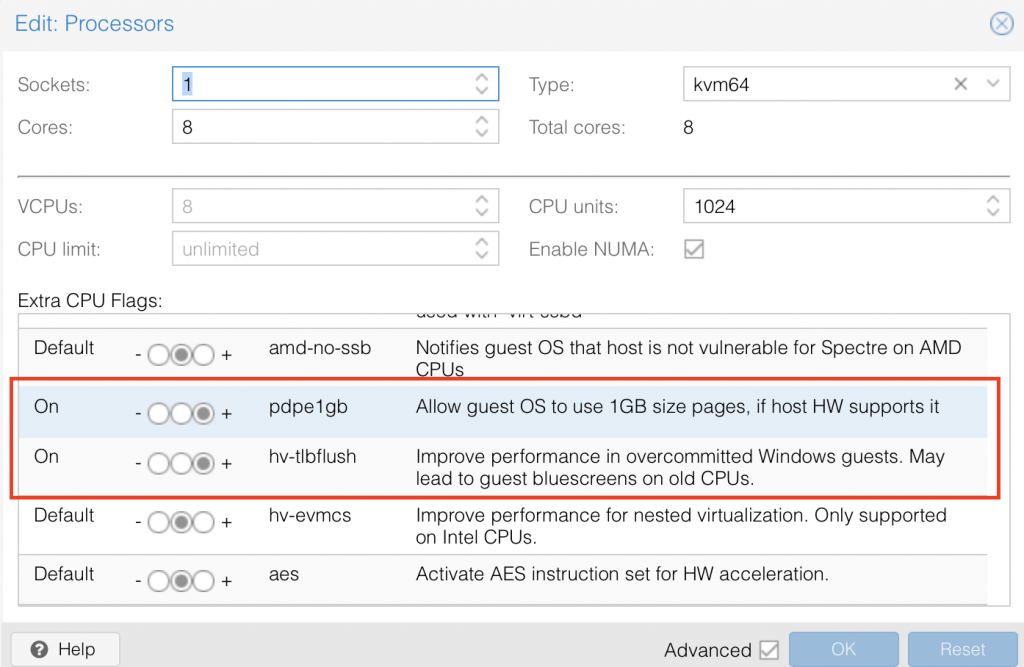
In your /etc/pve/qemu-server/102.conf try setting
NUMA = 1CPU flags in Proxmox VM hardware -> processors: